
The LOU Schedule mobile app is a targeted, focused way for your service techs to access their Schedule for Today and Tomorrow (similar to My Day), as well as view other limited information pertinent to their Schedule Tasks.
You can still access LOU Web through a browser on your mobile device, but LOU Schedule is designed to be the main access point for Service Techs.
Why do you need LOU Schedule? LOU Schedule is a companion app and is not required to use LOU. However, it is targeted for Service and helps focus your Service Personnel on the areas of LOU that are most important for them while out in the field for their Schedule Tasks. LOU Schedule is free but does require users to have a paid user license with access to the Service Bundle. You can still access LOU Web through a browser on your mobile device if you need to access areas of LOU not included in LOU Schedule!
What's the best part about the LOU Schedule mobile app? Offline mode! Service Personnel can head out to remote sites with unreliable, or no, internet connection and still access their Tasks and complete workflows, add pictures, and more!
WAIT! Make sure you have already activated LOU Schedule on your Mobile Device. You can also check out this Get Started with LOU Schedule article for guidance on setting everything up in LOU Web and for your Users.
You can use these links to jump to a specific topic:
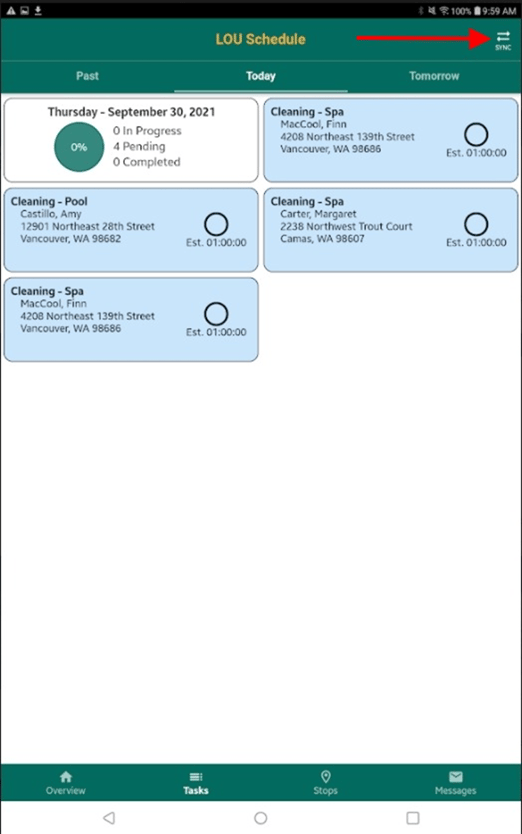
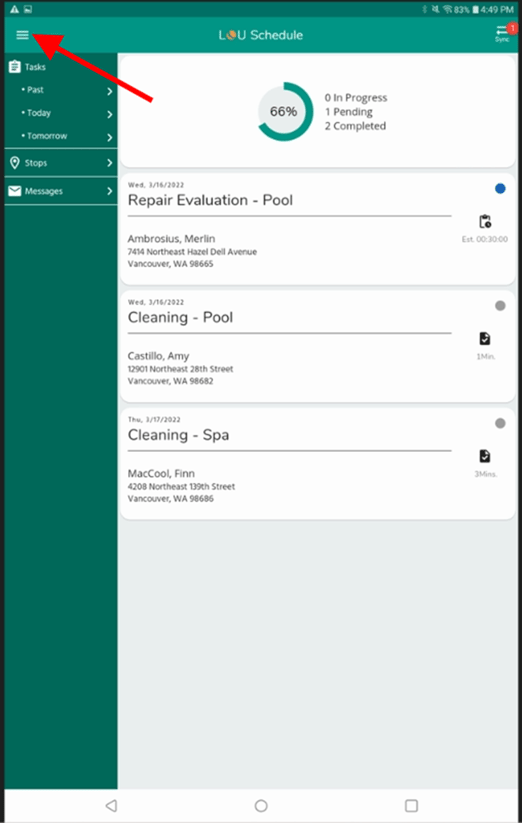
Open your LOU Schedule mobile app on your mobile device.

Enter your PIN. This will take you to the Main screen. The view will default to the Task tab and Today. 
This page will show you all your Tasks on the Schedule for Today and a Summary of totals for the Day.
Task Profile To enter a Task, tap one of the Tasks.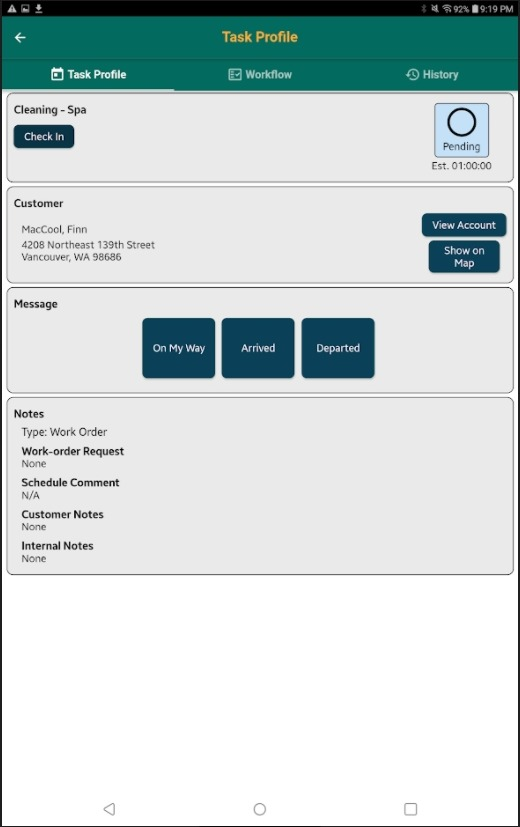
You will land on the Task Profile where you can Check In on the Task which starts the clock on the right. The estimated time for the Task is below the clock. You can quickly send the On My Way, Arrived, and Departed Messages to the Customer. The Customer Name and Address are there for reference. You can use the View Account button to view important information on the Customer’s Account.
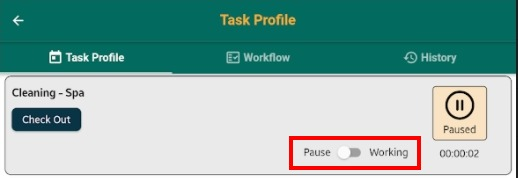
Check In/Check Out When you tap the Check In button, the clock starts on the Task. You can Pause the Clock any time, if you need to stop tracking time for any reason.
REMEMBER! You should Check In according to your company’s policy. LOU does not decide if you Check In when you’re on your way or after you’ve arrived. You should follow your company’s policies or guidelines. 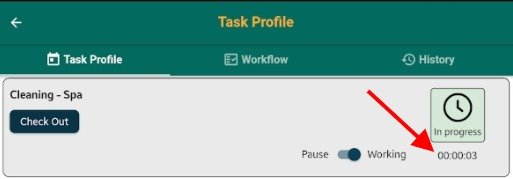
Once you’ve checked in, if you realize you made a mistake and want to undo the Check In, you can click Cancel Check In in the bottom right. 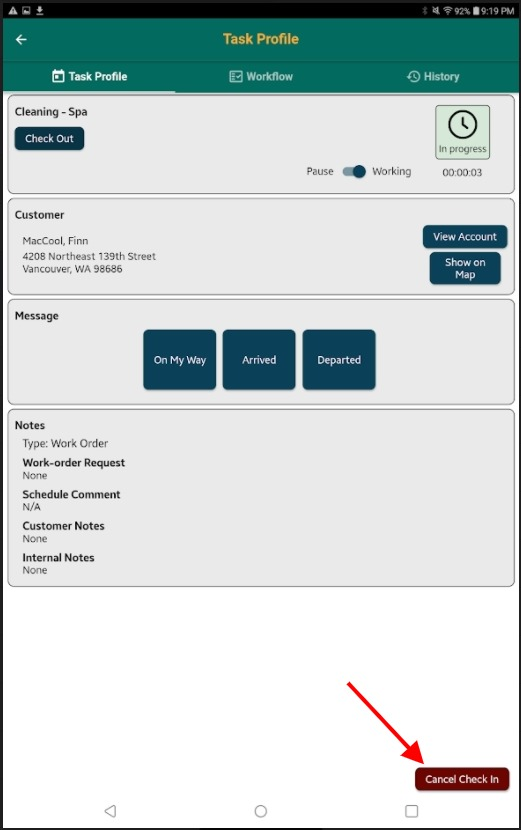
Once you’ve completed the Task, you can click the Check Out button. You will receive a Confirmation message asking if you’re ready to check out of the Task. 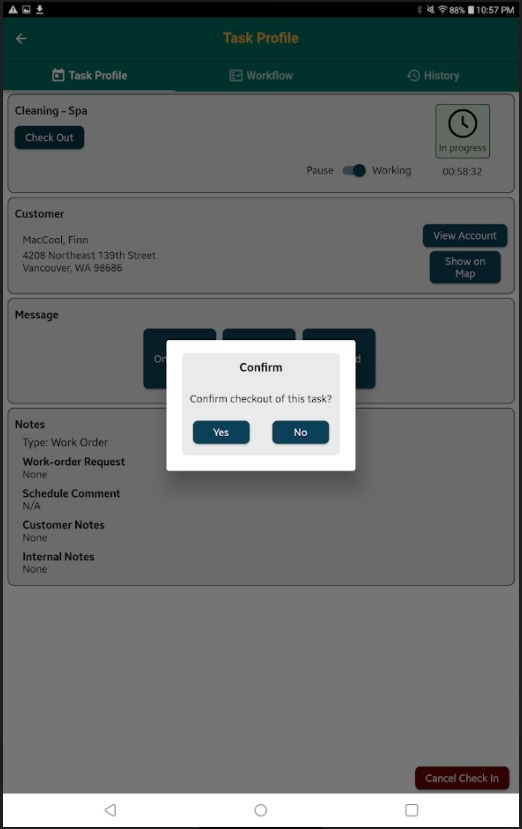
When you tap Yes, you will be asked to mark the Task as Complete. If you are not ready to mark the Task as complete, you will not be allowed to check out. Finish entering data and tap the Check Out button again to complete the Task and check out. 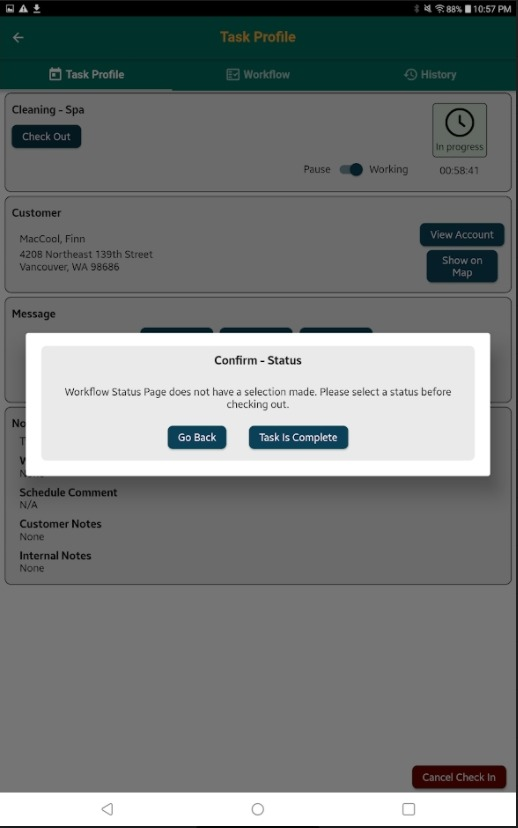
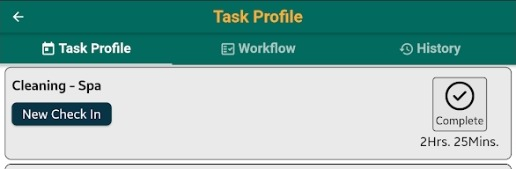
Once you’ve checked out, the Check In/Check Out button will change to say New Check In. The clock will show complete and have the actual time taken to complete the Task. If you need to Check In for a second time on this Task, you can click the New Check In button.
View Account When you click View Account, you land on this page where you can access the Customer’s Site Profile(s), Checklist History of previously completed Checklists for this Order/Task, Interviews completed on the Order, and Equipment on the Customer Profile.

This Account page shows you the address and Balance Due and gives you a button to quickly send the Customer Statement to the Customer. The Send Payment Link will send the Customer Statement according to the Customer’s Electronic Message Preferences.
Site Profiles
If the Customer has a Site Profile(s) set up, you can access them here. When you tap the Site Profile box, all Site Profiles for the Customer will display. Tap the one you want to view and it will expand to show you the information.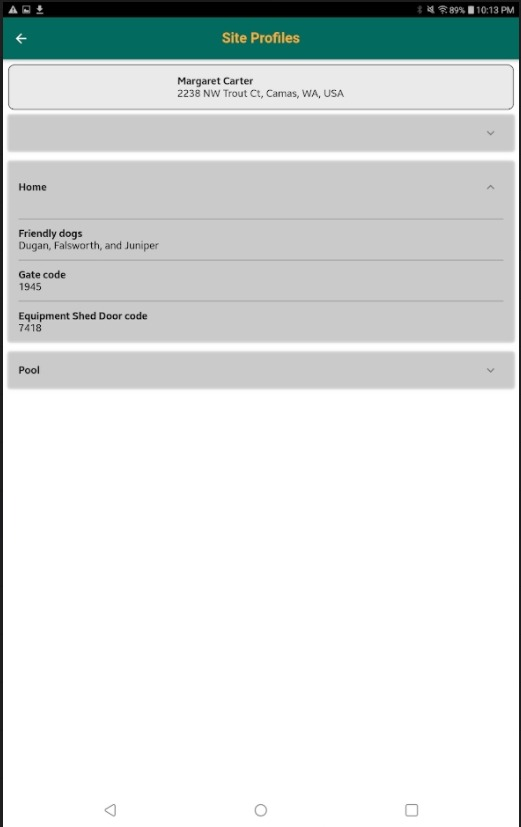
You can tap the Site Profile Name again to collapse the Profile and select another one (if more than one exists).
Checklists
Tap the Checklist History box to show completed Checklists on this Order.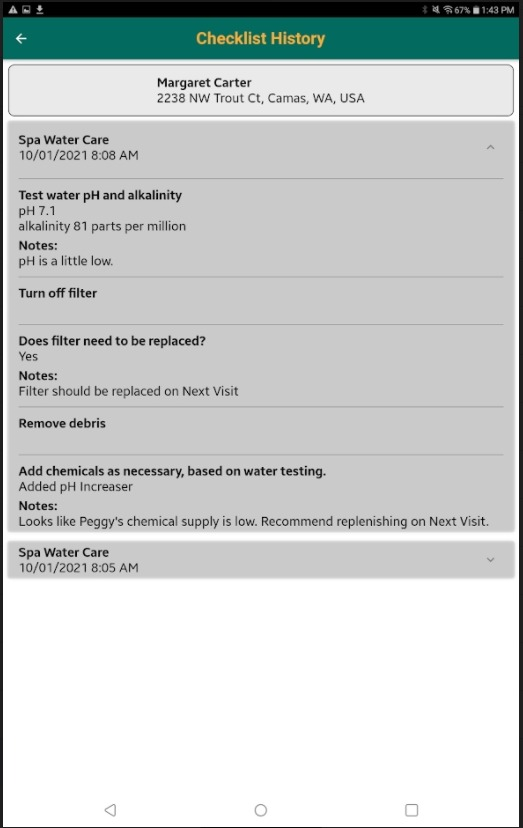
Interviews
If your company uses Interviews, these will appear here. Interviews are sets of questions Customer Service and Sales staff can ask when talking with a Customer and creating a Document.
Pictures
You can view the historical pictures on the Customer Profile.
Equipment
You can quickly see what Equipment LOU is tracking for the Customer in their Customer Profile by tapping on this Equipment box.
You can tap the line item to expand the details on the Equipment. 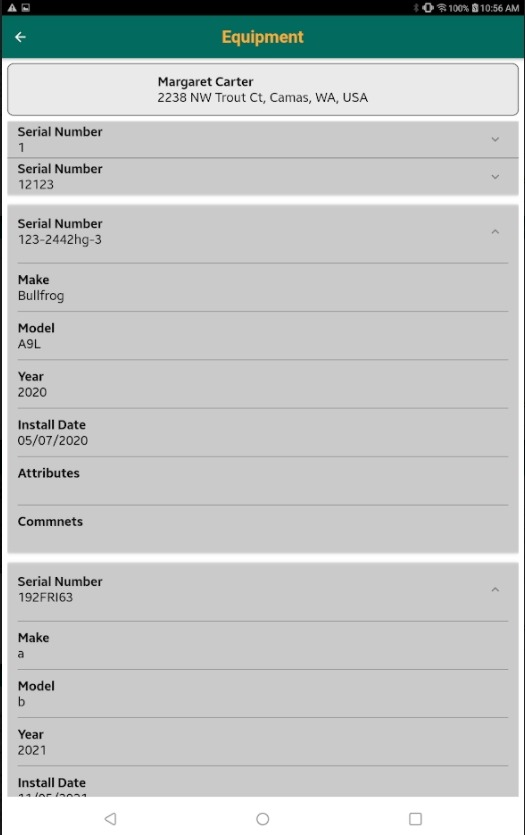
Show On Map
You can use this button to view your Task on the map in relation to where you are.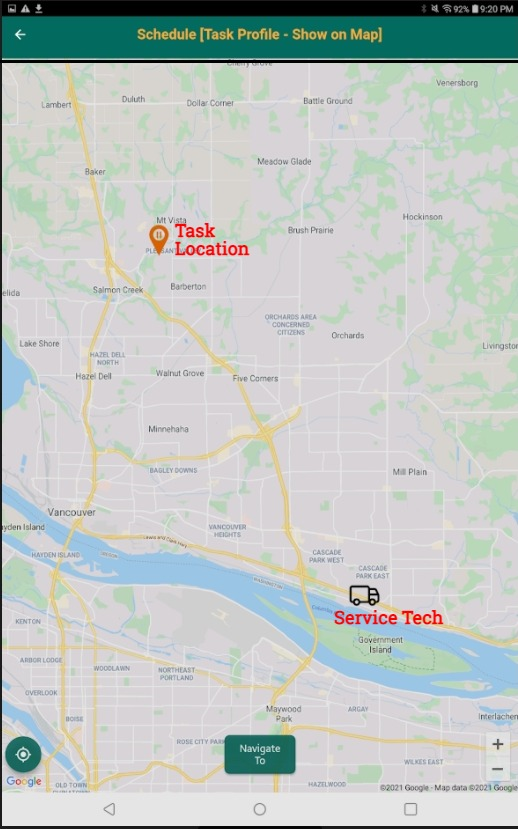
You can use this map to get an idea of where you are in relation to the Task. From this page, you can use the Navigate To button at the bottom of the map to have LOU Schedule send the address to your device’s default map app, allowing you to navigate to the service address.
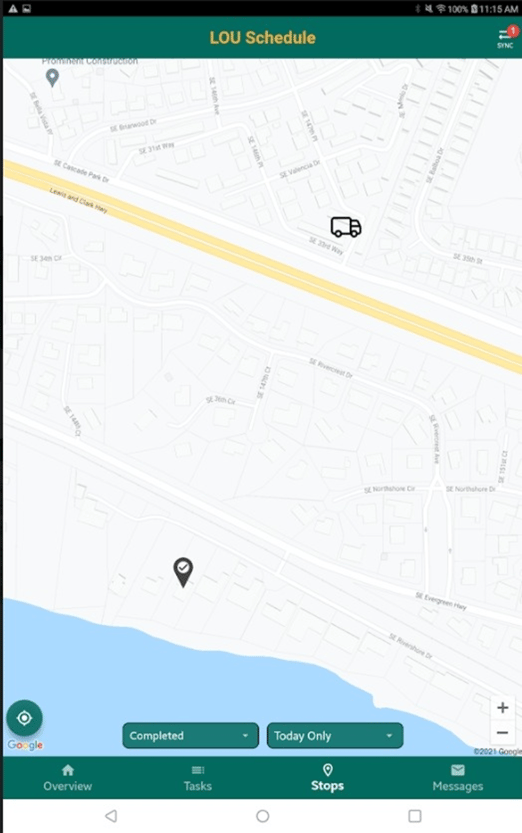
The pin on the Task will reflect the status of the Task. You can see in the image above, the pin is orange and has a pause symbol on it, indicating the Task has been checked in and paused. If the Task had not been checked in, it would be a blue pin indicating it’s Pending. If the Task was checked in and active, the pin would be green. If the Task is complete, the pin will be gray.
Messages
You can quickly send the pre-configured On My Way, Arrived, and Departed Messages to your Customer. Tap the Message you want to send.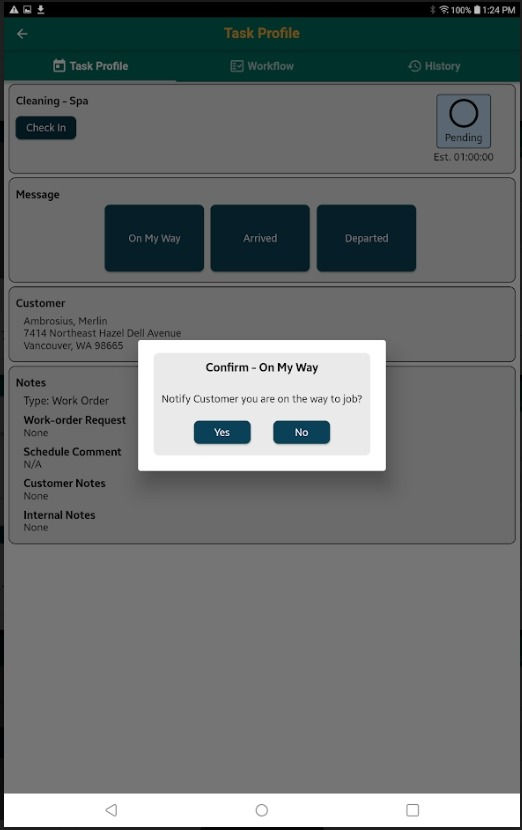
You will get a Confirmation Box asking you to confirm you want to send the Message. Click Yes and the Message will be sent according to your Customer’s
Electronic Messaging Preferences.
IMPORTANT! You can only send Messages when you have service/internet connection. If you try to send a message while out of service or without an internet connection, you will receive a message telling you it can't be sent. LOU will not add the message to queue to send once you're back in a service area.
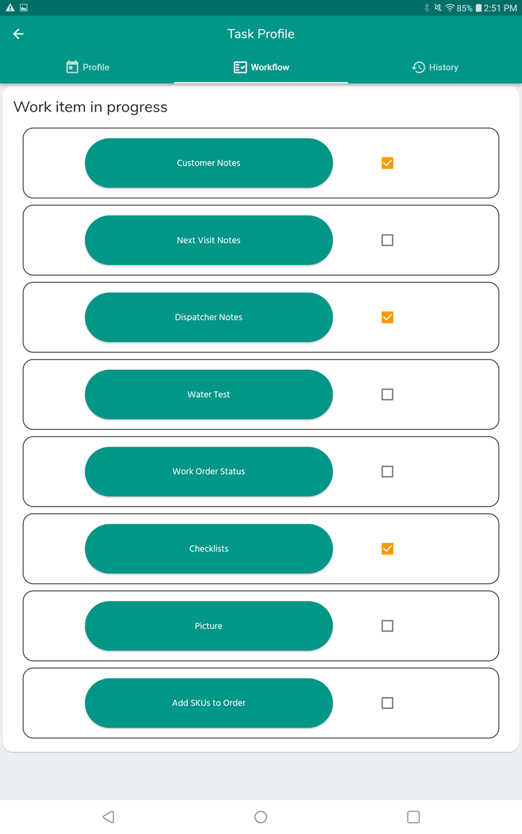
Workflow
Workflow is where you can create Customer Notes, Next Visit Notes, Dispatch Notes, update the Work Order Status, answer Checklists, and take and view Pictures.
REMEMBER! The LOU Schedule mobile app is a companion app to LOU Web. It isn’t intended to have every feature of LOU Web. On the occasions when your business’ workflows and processes require techs to access features not available in LOU Schedule, they should log into LOU Web on Google Chrome from their mobile device. 
- Customer Notes: General Notes you intend the Customer to see. You can see these in LOU Web in the Work Order Outcome and Door Hanger.
- Next Visit Notes: Notes specifically about the Next Visit. These notes are primarily intended for the dispatcher/service manager to know what actions may need to be taken when setting up the next visit. For example, “recommend filter replacement” or “next service is drain and fill – book more time”, etc. The dispatcher/service manager can make the necessary adjustments to the next Order and have any relevant conversations with the Customer. These may be visible to the Customer, depending on settings when creating an Outcome/Door Hanger through LOU Web.
- Dispatcher Notes: These are notes intended for your Dispatcher or internal staff. These are Internal Notes that are not visible to the Customer. .
- Dispatcher Notes are sent to Dispatchers through My Messages in LOU Web.
- IMPORTANT! Currently, LOU does not alert you when you have a new Message in My Messages.
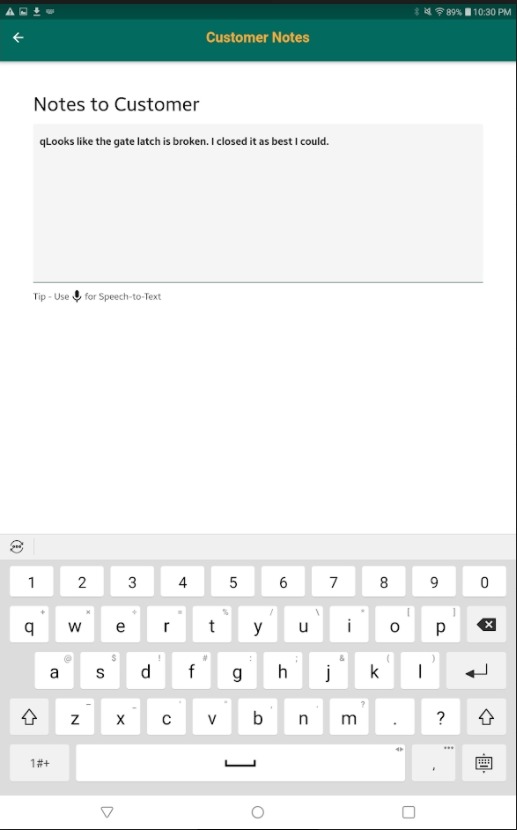
TIP! When you tap one of the Notes, you will land on a page allowing you to create a Note either by typing or using your device’s talk-to-text feature.
Watch out for typos and case! LOU’s keyboard doesn’t autocorrect like your device’s keyboard. When you’ve finished creating your Note, use the back button to go back to Workflow. LOU Schedule will autosave the Notes for you! You can go back into the Notes Workflow any time while working on a Task. You can add to, or change, Notes as necessary.
- Water Test: This is where you can enter your Water Test Readings and Dosages. Drag the slider to the correct value for each Reading. The readings will remain green when within normal ranges and will turn red when below or above normal range.
- REMEMBER! Normal Range is determined when you set up Water Testing.

- REMEMBER! Normal Range is determined when you set up Water Testing.

- Work Order Status: You can update the Status to mark as Complete when you are finished with the Task. REMEMBER! Work Order Status must be updated to Complete before you can Check Out and consider the Task completed.
- Checklists: Complete pertinent Checklists. Completed Checklists are viewable in Checklist History under View Account.
- Pictures: Take pictures that will automatically save to both the Order and Customer Profile. You cannot add Pictures from your device to LOU Schedule. You can only take new Pictures using the LOU Schedule Camera from this page.
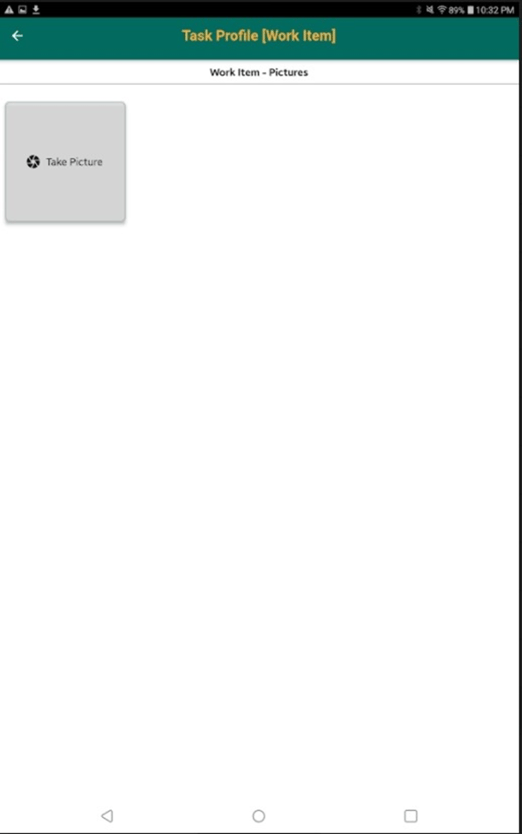
Tap Take Picture to open the camera and take a Picture. Then tap the Picture to change the Name and add a Description.
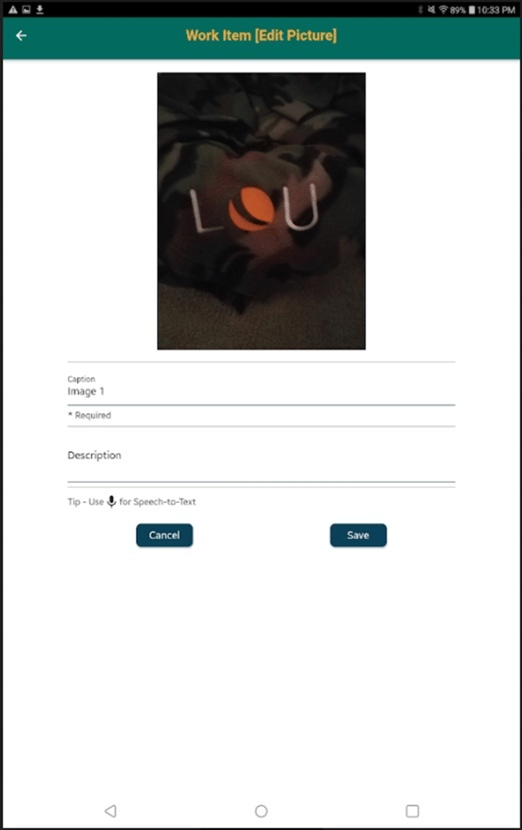
REMEMBER! Changing the Name and adding a Description are not required.
Be sure you tap Save after making changes to the Picture.
- Add SKUs to Order: Your Quick SKUs will default here. You can click Search All Inventory to search Inventory outside your Quick SKUs.
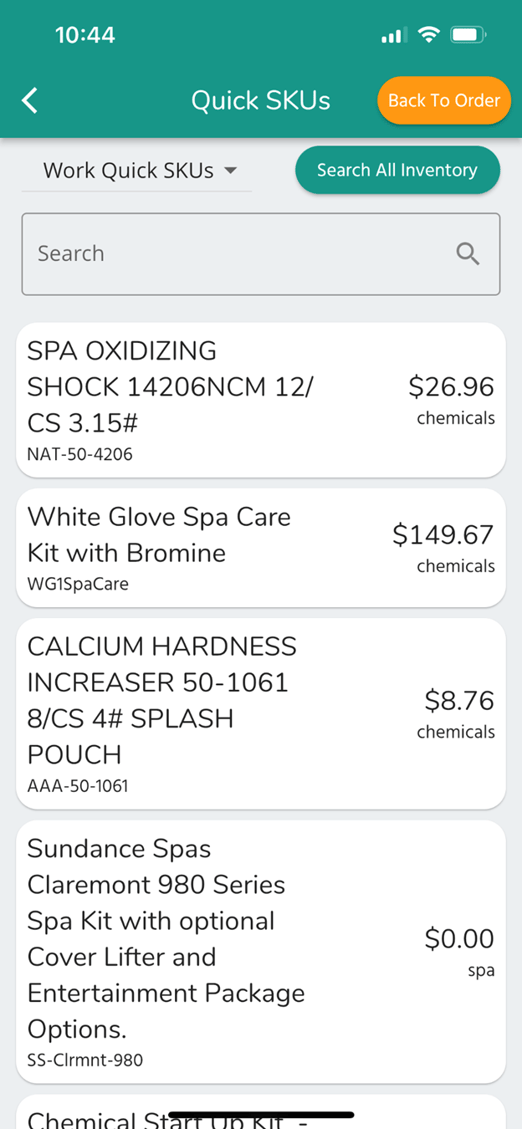
Tap a SKU and you will be asked to confirm you want to add the SKU to the Order.
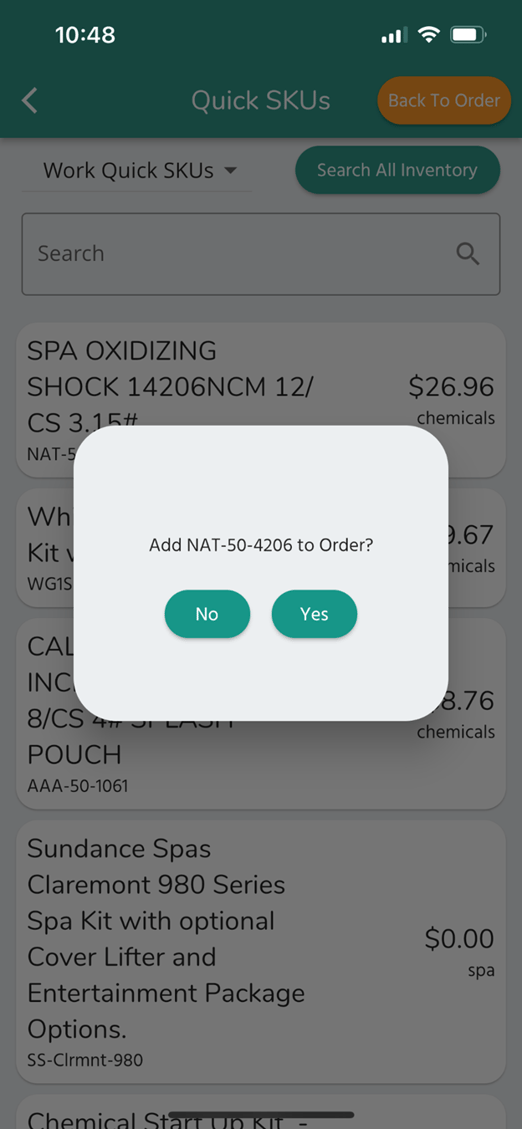
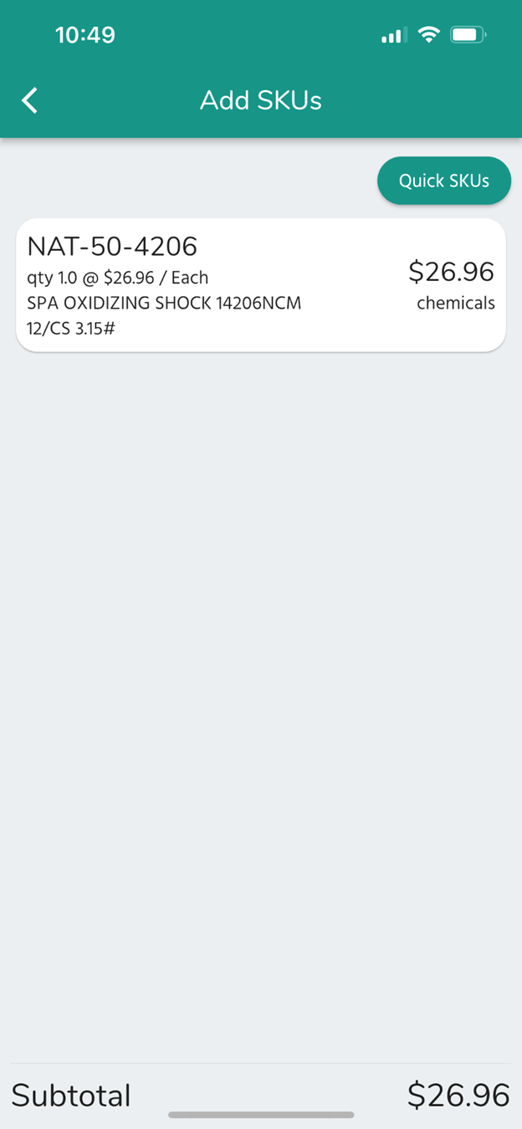
Tap Yes. The SKU will be added to the Order and you will be taken to a Subtotal page with the SKU you added listed. You can tap Quick SKUs or the back arrow to return.
As you tap on each Workflow item and complete it, LOU Schedule will automatically check the box next to it, indicating it’s been completed.
History
Once you’ve marked the Work Order as Complete and Checked Out of the Task, the History tab will be populated with a Summary of the Work Items. You can use the Update buttons to update the Notes items.

Stops
This tab connects with your device’s default map app to show you a map view of all your stops for the day in relation to where you are.
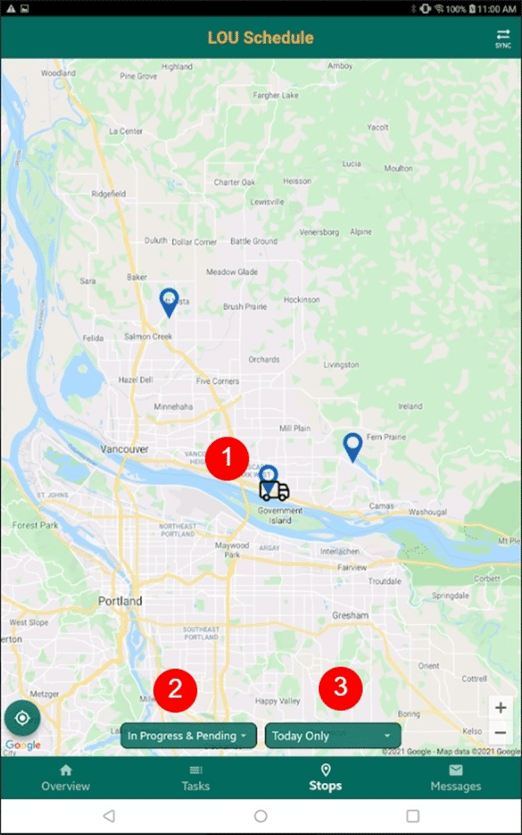
- Pins and a truck will appear on the map. Your location is the truck and the Pins are your Tasks.
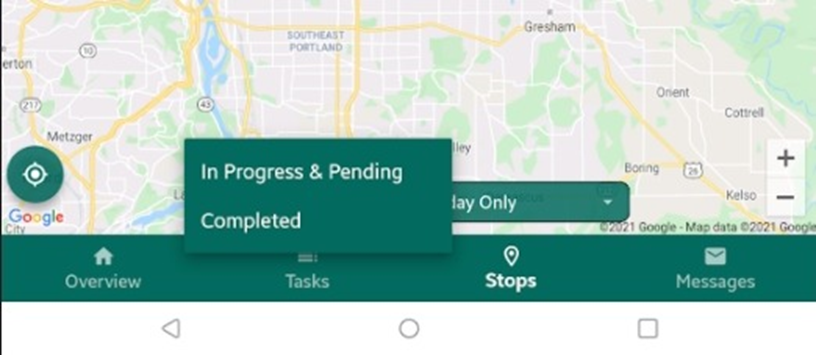
- You can filter the view for In Progress & Pending or Completed.

3. You can filter for Today Only or Today and Tomorrow. 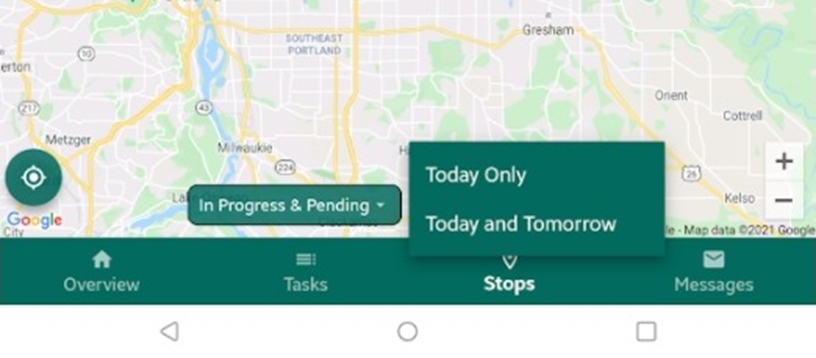

Messages
You can quickly send the pre-configured On My Way, Arrived, and Departed Messages to your Customer. Tap the Message you want to send.

You will get a Confirmation Box asking you to confirm you want to send the Message. Click Yes and the Message will be sent according to your Customer’s Electronic Messaging Preferences.
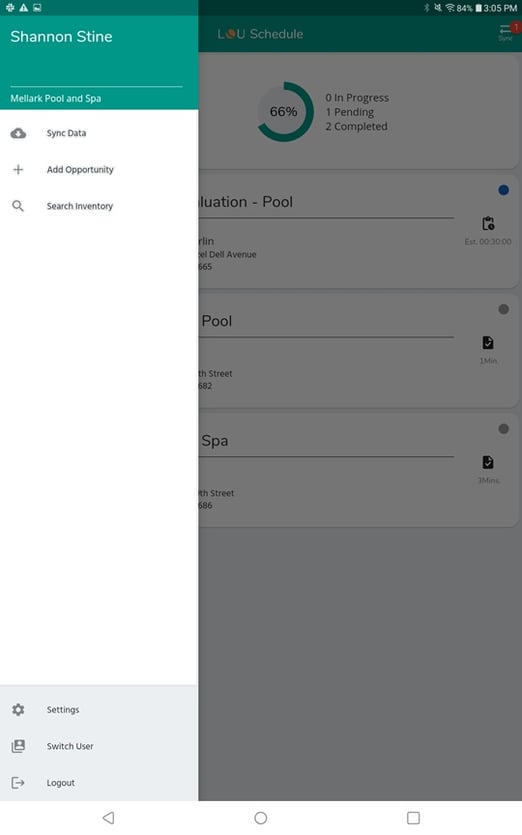
Sync Data
LOU Schedule and LOU Web need to remain in sync, since people are working in both applications. It’s a good idea to Sync Data when you first log into LOU Schedule, any time you’ve been out of cell service range and return, and after completing each Task. This ensures that every step of the way, the information in LOU Schedule and LOU Web remain in sync for your Tasks.
CAUTION! When you uninstall/delete/remove an app from your mobile device, all the data associated with that app is permanently deleted. If you uninstall/delete/remove LOU Schedule from your mobile device with data and pictures that have not yet synced to LOU Web, those data and pictures will be permanently deleted.
Before uninstalling/deleting/removing the LOU Schedule mobile app from your device, consult with the LOU Team.
REMEMBER! In order to help you sync and get on your way, LOU performs some sync activities in the background after you initiate a Sync. This means that immediately after tapping Sync, you may not be able to see the View Account button for a Customer when in a Task Profile. Don’t worry! This will only take a minute or two and that View Account will button return, allowing you to access the Account data.
LOU Schedule requires you to Sync Data and Sync Pictures separately. To Sync Pictures, you must first Sync Data.
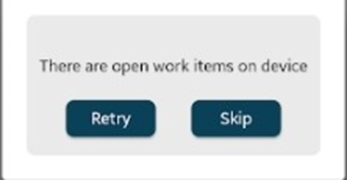
IMPORTANT! You cannot sync data if you have any open work items. Open work items are defined as Tasks on which you’ve checked in. You must sync before checking in or after checking out of a Task.
There are two ways in which you can Sync Data. The first is by using the Sync button on the upper right corner of a few screens in LOU Schedule.
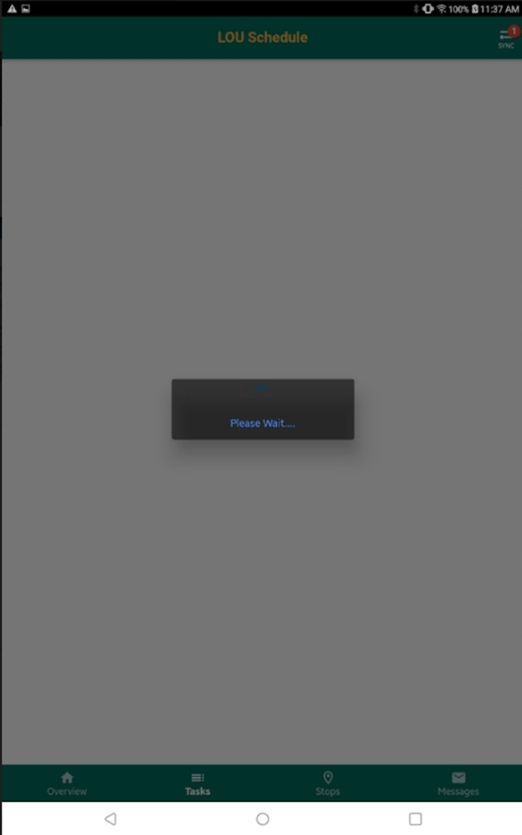
When you tap the Sync button, the screen will gray out with a progress meter while it syncs with LOU Web.
If you have open work items (Tasks), you will receive a message letting you know. You will need to go back and either complete Tasks or wait to sync data until you’re ready to complete the Task.

TIP! If you’ve recently checked into a Task and you haven’t completed any work, but need to Sync Data for any reason, you can use the Cancel Check-In button to cancel your Task’s check in and Sync Data. This will erase any work you’ve entered on the Task and you will have to start over. Use this option as a last option only.
Sync Data in Menu
Tap Sync Data to be taken to a page that will tell you the last time the Data was synced and allow you to sync data.
IMPORTANT! This Sync will sync the same data as the Sync button that appears on the upper right corner of the app.
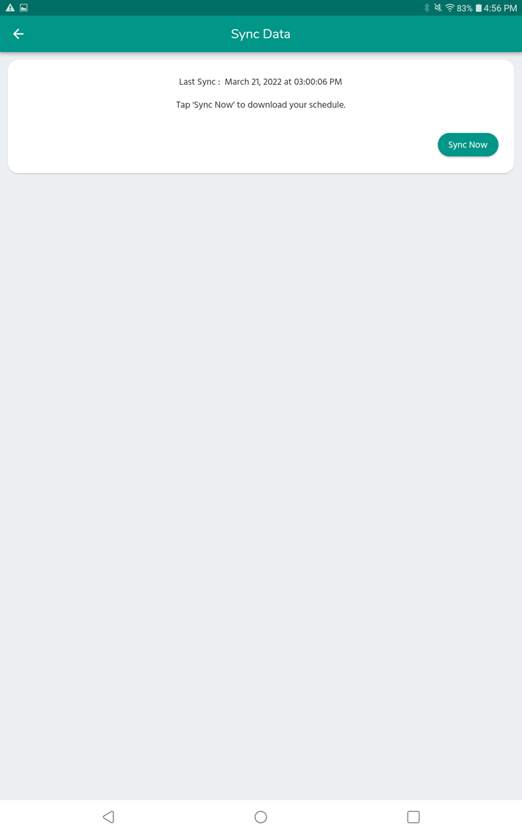
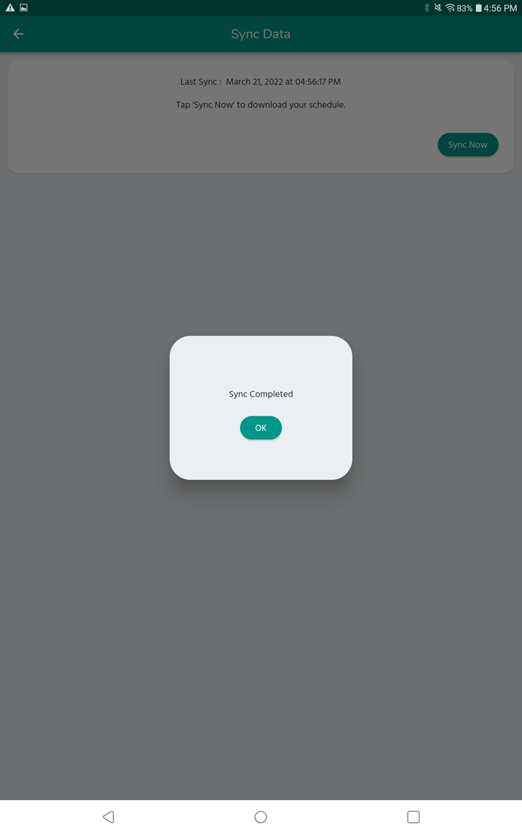
Tap Sync Now to sync data now. Once the sync is complete, you will get a confirmation message indicating the sync is complete. Tap OK to return to the Sync Page.
If you have open work items and you tap Sync, you will receive a message indicating there are open work items.
Once all the work items are closed and you sync again, the sync will proceed and update the date and time stamp.
Sync Pictures
You must Sync Data before you can Sync Pictures. In the hamburger menu, tap Settings.
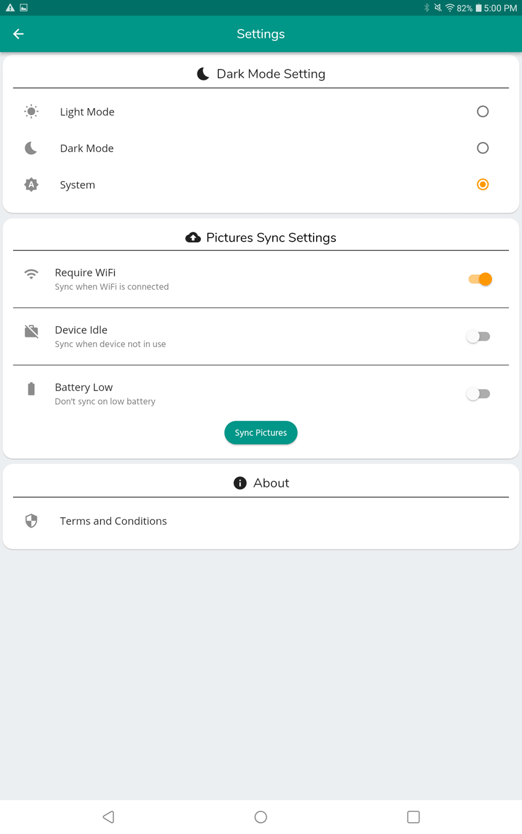
You can set a few settings to Sync Pictures. Android users can determine if you want to require wifi when syncing. This can save data if you’re on limited data plans. You can have LOU Schedule automatically attempt to sync pictures when the Device is idle and you can determine if pictures can be synced when the battery on your device is low.
Apple iOS Users can determine whether to require wifi for syncing data and pictures through their device Settings, not LOU Schedule. On iOS, go to Settings / Cellular / Cellular Data. To allow data downloads and uploads on Cellular Data, toggle on. To require wifi, toggle off. Keep in mind this impacts all data on the device, not just LOU Schedule. Make changes to these settings with caution and consult Apple Support if you have additional questions.
REMEMBER! These automated settings will not override the requirement that all data is synced before pictures are synced. If there is data to sync, LOU Schedule will not auto-sync pictures.
To manually sync, click Sync Pictures. This will manually sync pictures so long as there is no outstanding data to sync.
Synced Pictures appear in LOU Web on the Customer Profile and the Document associated with the Task on which you took the Pictures.
CAUTION! When you uninstall/delete/remove an app from your mobile device, all the data associated with that app is permanently deleted. If you uninstall/delete/remove LOU Schedule from your mobile device with data and pictures that have not yet synced to LOU Web, those data and pictures will be permanently deleted.
Before uninstalling/deleting/removing the LOU Schedule mobile app from your device, consult with the LOU Team.
Menu Options and Settings
There are several features available in the hamburger menu on accessed on the left.
Sync Data
Tap Sync Data to be taken to a page that will tell you the last time the Data was synced and allow you to sync data.
IMPORTANT! This Sync will sync the same data as the Sync button that appears on the upper right corner of the app.

Tap Sync Now to sync data now. Once the sync is complete, you will get a confirmation message indicating the sync is complete. Tap OK to return to the Sync Page.

Add Opportunity
You can create Opportunities out in the field by tapping Add Opportunity. This allows you to take down contact information and their interest if someone is interested in products and services.
Creating an Opportunity in LOU Schedule automatically creates a Customer Record with the contact information as well as the Open Opportunity in Opportunities in LOU Web. This information will appear in LOU Web as soon as you perform a data sync.
IMPORTANT! A Customer Record will be created in LOU Web even if you enter contact information for an existing Customer, including Customers on your Task list.
- Select the Opportunity Interest, Department, and Type from each dropdown.
- Enter the Customer/Contact Name.
- Enter the Contact information.
- Enter any Notes you want to include in the Opportunity.
- Tap the Check box on the upper right to save the Opportunity.
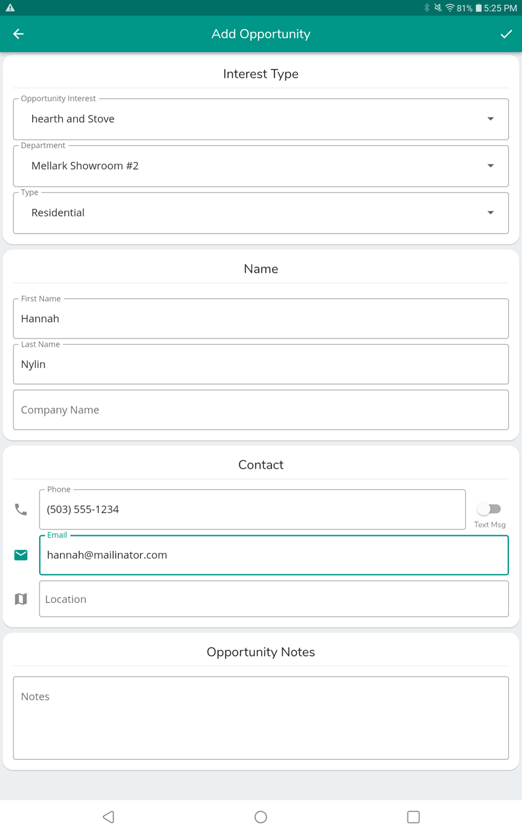
In order to create the Opportunity, you must have Opportunities set up in LOU Web.
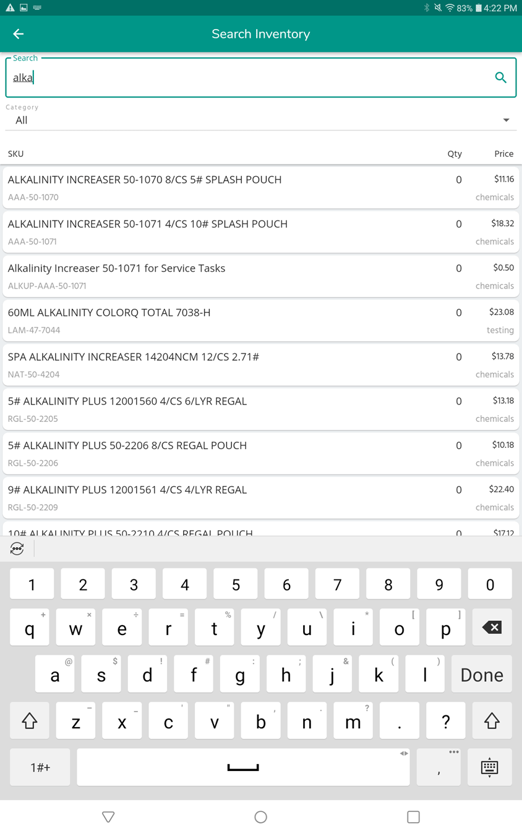
Search Inventory
You can search your entire Inventory if you need to locate a SKU.
REMEMBER! You cannot add any SKU to an Order. You can only add the SKUs in Quick SKUs through the Task Workflow.
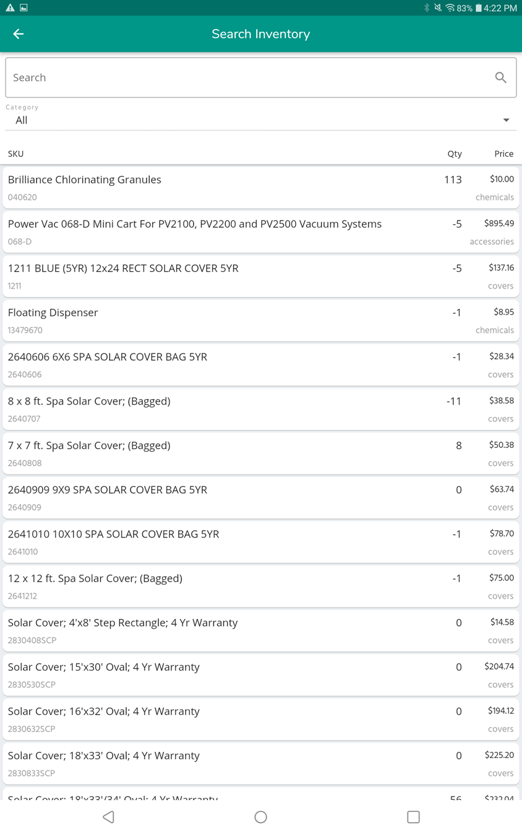
You can swipe up and down to scroll through the SKUs. You can also search keywords.
Switch User
Use this button to select another user activated on this device OR request access for another user on this device.
Settings
The Settings menu allows you to control several settings in the app. Dark Mode, Picture Sync Settings, and Terms and Conditions can be found in this page.

In the Picture Sync Settings, you can determine when to auto-sync data as well as manually sync photos by tapping the Sync Pictures button.
Tap Terms and Conditions to access links to the Terms and Conditions.
