Receive Inventory
When you receive your orders from Vendors, you need to input those products in LOU. The Receive Inventory feature makes it easy!
To receive inventory, there must be a Purchase Order with a status of On Order. If you are attempting to add Inventory without a Purchase Order, you need to perform a Stock Adjustment.
Looking for help managing inventory and determining when to place orders? Head over to Inventory Replenishment for more!
Before we dive into how to Receive Inventory, we need to understand how to read a Purchase Order versus how the SKUs appear in Inventory. When you add a SKU to a Purchase Order, you’re adding Quantity based on the Vendor UOM. Example: the Vendor sells the SKU in a case of 200 and you want 1000 Eaches, so you add the SKU to the PO as a QTY 5. However, when you receive the SKUs into your Inventory, they’ll be the Eaches you were after. When you’re viewing a Purchase Order, you’re viewing SKUs in quantities based on Vendor UOM. When you’re viewing Inventory, you’re viewing SKUs in quantities based on Sell UOM.
Contents:
Go to Operations / Receive Inventory
When you arrive at the Receive Inventory screen, you will see a line item corresponding to each line item on a PO. This page will show all SKUs available to receive for all Purchase Orders.
This page displays several columns of important information about the SKUs, including the Requested Quantity and Received Quantity. If you’ve partially received a quantity of a SKU, you can see the total Requested Quantity as a reflection of the Vendor UOM and the total Received Quantity as a reflection of the Sell UOM. More about Partial Receives later.
IMPORTANT! If you created one line item with multiple quantity for the SKU on the Purchase Order, there will be one line item with multiple quantity for the SKU on this page. If the SKU appeared as multiple line items on the Purchase Order, it would appear as multiple line items on this page as well.
Single Line Item with Multiple Quantity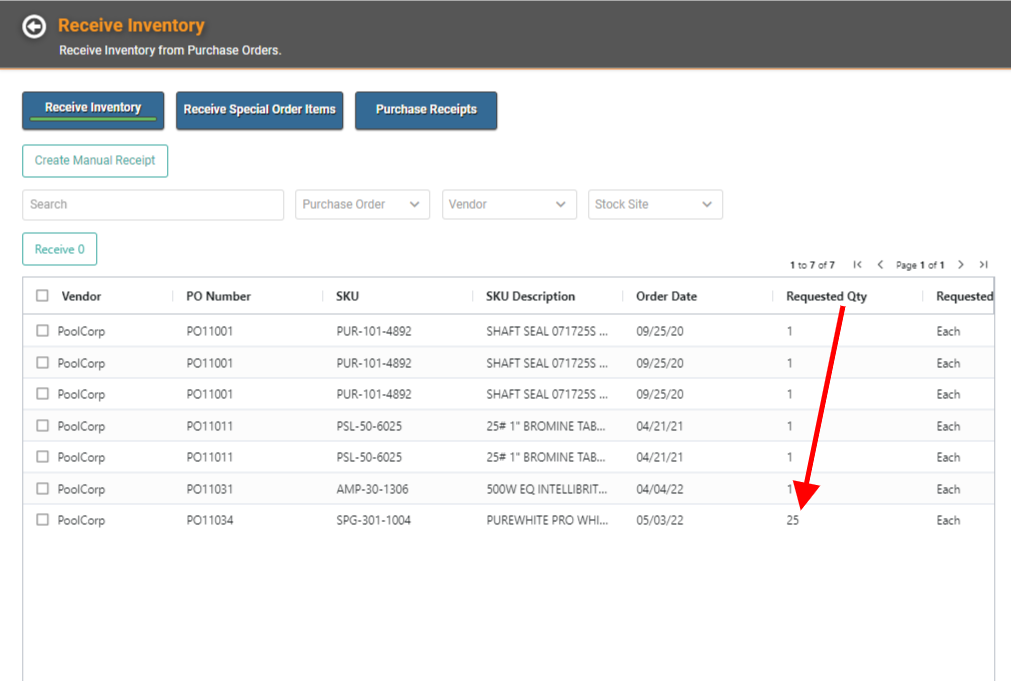
Multiple Line Items of a Single SKU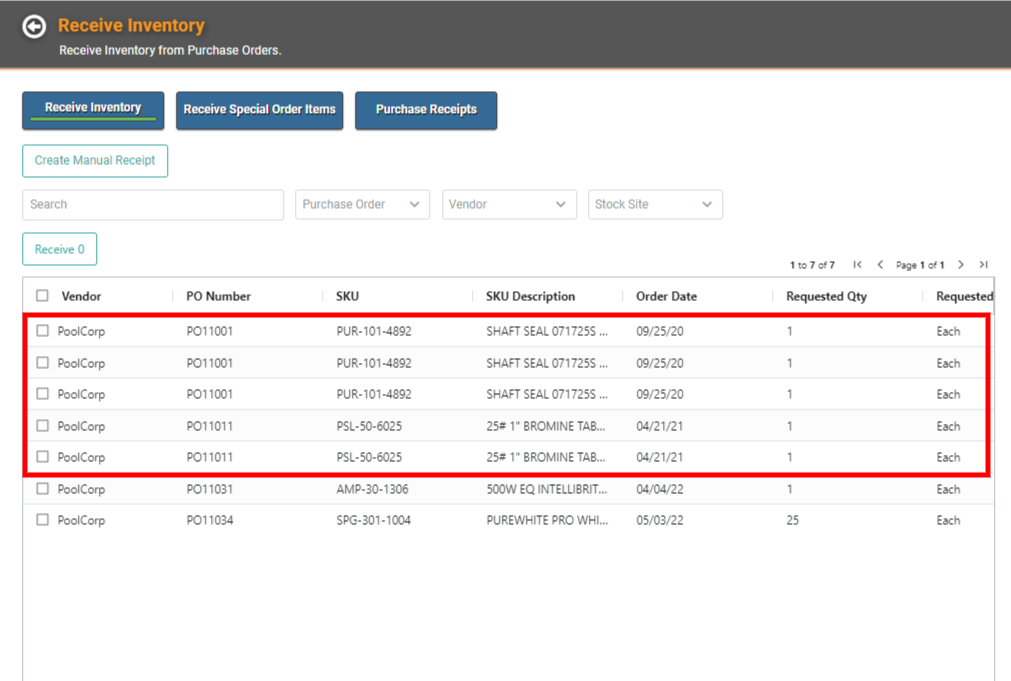
Receive Inventory
To receive inventory, check the box next to each line item you want to receive. To receive all, you can check Select All. 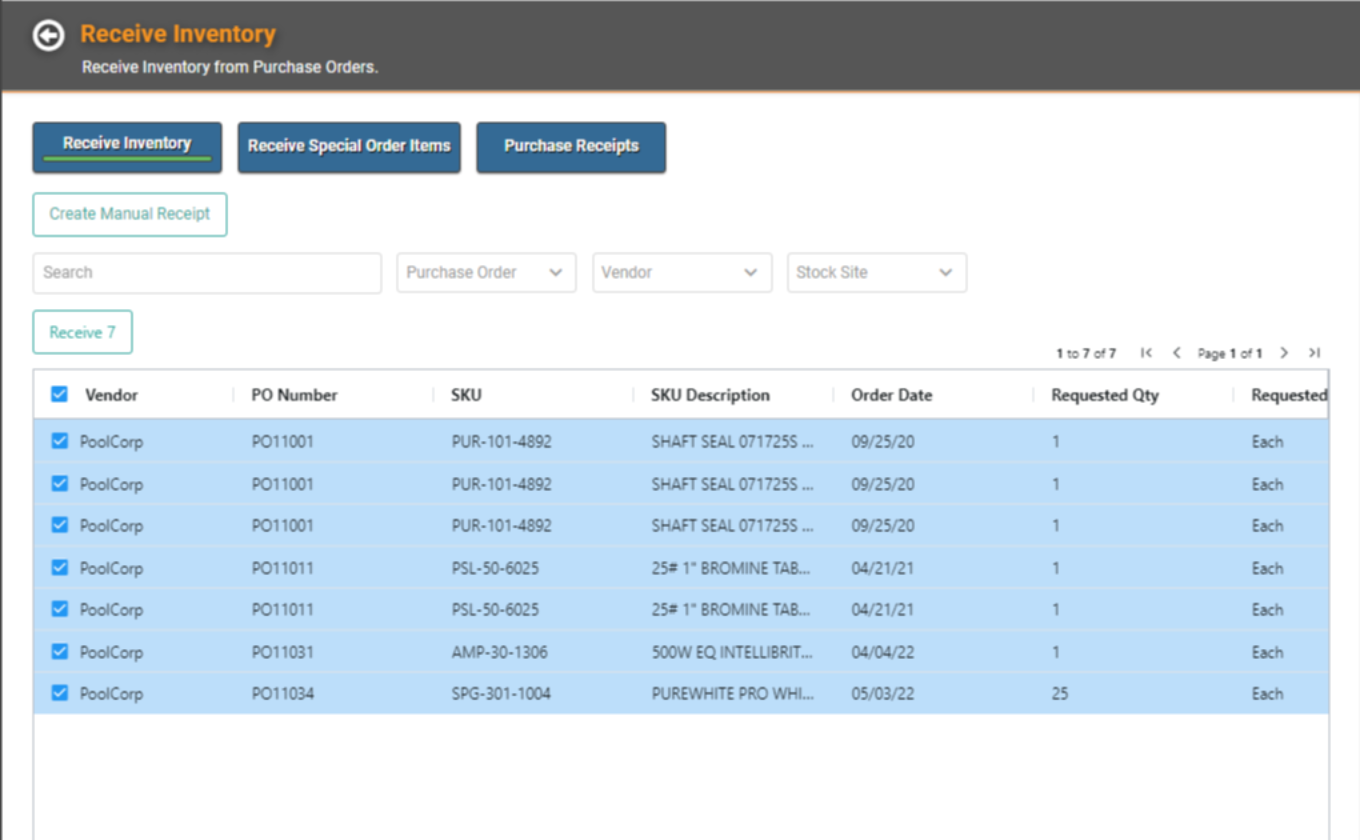
After you select the items you want to Receive, click the ![]() button. It will be updated with the number of items you’re receiving.
button. It will be updated with the number of items you’re receiving. 
Review the items to confirm the quantities. If you need to make changes to a line item, you can do so by clicking the Actions and selecting Update. 

On the pop-up, you can change several pieces of information about the SKU to match what you physically received as opposed to what you ordered in the PO.
REMEMBER! You only need to change the quantity if the Vendor sent more than you ordered or if you received less than you ordered. Depending on how you entered quantity on the PO, they will be listed as individual line items or as one line item with multiple quantity.
This pop-up is where you can add Add-On costs such as Vendor shipping charges you want to factor into the Cost and Sell Price. You can also add a note which will appear on your Purchase Receipt. Once you’ve made the additions/changes to the line item, click Save to return the Confirm Cost and Quantities page. Once you’ve made all the updates to each line item, click the ![]() button.
button.
You will return to the Receive Inventory page and a message indicating the Inventory has been Received will pop up in the lower right corner. The products from the order are now part of your Inventory and, if you received all the items in a Purchase Order, the status of that PO will update to Completed and it will move from Pending to Completed on the Purchase Orders search page.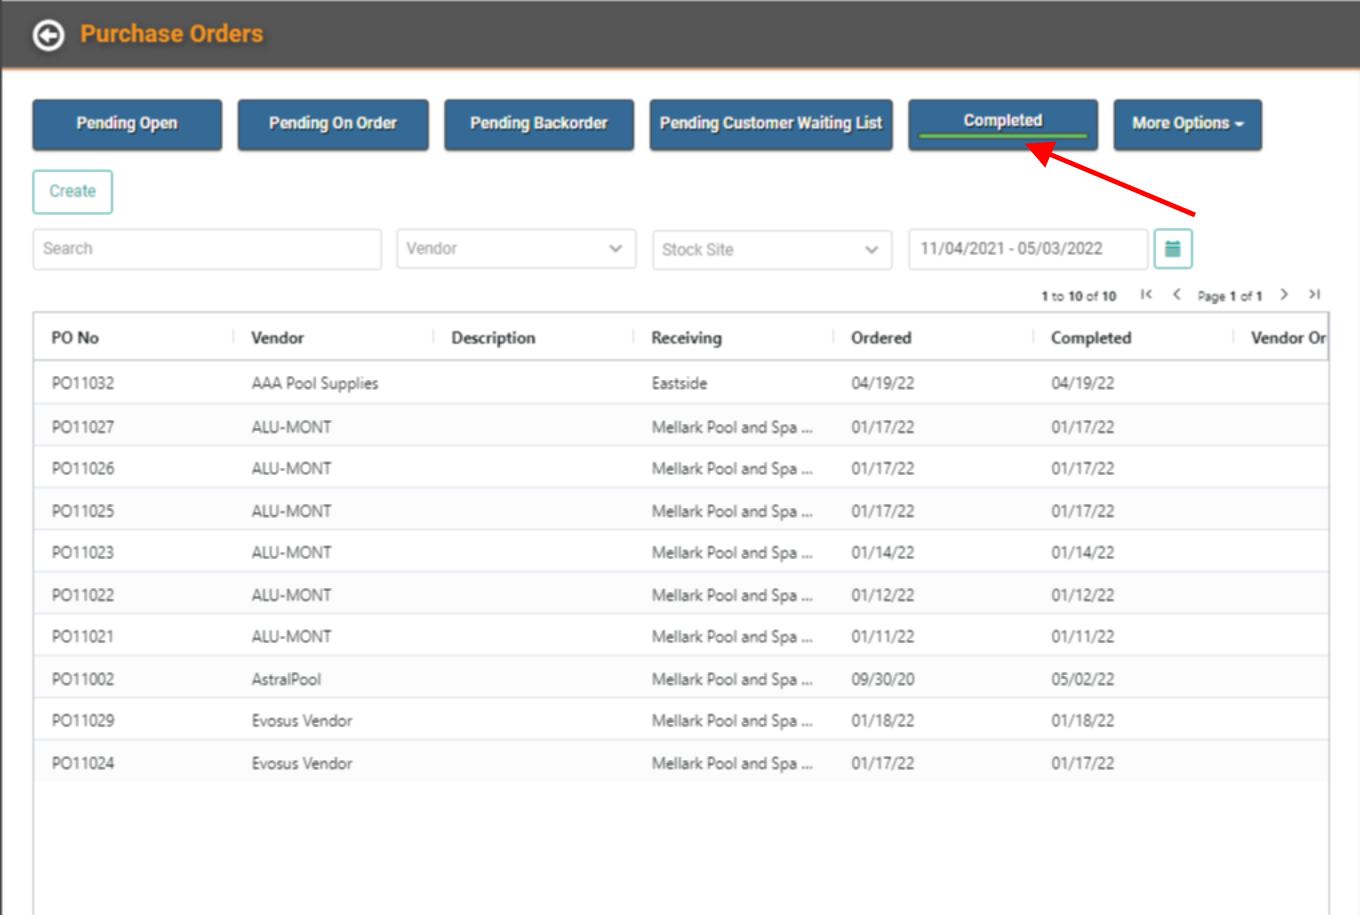
Actions Link
On the Receive Inventory Page, you will see the Actions link on each line item. From this link, you can perform several tasks: Receive the item, Open the PO to review, Update the SKU listed on the PO, Update the SKU Vendor, or mark the item as Back Ordered.
Receive: Rather than checking the boxes next to the line items, you can use Receive to receive the individual line item.
Purchase Order Profile: Quickly access the Purchase Order Profile right from this link.
Update SKU on PO: If you need to update the SKU on the PO, you can do so with this link without leaving the Receive Inventory screen. 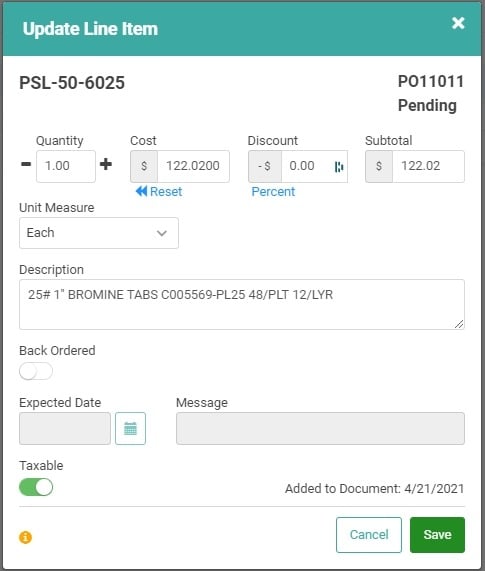
Update SKU Vendor: You can update the SKU Vendor. IMPORTANT! You cannot change the Vendor when there is an Active Pending PO for the SKU, but you can update the other Vendor SKU information. 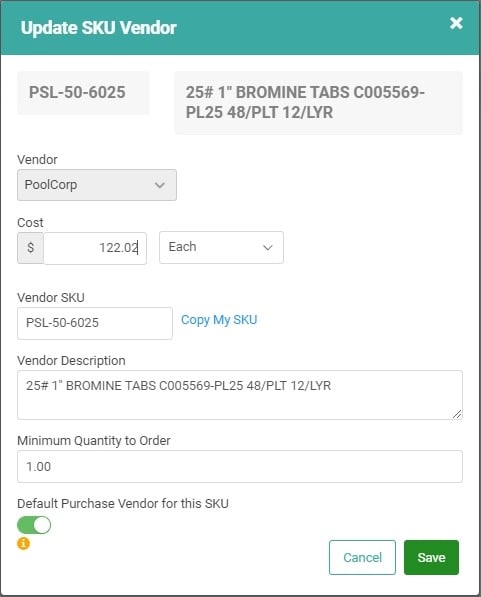
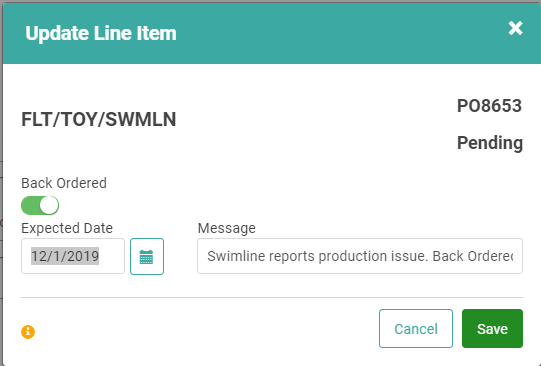
Back Order: On occasion, you may hear from the Vendor that an item you have ordered is not available and is on Back Order. To track that information in LOU, you can use the Actions link to mark the item as Back Ordered.
- Click Back Order on the Actions link next to the line item.
- The Update Line Item window will pop up, allowing you to enter information regarding the item’s status.
- Toggle the Back Order button on
- Enter an Expected Date
- Enter a message regarding the Back Order.
- Click

All POs with Backordered SKUs will appear under the Purchase Orders tile on the Pending Backordered screen. 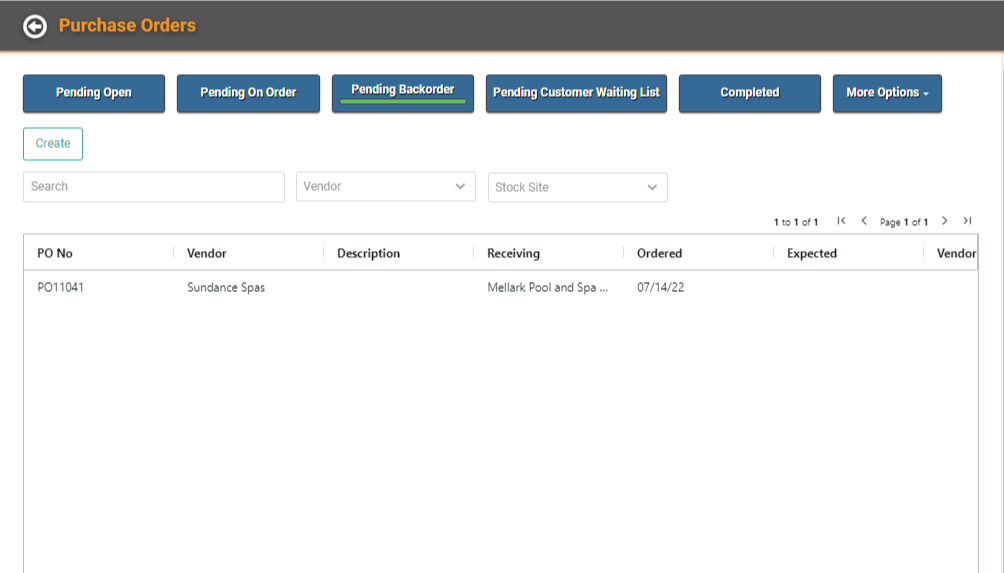
Using the Actions link on the PO line item, you can access the Purchase Order Profile, Vendor Profile, Receive SKUs on the PO, or view info on the SKU(s) associated with the PO that are backordered. 
Receive Serialized Inventory
When you receive inventory which contains products with serial numbers, you will need to add the Serial Numbers. Check the box next to the product(s) you want to Receive and click Receive. 
You will be taken to the Confirm Cost and Quantities page. There is a line on the line item for Serial Number which is blank. Click the Actions link and select Update. 
The Update Line Item window will pop up. In the Serial Number box, add the Serial Number for the product. You can add Make, Model, and Year, as well as a comment, if you want. 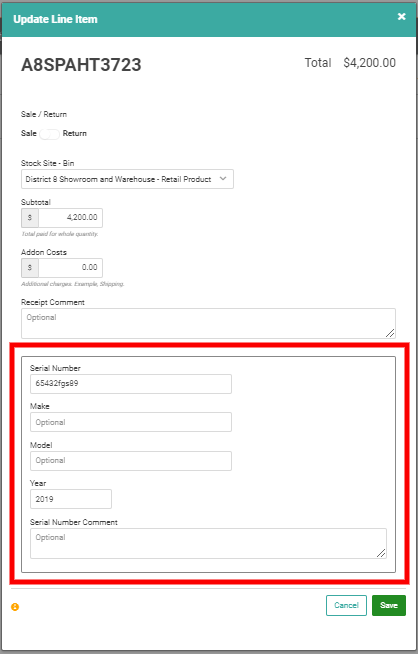
Once you’ve added the Serial Number and any other information, click the  button.
REMEMBER! Serial Numbers are unique identifiers for a SKU, but they are not unique across all SKUs. Different Manufacturers may use the same Serial Number for their products. LOU does not prevent you from adding the same Serial Number to two different SKUs but will prevent duplicate Serial Numbers on the same SKU. For example, SKU123 can only have one instance of Serial Number 1A2B. SKU345 can also have Serial Number 1A2B as they are different products. 
On the Confirm Cost and Quantities page, the Serial Number will now appear. You can complete Receiving the Inventory by clicking ![]() .
.
To see a list of your Serialized Inventory, see Serial Numbers.
Receive a Partial Order
On occasion, a vendor may send you an incomplete order. Maybe you ordered a box of 50 and there were only 25; or maybe you ordered two boxes of 50 and they only sent you one. In both instances, you can receive the partial order.
Receive Partial Quantities of Single Line Item
As we’ve mentioned, you can add some SKUs to a PO as a single line item with a multiple quantity. In the event you need to receive part of that quantity, you can do so on the Confirm Cost and Quantities page. 
Click Update. 
Change the Quantity to the amount you want to Receive and Click Save when you’re done making changes. Click the Receive button to complete Receiving the SKUs. You’ll be returned to the main Receive Inventory Page. 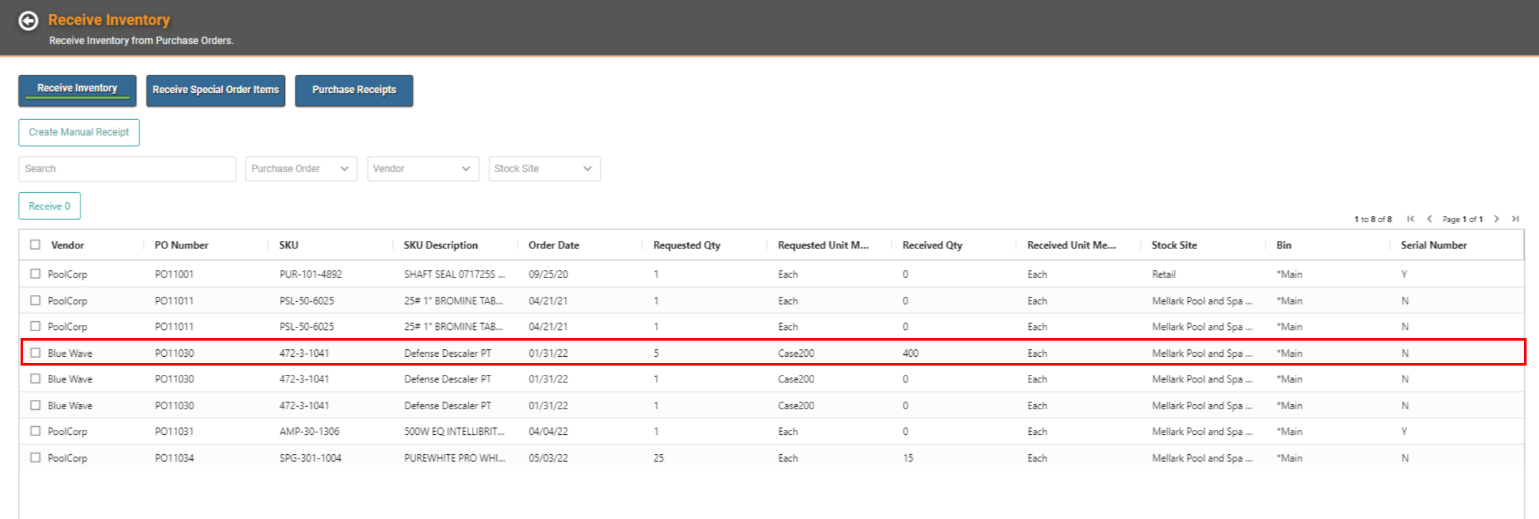
Now that we’ve received 2 of the 5 ordered, we can see the information reflected on the main Receive Inventory page. Unlike when you receive the entire quantity requested, the SKU will remain on this page as you still have quantity to receive.
The Requested Quantity of our SKU is 5 and the Requested UOM is a Case200. The Received Quantity is 400 and the Received UOM is Each. This is an important distinction. When you Receive a SKU, LOU automatically adjusts how it counts the SKU to reflect the Sell UOM rather than the Vendor UOM. Pretty neat!
When you get the rest of the Requested Quantity, just double-click or use the Actions / Update link on the line item to return to the Confirm Cost and Quantities screen and complete receiving the SKU. 
You can see the Quantity outstanding has been updated from the Requested Quantity to only that which is left to Receive. If you need to make additional updates, follow the same process to click Actions / Update and make your adjustments. If everything is good to go, click Receive on the upper right to complete Receiving the SKU.
Once you click Receive, you’ll return to the main Receive Inventory page. If you received the entire outstanding quantity, the SKU will be removed from the Receive Inventory page.
Receive Part of a PO (Some Line Items, but not all)
You received two line items out of 4 line items on the PO.

Following the steps above to Receive Inventory, we’re going to select the two SKUs we received and click Receive.

Confirm the Cost and Quantities. If you need to make changes to the line item or add Add-On costs, click Actions and Update. If you make updates, click Save to return to the Confirm Cost and Quantities Page, then click Receive.

When you return to the Receive Inventory screen, the remaining SKUs on the PO will remain On Order. The two you just received have been accounted for in your Inventory and removed from the Receive Inventory screen.
On the Purchase Order Profile, the SKUs that have been Received will have a checkmark and Received on the SKU line item; the Received Qty will reflect the amount received. The SKUs yet to be received will not have a checkmark and Received and Received Qty will show 0.

Receive Different Unit of Measure
What if you ordered a UOM Box 50, but they only sent you a Box 25? You can update that information when receiving the inventory.
IMPORTANT: You can only update the SKU quantity by existing Units of Measure. If the Vendor sent you a quantity in a UOM you don’t have configured, go to Units of Measure to create the UOM before receiving inventory in a different quantity.
Select the line item you want to receive and click Receive. On the Confirm Cost and Quantities page, click the Actions link on the line item and select Update.

The Update Line Item window will pop up. Using the Unit Measure dropdown, change the UOM to the unit received.

Once you’ve made the necessary changes, click Save. When you change the UOM in the Update Line Item window, you should see the Cost change automatically. As you click Save and return to the Confirm Cost and Quantities page, you should see the Cost and Quantity updated as well. Once you’ve made the updates, click Receive.
Purchase Receipts
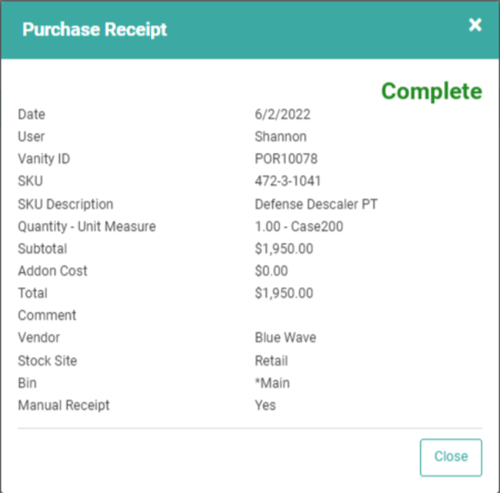
Once you receive the inventory, the Purchase Order is updated to completed and the SKUs reflect in your Inventory. A Purchase Receipt is also created and associated with the SKU for additional recordkeeping.

This Purchase Receipt will provide relevant information about receiving this SKU, including the Purchase Order ID.
Purchase Receipts are accessible from the Receive Inventory main page, the SKU Profile, and the from a link on the Purchase Order Profile.
Create Manual Receipts
Occasionally, you may have a situation where you physically receive inventory for which you didn’t create a PO or place an order. You still need to account for the inventory in LOU and in your receipts.
IMPORTANT! As a best practice, you should be creating Purchase Orders for all Inventory that is ordered and purchased through your Vendors. Manual Purchase Receipts should be reserved for extenuating circumstances where a typical purchasing scenario did not take place.

On the Receive Inventory page, click the Create Manual Receipt button.

When you select a SKU in the dropdown, the window will expand to allow you to enter additional information about the SKU for which you’re creating the Manual Receipt.

Fill in the relevant information. We recommend entering a Receipt Comment to explain why you’re creating a Manual Receipt rather than receiving inventory through the Purchase Order/Receive Inventory process.
The Purchase Receipt created will not contain the same information as a Purchase Receipt created through the Receive Inventory process because there is not a Purchase Order associated with this Manual Receipt. However, the Purchase Receipt is accessible through the Receive Inventory main page and the SKU Profile.
