
Purchase Orders (POs) are an essential part of business. You can quickly and easily create, update, and access a list of previous POs on the Purchase Orders page.
IMPORTANT! The primary function of POs in LOU is for internally tracking inventory and orders. Most Vendors have a preferred method by which you should submit your Purchase Orders outside of LOU.
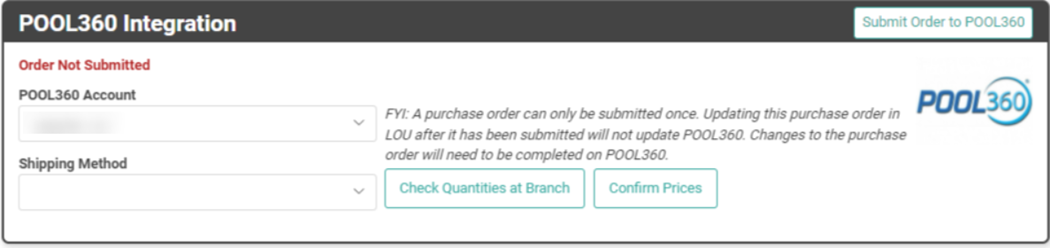
Two integrations offer the ability to electronically submit a PO to the Vendor. These integrations must be properly set up and configured before you are able to send POs electronically.
1. Click Create
2. Enter Vendor, Department, receiving Stock Site, etc.
3. Add SKUs
4. Place On Order
5. Submit the PO to the Vendor via their preferred ordering method (most often this is outside of LOU and the LOU PO is for internal Inventory tracking only)
Go to Purchase Orders
Jump ahead to:
- Search Page Filter Options
- Create a Purchase Order
- Waiting List
- Purchase Order (Message, Print, etc.) and Outcome
- Return Items to Vendor
- Receive Partial Quantity
Search Filter Options
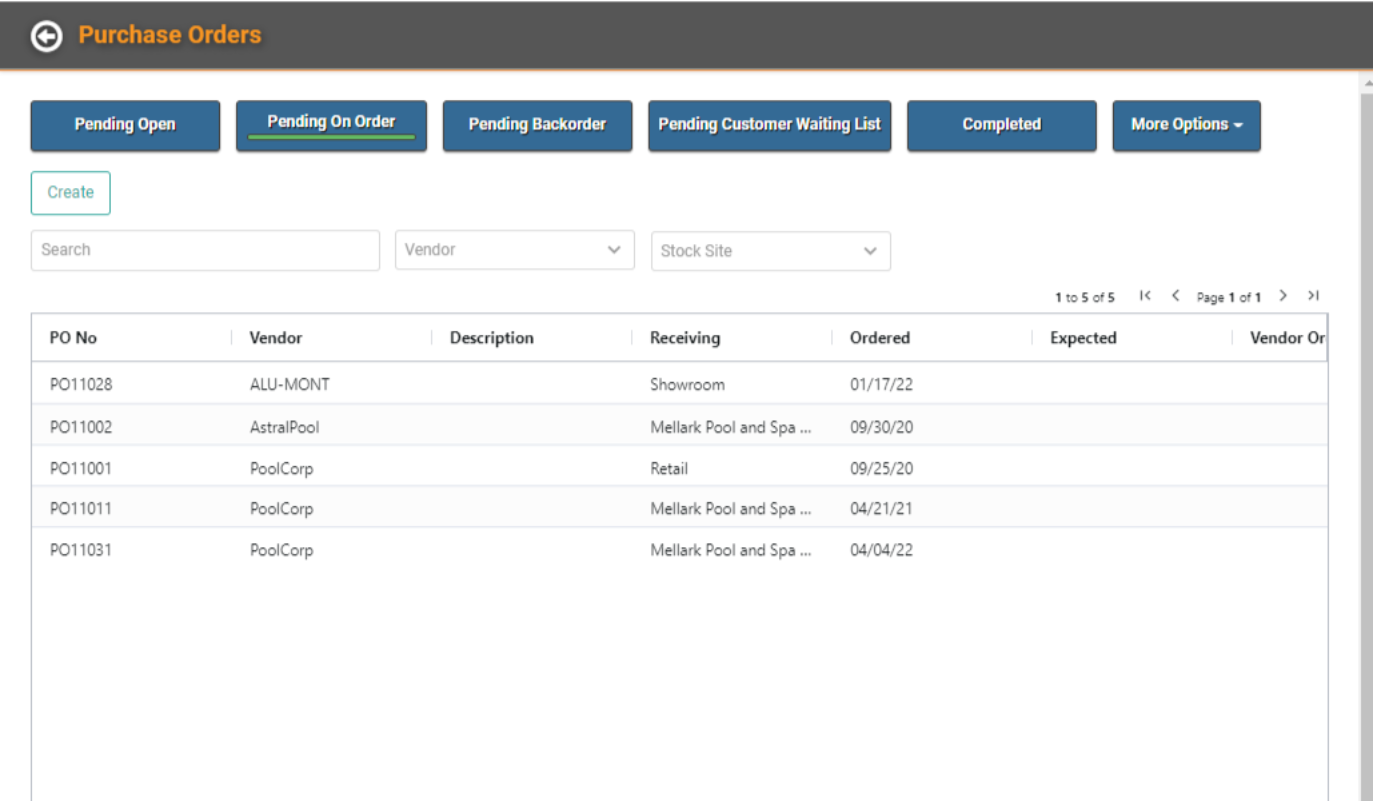
On the main Purchase Orders page, there are buttons along the top which allow you to choose which POs you want to see.
- Pending Open: These POs have been started but have not been placed On Order.
- Pending On Order (Default landing page): POs which have been placed On Order. This means you’ve contacted the Vendor to order the SKUs.
- Pending Backorder: The items on these POs are backordered with the Vendor.
- Pending Customer Waiting List: These POs have a Customer Wait List.
- Completed: POs on which you’ve received all inventory and the Purchase Order status is Complete.
- More Options (which includes Voided Purchase Orders): Several other features throughout LOU that are related to Purchase Orders.
No matter which group of POs you’re viewing, there are additional filtering options in a couple of dropdowns on the page. 
You can filter for a specific Vendor and/or a specific Stock Site and enter a keyword search in the search box. The grid also allows you to perform the same filter, sort, and export features available in LOUs Reports.
POs are important records and cannot be removed or deleted. The filtering options are essential in helping you locate the POs you need fast.
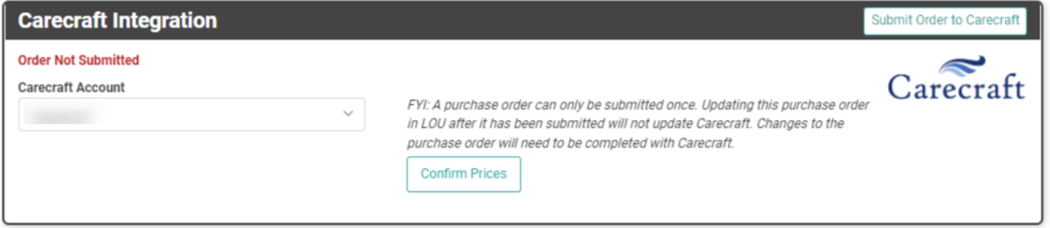
IMPORTANT! For most of your POs, you will need to submit the PO to the Vendor outside of LOU. Purchase Orders in LOU are primarily intended for Inventory tracking purposes. Exceptions for this include our Integrations for Pool360 and Carecraft which do allow for electronic submission of the Purchase Order.
Actions
The Actions link on the Purchase Order line item allows you to open the Purchase Order Profile, go to the Vendor Profile, Print the Purchase Order, or Receive the Inventory in the Purchase Order. 
Create Purchase Order
- To create a new Purchase Order, click

- Choose the necessary information from dropdowns or enter it in the fields provided. Vendor, Department, and Receiving Stock Site are the only required fields. The remaining fields are optional.
- Purchase Order Description: A brief description of the Purchase Order. Nor more than a sentence or two.
- Vendor Order Number: If you have this information already, you can enter it here.
- REMEMBER! This field is for your information only. It does not affect Inventory or any other area of LOU.
- Notes: These are not internal notes. If you print or electronically send the Purchase Order, they will be visible.
- Expected Date: This is the date you are expected to receive the order.
- Confirmed Date: This is the date the order is confirmed by the Vendor.

- Click

The Purchase Order will display on the Purchase Orders page with a status of Pending and you will be automatically taken to the Purchase Order Profile Screen.
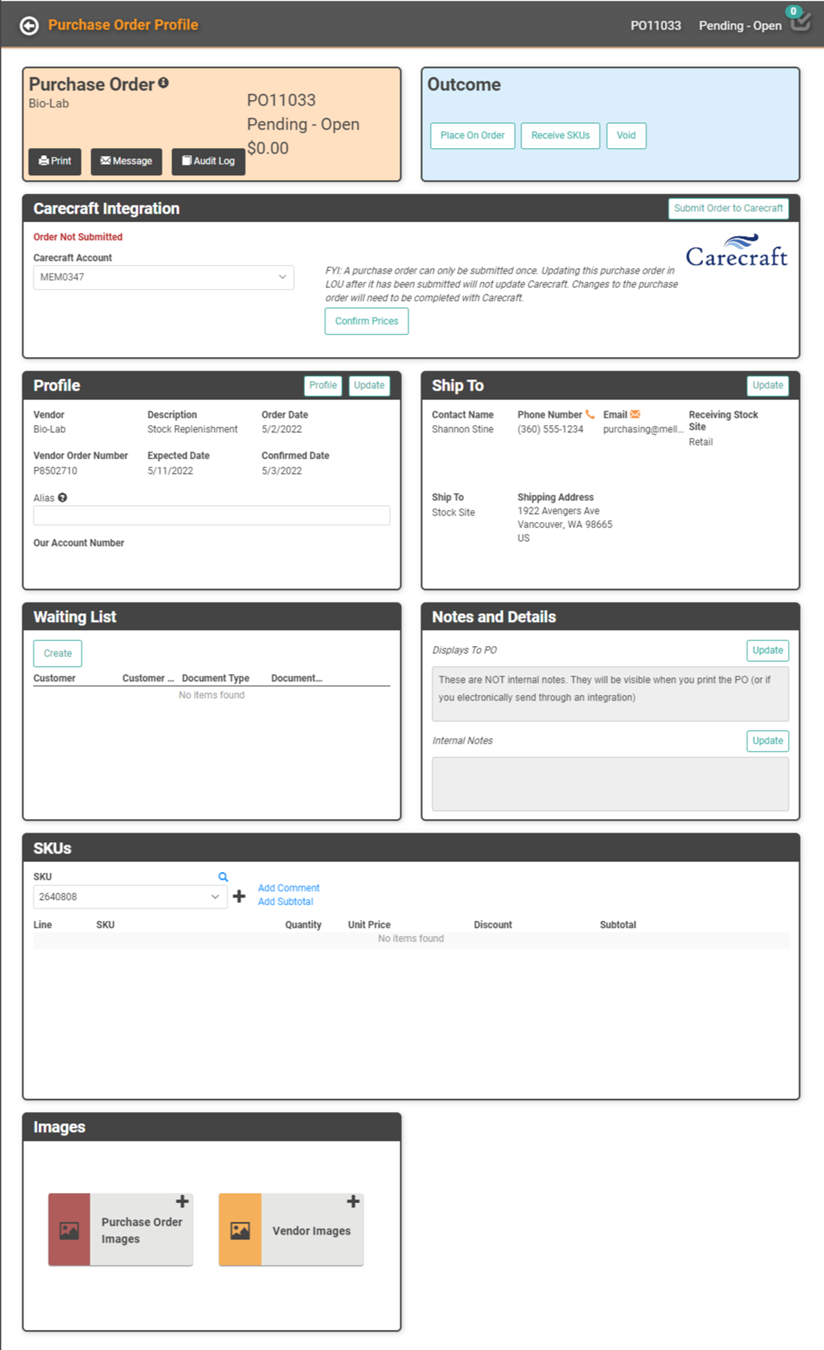
We’ll look at the two top boxes – Document Type and Outcome – last.
Pool360 and Carecraft Integration
LOU can submit POs electronically for the integrations only. Non-integration POs will need to be submitted manually, outside of LOU, according to the Vendor’s preferred submission method.
Profile and Ship To
We’re going to get back to the Purchase Order and Outcome boxes at the top. For now, let’s start with Profile and Ship To.
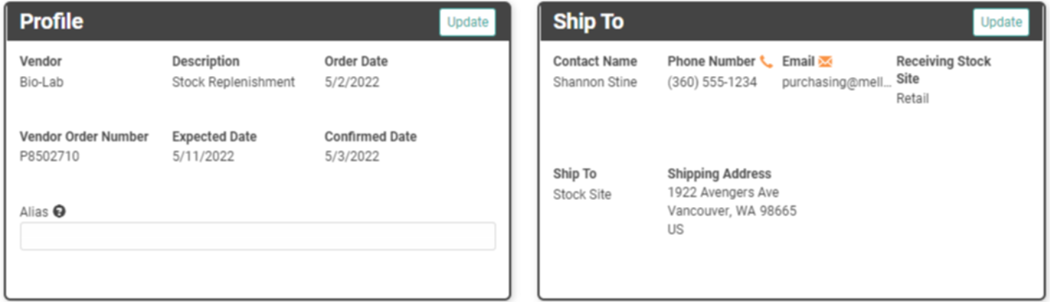
The Profile box has Vendor Profile information and other information regarding this order. You can click ![]() to add or change information in this box. The Profile Update box will open.
to add or change information in this box. The Profile Update box will open.
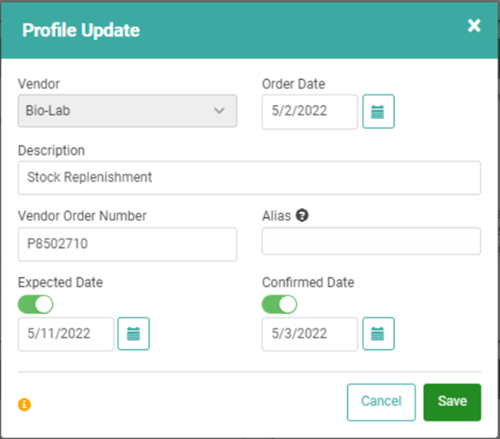
You cannot change the Vendor name, but you can add a description for the order, add an alias and Vendor Order Number for the Order, and set the Expected and Confirm Dates. Once you’ve entered the information, click ![]() to return to the Purchase Order Update Screen.
to return to the Purchase Order Update Screen.
The Ship To box contains information about you and where you want the order shipped. You can add or update information in this box by clicking ![]() . The Ship To Update window will pop up.
. The Ship To Update window will pop up.

You can change the Receiving Stock Site, Delivery Method, Contact Name and Information, and the Address.
The Delivery Method will default to Do Not Drop Ship, meaning it will ship to the Receiving Stock Site. On occasion, you may place an order with one of your Vendors that you want delivered to another location instead of the Receiving Stock Site. You can choose Drop Ship to Customer to send it straight to the Customer or Drop Ship Other to enter an address. The product(s) will still be counted in the Receiving Stock Site Inventory, but they won’t physically arrive at the Stock Site.
Once you’re satisfied with the information on this pop-up, click ![]() .
.
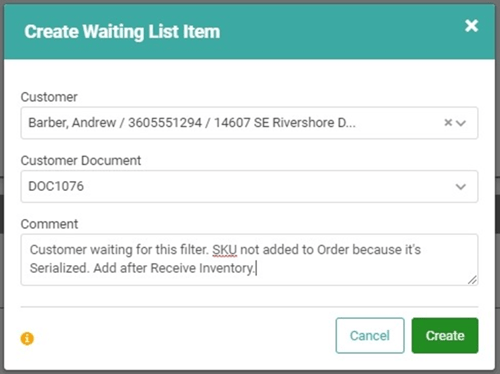
Waiting List
You can create Waiting Lists and attach customers to this PO to give them priority access to the products in the order.
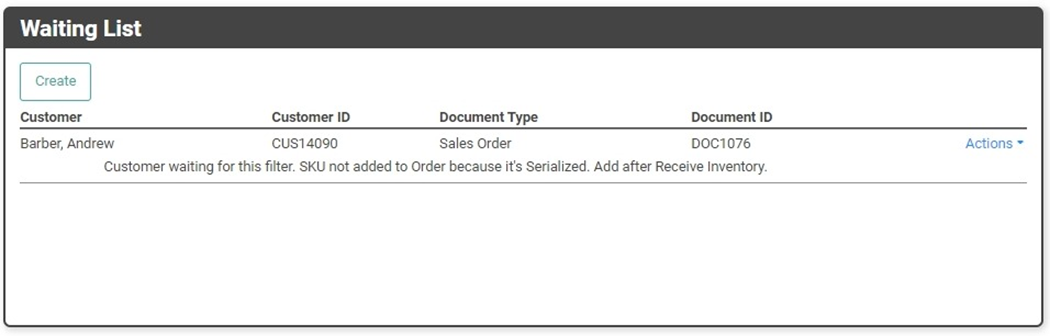
When you have pending Sales Orders for products which are not currently in stock, you can create a Waiting List attached to the PO for that product. When you receive the product into inventory, priority will be given to those Customers on the Waitlist.
- Click

- In the pop-up, select the Customer and pending Sales Order for that Customer which you want associated with this PO.
- REMEMBER! The Customer dropdown will show all your Customers.
- REMEMBER! The Customer dropdown will show all your Customers.
- You can enter a Comment if you want.
- Click

The Sales Order will now be associated with this PO and the Customer will have priority to receive the product on the PO when it’s received into your inventory. On the Purchase Order profile, you’ll see the Customer Name and ID, Document Type and ID, and the SKU they’re waiting for.

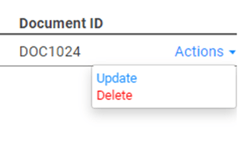
If you need to make changes to the Waiting List line item, you can use the Actions link to Update or Delete the Waiting List line item.
Once you create a Waiting List, that Customer will appear in the Pending Customer Waiting List page.

The PO is accessible from the Customer’s Order Profile in the SKU box, in the Actions menu.


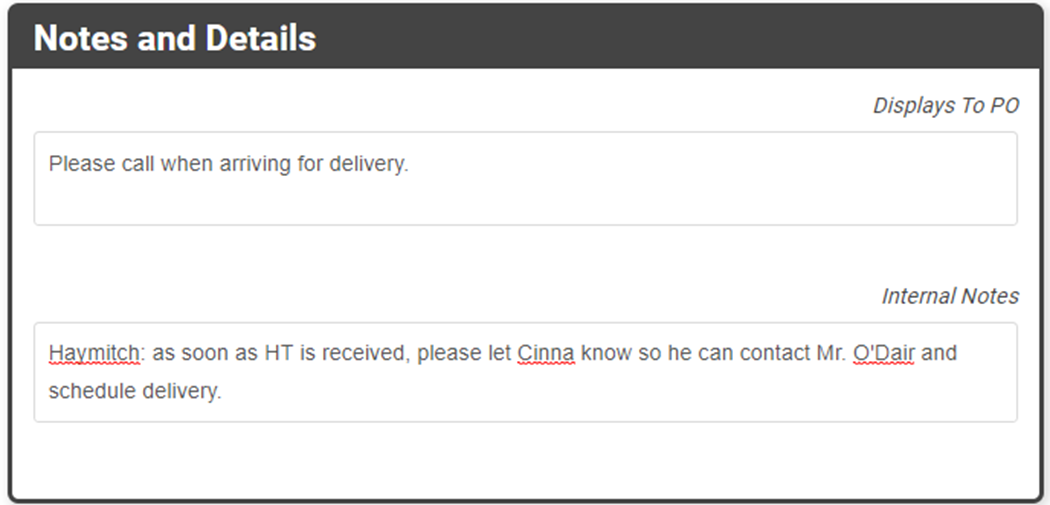
Notes and Details
In the Notes and Details box, you can enter notes which will appear on the PO, visible to the Vendor, and internal notes which are only visible to you and your users.
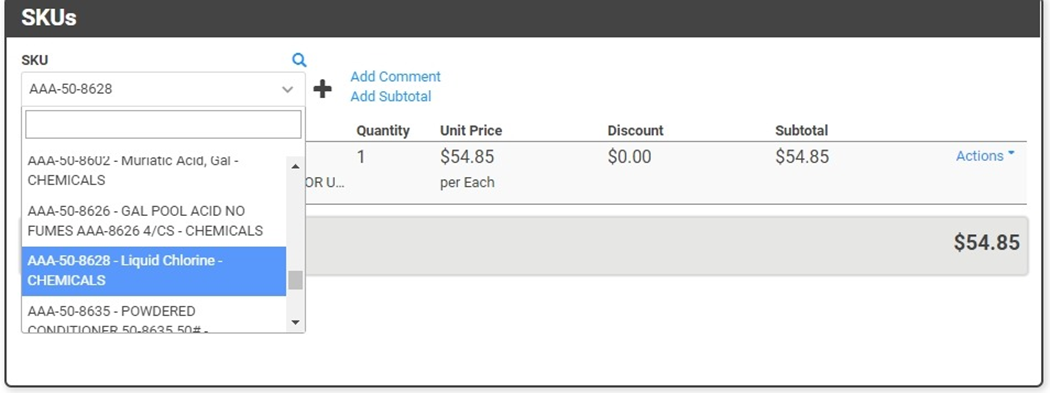
SKUs
The SKUs box allows you to add the SKUs for your PO. You can add SKUs two different ways.
- You can select the SKU from the dropdown and click the plus sign to add the SKU.
- To add multiple quantity, click Actions and Update, then change the quantity. (You cannot update quantity on Serialized SKUs. Each quantity must be its own line item for Serialized SKUs so that Serial Numbers can be correctly tracked when receiving inventory)
- You will need to search for every SKU and use the plus sign to add each time.
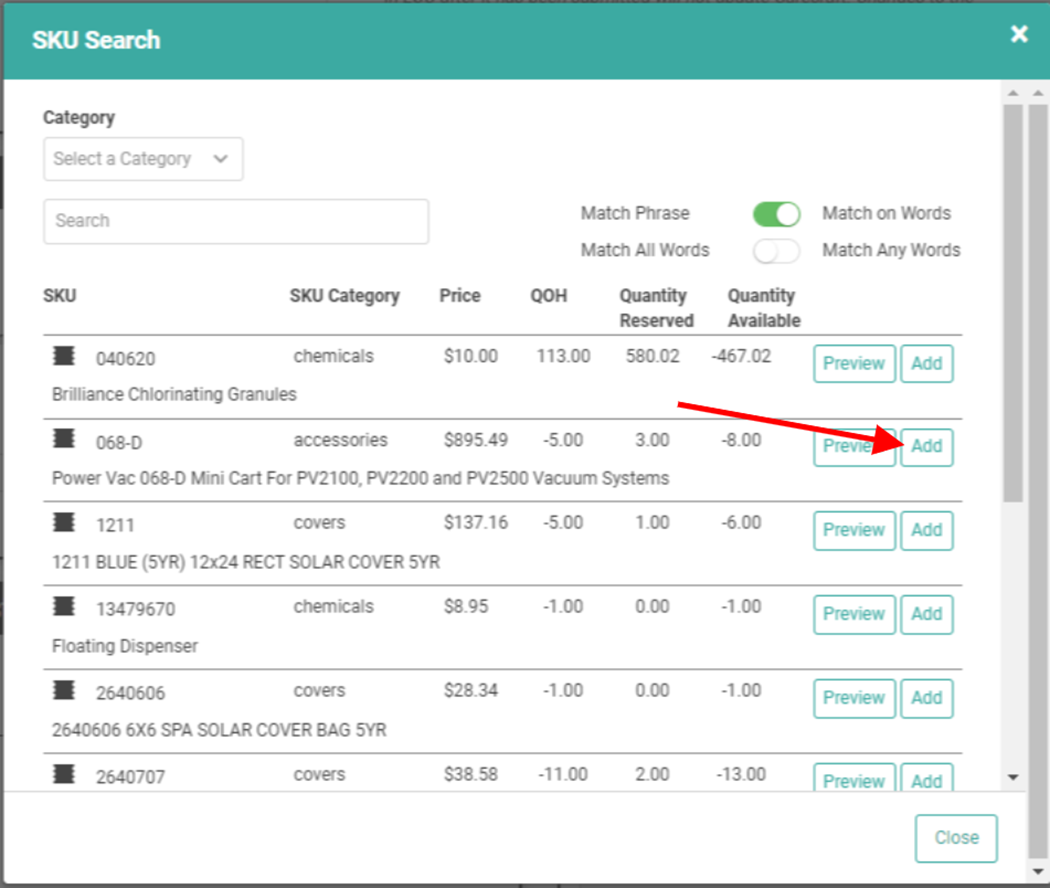
- You can click the
 magnifying glass to open a SKU Search window to add SKUs.
- For most SKUs, the magnifying glass is going to be easier and quicker than the dropdown.
- On this pop-up, you can filter for Category and search on the exact Phrase or on Words. With Words selected, you can choose to match on all words or any of them. As with any basic search, all words will only return results that include every word you type. Any words will return results that include any combination of the words you type.
- Once you find the SKU, you can click Preview to see the SKU Details. Click Add to add the SKU to the Order.
- For multiple quantities of a single SKU, simply click Add the number of times you want to add the SKU. This will create a unique SKU line for each Quantity rather than a single SKU line with multiple quantity.
IMPORTANT! If you have created a unique SKU that varies from the Vendor’s SKU for My SKU, when you add the SKU to the Purchase Order, the SKU displayed will change from My SKU to the Vendor SKU because the Purchase Order is related to the Vendor. SKUs will be tracked through Vendor information on Purchase Orders. This includes UOM and Cost.
The Actions link next to the SKU line item allows you to Update or Delete the SKU and Update the SKU Vendor Cost.
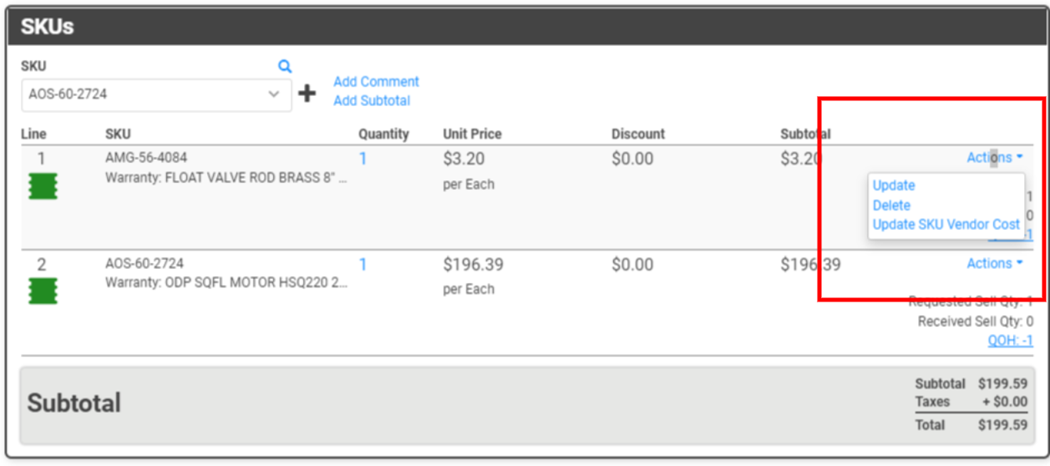
To Update the SKU, select Update. This allows you to make many of the same changes to the SKU you would on an Order for your Customer.
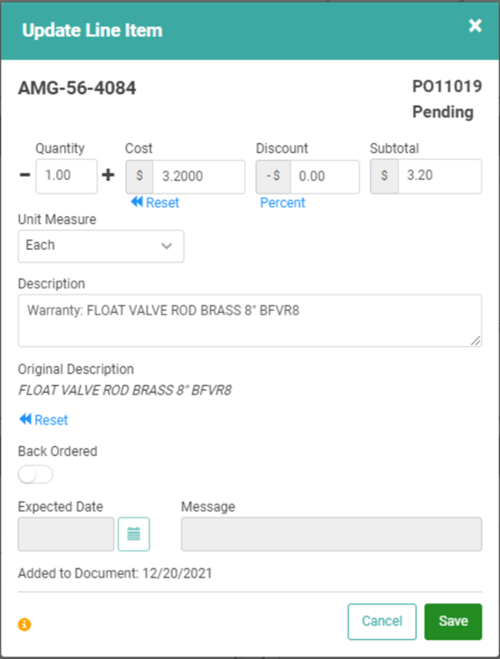
For non-Serialized SKUs, you can use the Quantity field to update the quantity you wish you order. For this PO only, you can change the Cost, apply a Discount, including a Percentage Discount, and view the Subtotal after applied Discounts. The UOM can be changed, as well as the Description.
REMEMBER! All these changes to the SKU apply to this Purchase Order only. These changes will not change the SKU Profile, affect pending Orders, or apply to additional POs.
If you receive word from the Vendor the SKU is backordered, you can toggle the Backorder button on. You can add an Expected Date, a brief message related to the Expected Date, and toggle the Taxable button.
IMPORTANT! Discounts should only be applied if approved by the Vendor.
Serialized SKUs do not allow you to increase or decrease the Quantity in the line item update because they require serial numbers upon receipt. Instead, there is a button that indicates whether you are buying (Sale) or returning (Return) the Serialized SKU.

Purchase Order Quantities and UOM vs Inventory Quantities and UOM
When you’re adding SKUs to a Purchase Order and determining the quantity to order, the SKUs are being reflected as the Vendor UOM and the quantity of that UOM you want to order. Oftentimes the Vendor will sell a SKU in a greater UOM than you sell it. For example: you may order 5 cases of 200 and sell the items in the case as Each. That means you’re ordering a Quantity of 5 on the PO, but your Inventory will reflect a quantity of 1000 after you receive them. Keep this in mind as you’re working with Purchase Orders and the Receive Inventory process.
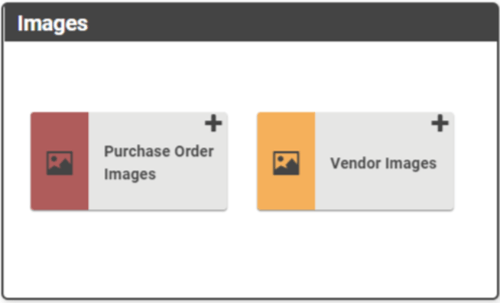
Images
As with other Documents in LOU, you can add Images. Purchase Order Images are specific to the contents of the specific Purchase Order. Vendor Images are on the Vendor Profile.
REMEMBER! Images added to the Purchase Order will also be added to the Vendor Profile. Images added to the Vendor are accessible on the Purchase Order – through the Vendor Images tile, but will not be added to the Purchase Order Images.
Purchase Order and Outcome
Jumping back up to the top two boxes, the Purchase Order box displays information about the PO, including Status, Document ID, and Total. The Outcome box allows you to select the Outcomes for the PO.

- Print: Allows you to print a physical copy of the Purchase Order
- Message: Allows you to send an email with a .pdf attachment of the Purchase Order to your Vendor.
- IMPORTANT! The Vendor Profile must have a Sales Contact Email.
- Audit Log: View an Audit Log of actions taken on this Purchase Order.
- Place on Order: Update the Status of the PO to On Order to indicate the Vendor has the PO and you’re awaiting receipt of the SKUs.
- Receive SKUs: Once you have physically received the SKUs, you can Receive them into LOU.
- Void: Cancel the PO. You’ll need to choose an Outcome Reason.
Once you have placed the PO On Order, the Outcome box will change to reflect the PO’s status as a Read Only document and add some additional Outcome options.

- Close: If you have received SKUs and you are not going to receive any additional SKUs, you can use this to essentially Force Close the PO with no further action. If you have not received any SKUs, you must use Void to cancel/close the PO.
- Receive SKUs: Once you have physically received the SKUs, you can Receive them into LOU.
- Search Receipts: View the Purchase Receipts created when you receive SKUs on the Purchase Order.
- Void: Cancel the PO. You’ll need to choose an Outcome Reason.
- Set Status back to Open: If you need to make a change to the PO for any reason, and you have not received any SKUs on the PO, you can set the status back to open to make changes.
REMEMBER! Changing information in the PO can impact financial transactions and inventory. Make sure any changes you’re making are correct and necessary.
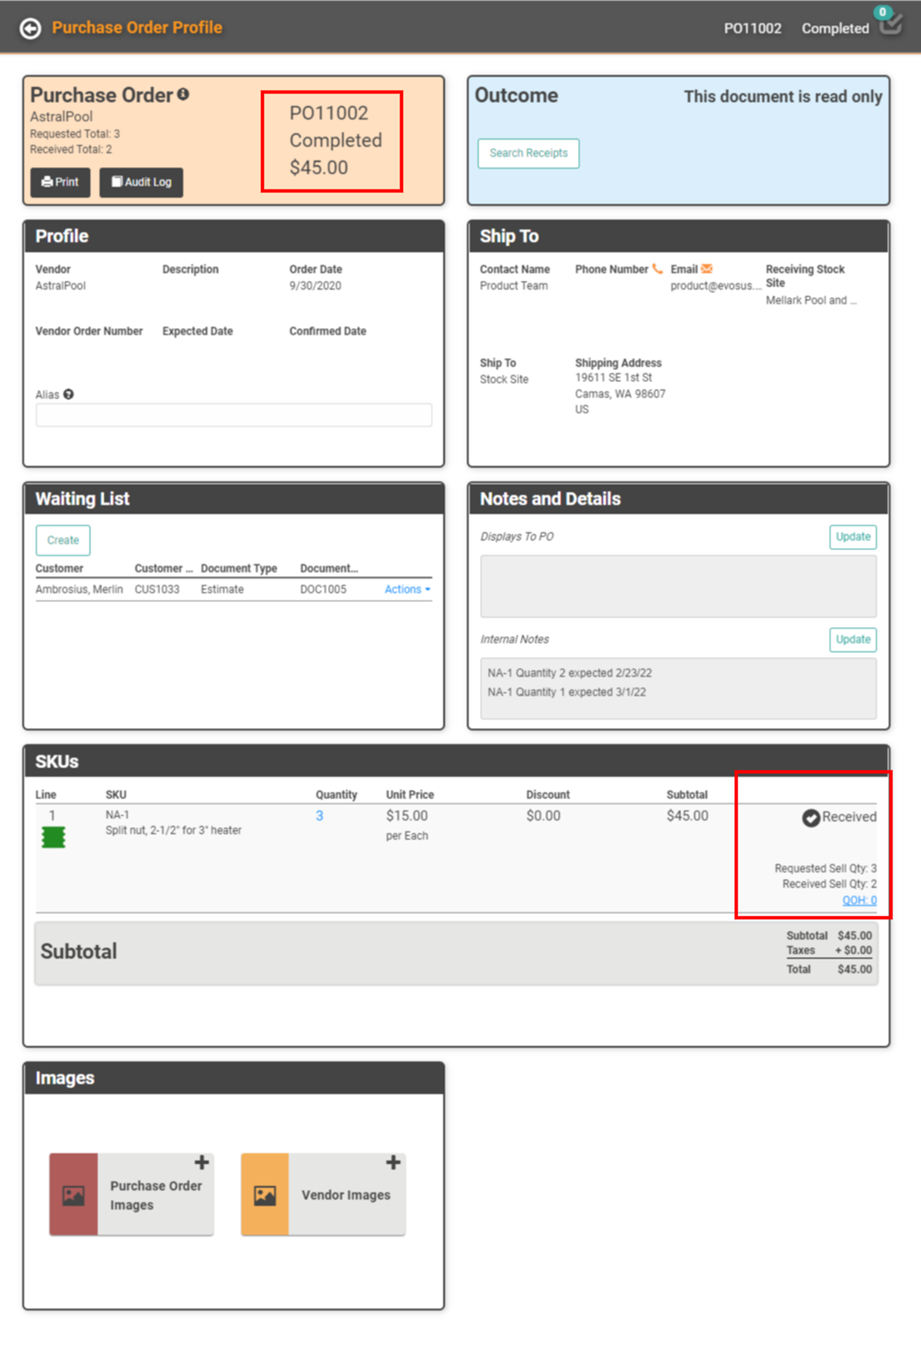
Completed Purchase Orders
Once you’ve received all the SKUs on the Purchase Order in Receive Inventory, the Purchase Order Status is automatically updated to Completed and each SKU line on the Order will show a checkmark and Received, the most recent Received Date, and the Requested Quantity and the Received Quantity. There will also be a link to the current QOH. If the SKU is serialized, the Serial Number will also be displayed.
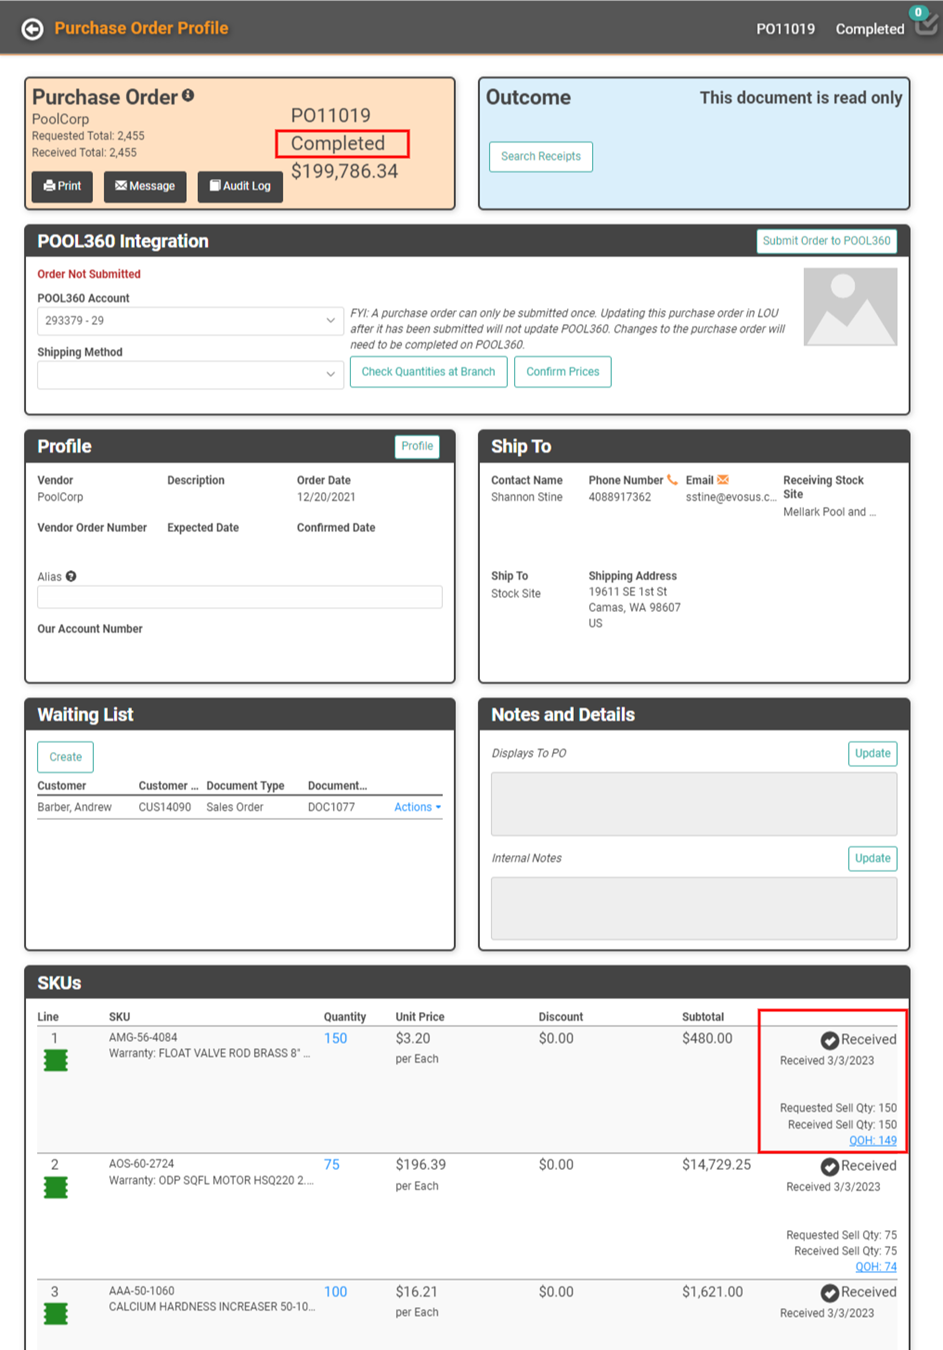
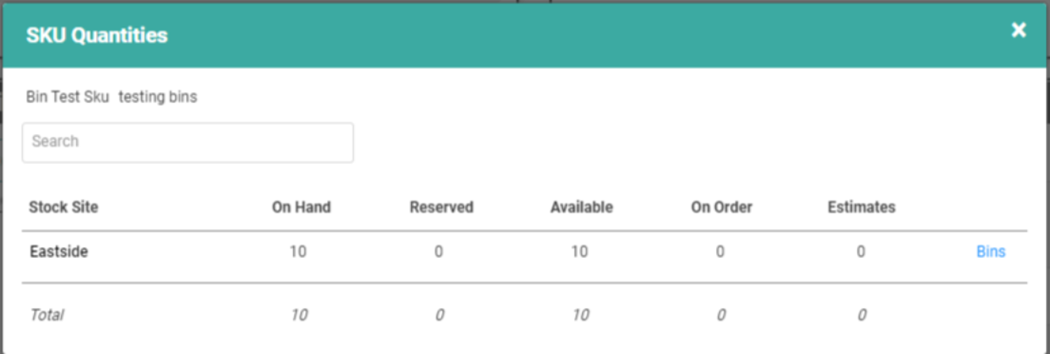
When you click the link to see the current QOH, it will show you the SKU Quantities for that SKU in the receiving Stock Site.
Return Items to a Vendor
On occasion, you may need to return an item to a Vendor. You can do so in LOU by creating a PO with a negative quantity for that SKU.
Follow the steps to create the PO. When adding SKUs, click the Actions link and Update next to the SKU. In the Quantity field, make the quantity negative by either entering a negative sign (-) and the number, or clicking the minus sign to reduce the quantity to negative.

The information will update to reflect negative amounts. Once you’re done, click Save. The PO will reflect a negative quantity and amount.

Serialized SKU Returns
When a SKU is Serialized and needs to be returned, the process is slightly different. Just as you cannot manually change the quantity on a Serialized SKU to add additional SKUs to a PO, you cannot update the quantity to be negative. Instead, you can toggle the Sale button to Return. On the Serial line item, click Actions and Update, then toggle the button to Return.
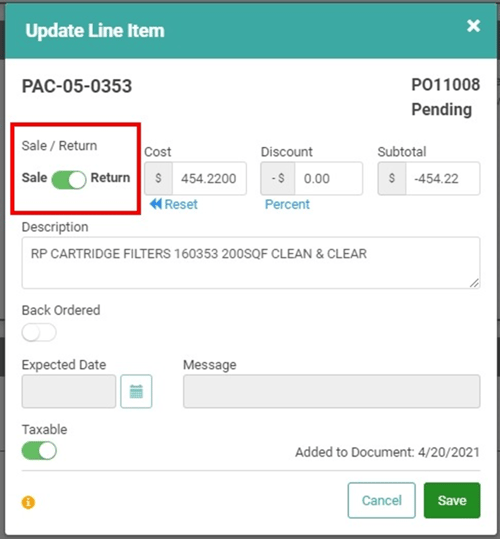
The amounts will change to negative. When you’re finished, click Save. The SKU will be updated to reflect a negative and will say Return under Quantity instead of Sale.

Receive Partial Quantities
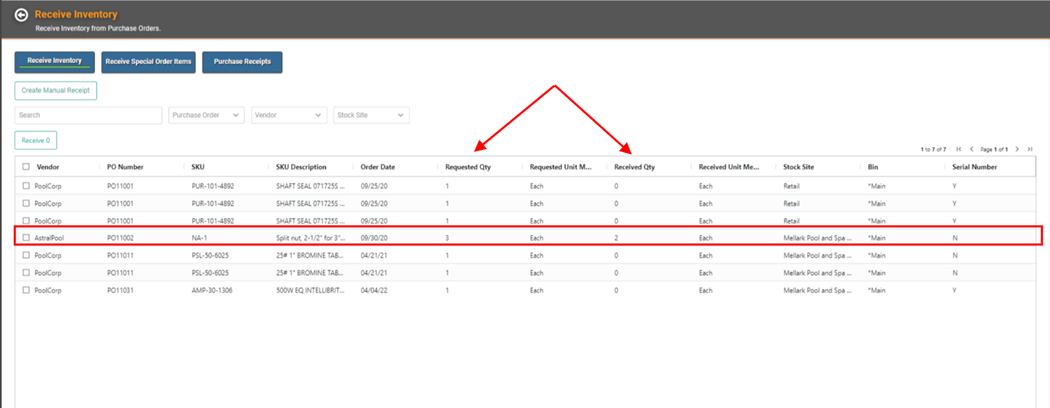
Sometimes, the Vendor will short you on a SKU. The Receive Inventory process allows you to update the Quantity to reflect what’s received. This reflects on the Purchase Order SKU line item. The Requested Quantity will remain unchanged and the Received Quantity will reflect the quantity you actually received.
If you received a quantity less than requested, the Purchase Order Status will update to Pending -- Receiving and the SKU will not be updated to say Received because there is a still a quantity outstanding.

The Purchase Order will remain in the Pending On order tab until you receive the rest of the quantity outstanding. The SKU will remain on the Receive Inventory page as well. The Requested Qty will reflect the ordered amount and the Received Qty will reflect what you’ve already received.
When you physically receive the quantity outstanding from the Vendor and receive it into your inventory, the Purchase Order will update to Completed and the SKU line item on the PO will reflect Received and the quantities requested and received.
If you will not be able to receive the rest of the quantity and you want to complete the PO with only a partial amount received, click Close on the Purchase Order Profile Outcome box.

You will receive a message telling you all the SKUs have not been received and asking if you want to close the Purchase Order and void the remaining SKUs.

Click Yes to proceed. The outstanding quantity will be void, the PO will be marked as Completed, and the SKU line item will reflect Received.
The SKU will be removed from the Receive Inventory page as well. The Purchase Receipt will reflect the quantity you received.