
You’re not required to create a unique Serialized SKU for every combination of Attributes and Answers for a Special Order Item (SOI) SKU. You may choose to create a Serialized SKU for each configuration, but it’s not required.
When you receive an SOI, you only need to create the Serialized SKU the very first time you ever receive an item using that SOI. When you receive additional items for the same SOI SKU, you have the option to either use the Serialized SKU already created OR create a new one and receive the item with that new SKU.
Some clients prefer to be specific and have a Serialized SKU for each combination/configuration of the Special Order Item while others are content to be more generic and use just one or two Serialized SKUs for each SOI. The Attributes/Answers for the SKU are included on the Serial Number page for the Serialized SKU after the SOI is received into inventory and converted to a Serialized SKU.

The Special Order Item SKU is not eligible for Use Tax. However, remember that the SOI SKU Type is just a placeholder that allows you to configure Attributes and create a PO to buy the customized item from your Vendor. Once it’s received, it becomes a Serialized SKU and this SKU Type is eligible for Use Tax.
Workflow Key Steps
The example workflow below is an example of how to use an SOI SKU and Use Tax.
(We’re assuming the Tax Setup portion, including Use Tax, is already complete on your DB.)
Part 1: Create the SOI SKUs in Your Inventory
Part 2: Add an SOI to an Order and Follow the Lifecycle of the Transaction
Part 3: Receive SOI into Inventory
Part 1: Create the SOI SKUs in your Inventory
You’ll need to do this for every SOI you offer. Since some SOIs may have many Attributes and Answers, this can be the most time-consuming part. But once it’s done, you’ll be on Easy Street!
- First you need to create your SOI SKU.
- Go to Inventory, select New SKU, choose Special Order Item.
- Fill in the information much like you would other SKU Types. My SKU is whatever you want, a brief Description as generic as possible because this is before you’ve configured it, UPC if there is one, Category, Vendor info, Sell info.
- REMEMBER! Everything at this stage is generic and should work for every configuration. Cost and Price may be 0 because the Attributes define price OR you may have a base price and the Attributes increase the price.
- Once the SKU is created, you need to define the Attributes and Answers.
- On the SKU Profile, click SKU Attributes.
- Create the Attributes and Answers that apply to this SOI.
Once you’ve done this, your SOIs are ready to be used on Estimates and Orders.
REMEMBER! You won’t create Purchase Orders for them, yet, nor do you need to ensure QOH in Inventory before adding them to Orders. The SOI will help initiate the Purchase Order process.
Part 2: Add an SOI to an Order and Follow the Lifecycle of the Transaction
You’ve created your SOIs and now your Customer is asking for the item. This example is going to start at the Sales Order for simplicity. But adding the SOI to an Estimate would be the same process.
- Create your Sales Order
- Update the Tax Code in the Profile Box to the Use Tax Code.

- Click Update
- Select the Use Tax Code from the dropdown
- Click Save
- Under SKUs, find your SOI and add the item.
- Choose answers for each Attribute on the SOI.

- Choose answers for each Attribute on the SOI.
- Click the Actions button on the SKU box and select Purchase Order.
- Click the checkbox next to the SOI SKU you want to Order
- Click Create Purchase Order
- On the Pending Purchase Orders pop-up, you can choose to add this SOI SKU to another Pending PO or you can click Create New Purchase Order to create a PO for this SOI
- If you choose new PO, choose the appropriate information from the dropdowns and fill in optional information on the Create Purchase Order pop-up
- Click Create
At this point, you will have a Purchase Order Profile with the SOI SKU added and the Customer’s Sales Order on the Waitlist.

- If you want to update any additional information on the Purchase Order, you can make those adjustments or additions to the Purchase order Profile.
- Once you’re satisfied with the PO, place it on order.
- If you haven’t already placed the order with the Vendor, be sure to do so.
Part 3: Receive SOI into Inventory
Once you’ve physically received the item, you need to Receive Inventory in LOU.
- You can click Receive SKUs on the Purchase Order Profile. You can also go to Receive Inventory and click the Receive Special Order Items button.
- On Receive Special Order Items, locate the SKU you want to receive.
- Double-click the SKU or click the Actions link and select Receive.
- If you’ve already received the SOI and created a Serialized SKU you want to use to receive this item, double-click the SKU on the list or click the Actions link and select Receive Using this SKU.

- On the Receive Special Order Item pop-up, enter the Serial Number (using Customer Name is a great idea!)
- If you need to change the Receiving Stock Site and Bin, you can choose a different choice from each dropdown.
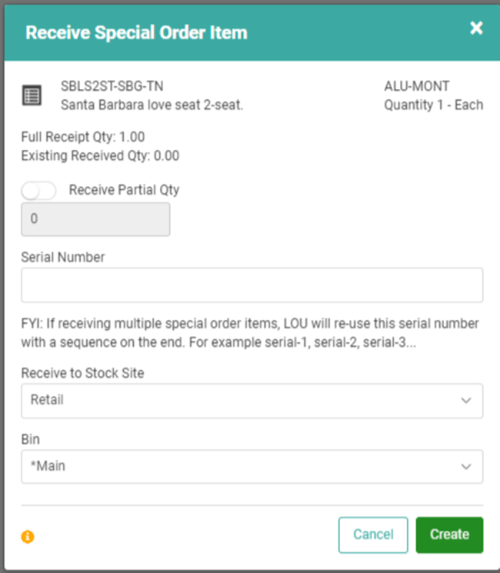
- Click Create.
As soon as you click Create, the item will be received into inventory, removed from the Receive Inventory screen, and the SOI SKU will be replaced on the Order with the Serialized SKU you just received.
Part 4: Complete the Order with the Serialized SKU
Now that you’ve received the item, you’re ready to complete the Order. The Attributes/Answers are no longer on the Order, but you can easily add them by creating a comment on the SKU box.
- If you need to grab the Attributes/Answers from the PO, grab the PO ID so you can quickly locate it.
- On the Receive Inventory page, click the Purchase Receipts button.
- Locate the SKU you just received and double-click the line item
- Copy the Purchase Order ID
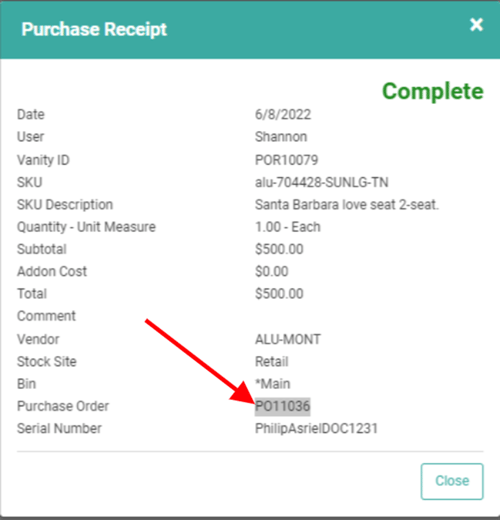
- Go to the Purchase Order tile, click Completed
- Paste the ID in the search box and press <Enter>
- Open the PO and copy the Attributes/Answers
- In the Waitlist box, click actions on the correct Order line item and select Order Profile
- On the SKU box, click Actions and Add Comment
- On the Comment line that appears on the SKU box, click Actions and Update
- Paste your Attributes and Answers in the box and click Save.
On our example Order, we added our Use Tax Code to the Profile box on the Order so that it would utilize Use Tax on the Order. We also followed the steps above.
Order Profile View

Printed Document View
