
Pick Lists are an easy way to make sure all the Inventory, Non-Inventory, and Serialized SKUs you need for the day are on your service vehicle. There are two ways to create a Pick List: From an Order or through the Transfer Inventory to Vehicles process.
IMPORTANT! Since you create Pick Lists from Orders, this includes REOs. You do not need to go to the Recurring Order setup page to create a Pick List for REOs.
Pick Lists are not required to fulfill orders. This feature is a convenience feature intended to help you efficiently and quickly move Inventory for your Service Personnel.
Group Security: There are a few Security Permissions associated with Pick Lists which you can use to allow or restrict access to aspects of this feature. Head to Group Security for more information.
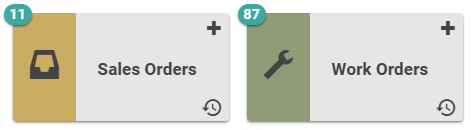
Go to Sales Orders or Work Orders
Create a Pick List from an Order
A message will pop up and give you a Pick List Summary, indicating what Pick Lists have been created.
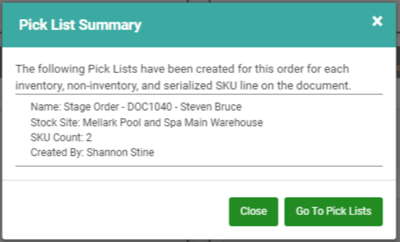
If you are ready to proceed with the Pick List, you can click Go to Pick Lists. Otherwise, click Close to return to the Order.
REMEMBER! Pick Lists will only include Inventory, Non-Inventory, and Serialized SKUs.
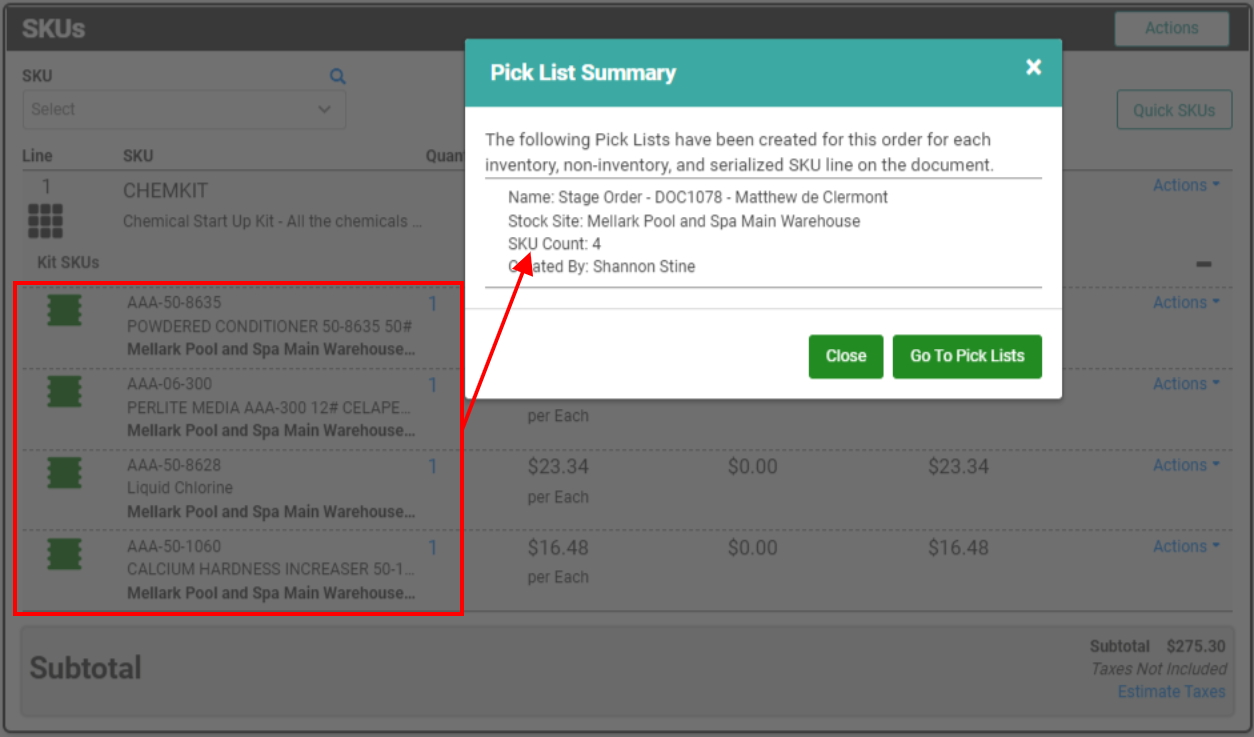
Kit SKUs
When you add a Kit SKU to an Order and your Kit includes SKUs that are Inventory, Non-Inventory, or Serialized, those individual SKUs will be included in a Pick List created for that Order.
Special Order Items
Special Order Items are unique in that they are not typically maintained in Inventory. The Special Order Item SKU does not represent physical inventory and does not behave in LOU the same way physical inventory SKUs (Inventory, Non-Inventory, and Serialized SKU Types) would. Since there is a special process for ordering these SKUs, they cannot be included on Pick Lists.
Once you’ve processed the Special Order Item Purchase Order and received it into Inventory, the resulting Serialized SKU which appears on the Customer’s Order can be included on a Pick List.
Services and Labor and Trade SKUs
Since these SKU Types do not represent physical product, they are not included in Pick Lists.
Go to Warehouse / Pick Lists
Pending Pick Lists
Once you’ve created the Pick Lists, it’s time to go pickin’!

When you click on the Pick Lists tile, or click Go to Pick Lists from an Order, you land on Pending Pick Lists. These are lists that have been created but not yet assigned or started.
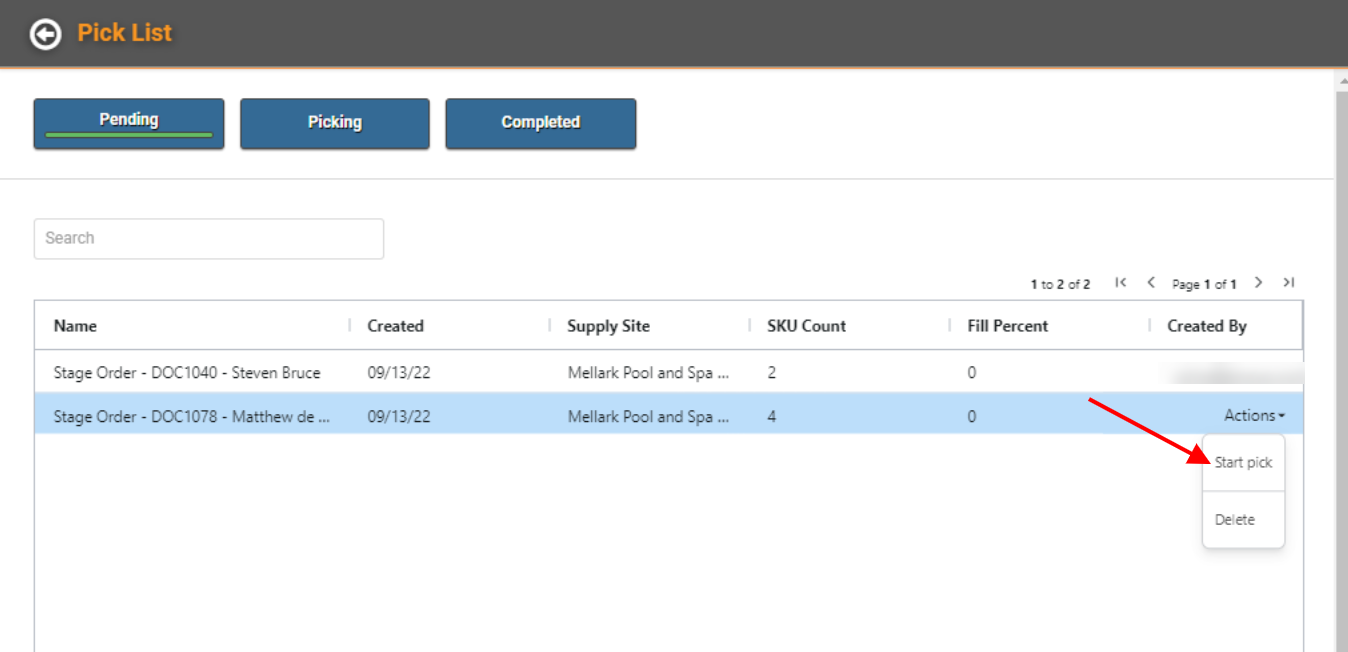
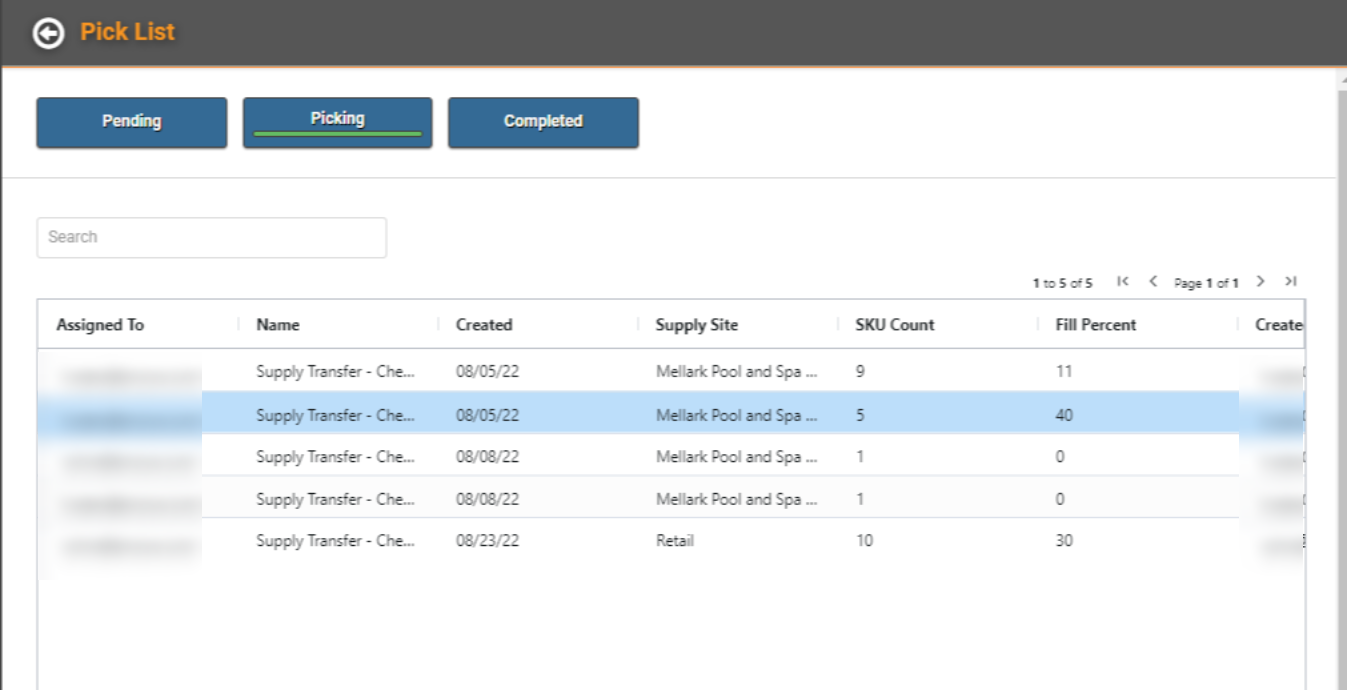
As soon as you click Start Pick and confirm that you do want to assign the Pick List to yourself, you will land on the Picking page which will list all the Pick Lists currently assigned to you.
REMEMBER! You cannot assign Pick Lists to other users or take Pick Lists that are assigned to other users. However, you do not have to create the Pick List to assign it to yourself.
Unassign a Pick List
If you assigned a Pick List to yourself, but you are unable complete it or assigned it by mistake, you can unassign it and it will return to the Pending Queue so that another user can assign it to themselves.

IMPORTANT! Admins do not have the ability to assign or unassign Pick Lists for other users. All users, admin or not, can only assign and unassign Pick Lists for themselves.
Picking a Pick List
To complete a Pick List, you need to pick the items on the list. You can refer to the list while you go pick the SKUs two ways.
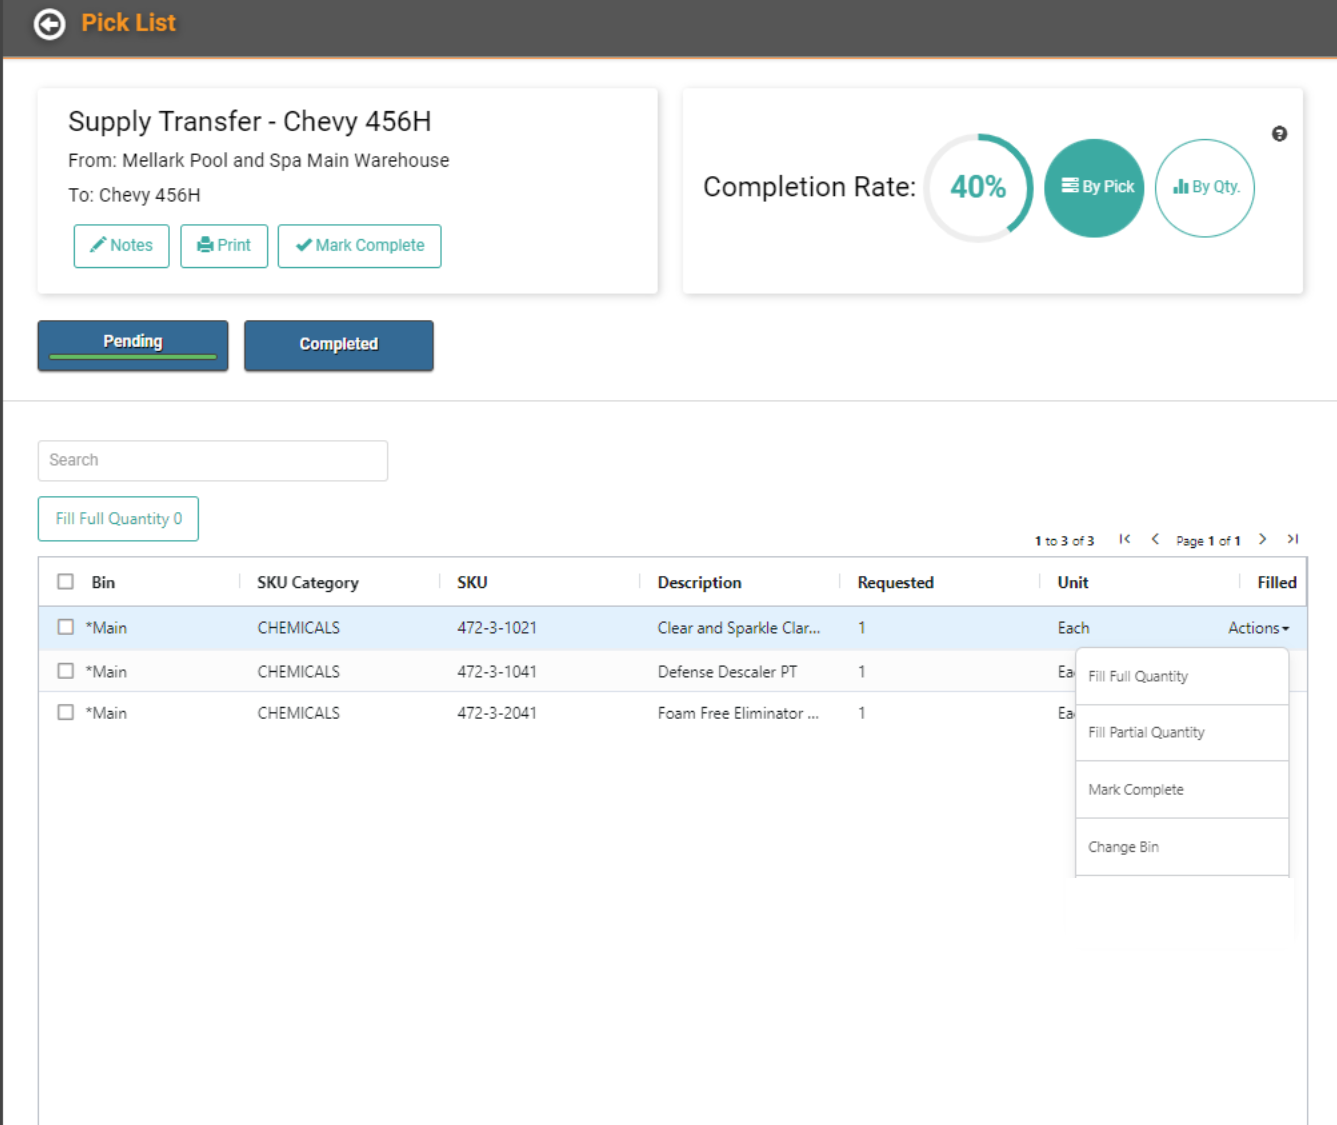
Once you click Fill Full Quantity or Fill Partial Quantity, the Completion Rate will increase and the SKUs will move to Complete if you filled Full Quantity. If you filled a Partial Quantity, the Filled amount will reflect onscreen, but the SKU will remain until the full requested amount has been filled.
Fill Partial Quantity
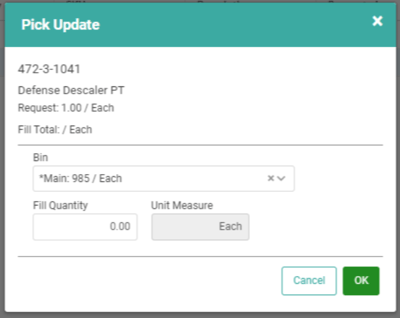
When you click Fill Partial Quantity, a pop-up will allow you to select the Bin and enter the Quantity you’d like to fill.
Notes
On the upper right, there is a Notes button which opens a Notes box allowing you to enter Notes pertaining to the Pick List.
REMEMBER! The only place these Notes show is on this Notes box.
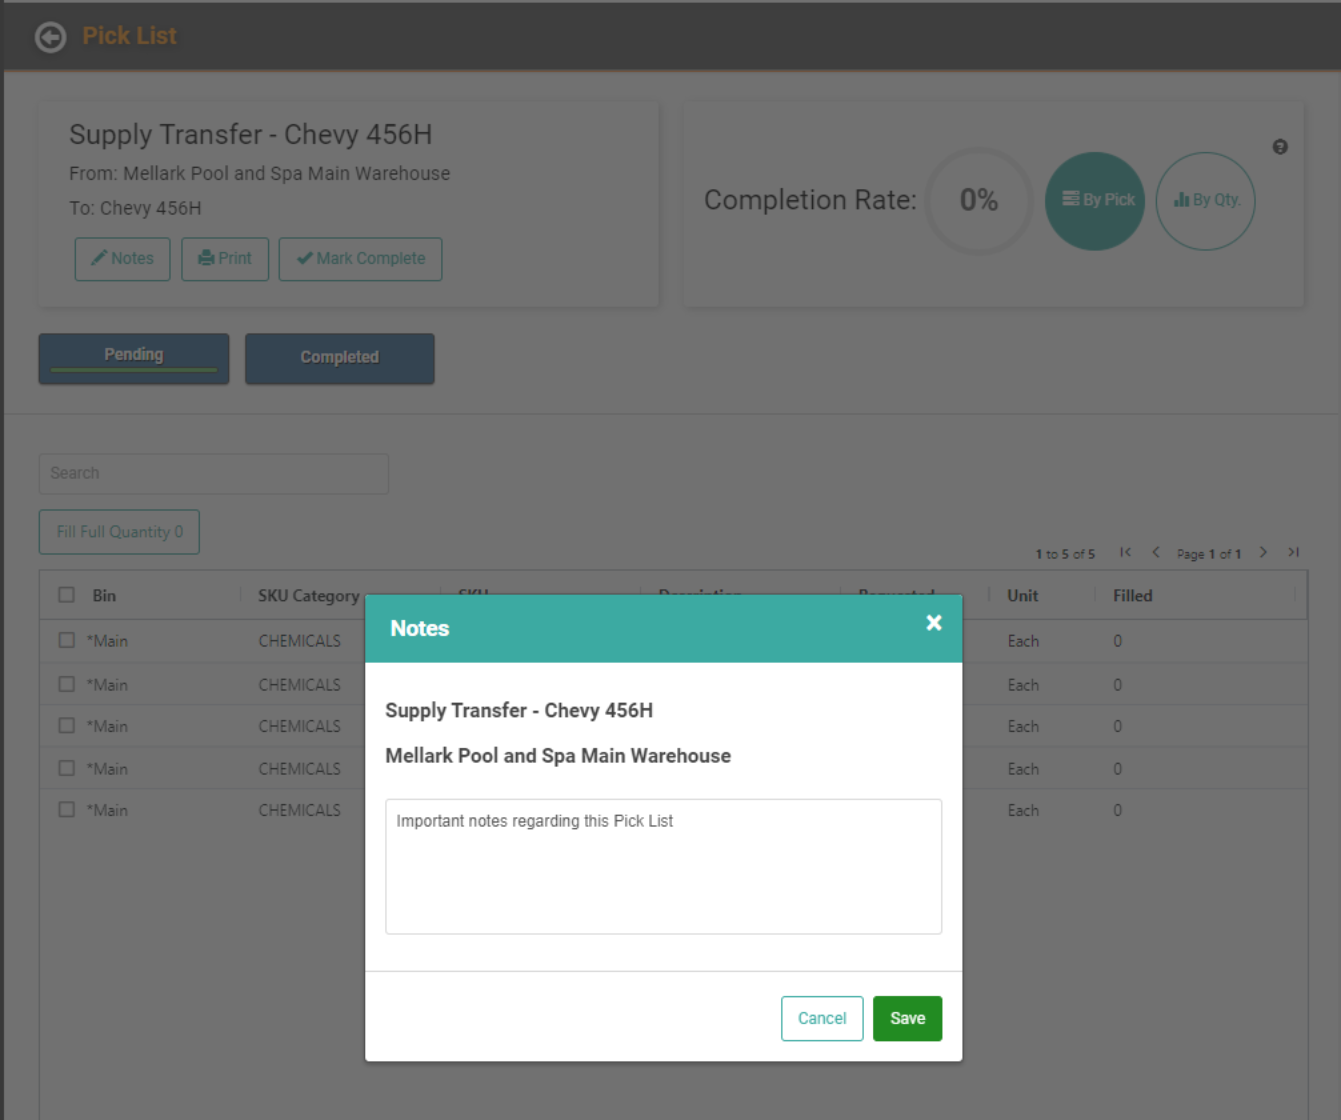
This Notes box is a “whiteboard”, meaning it does not save individual notes. Instead, you can write over, or add to, existing notes. It’s also not timestamped or tracked. This is just a place to jot down notes you may want to see while working through this Pick List.
For important Notes that need to be seen on the Order, best practice is to enter those Notes in the appropriate Note field on the Order directly.
Print
This is another place you can print the Pick List. It will open the Print Preview and allow you to print a physical copy.
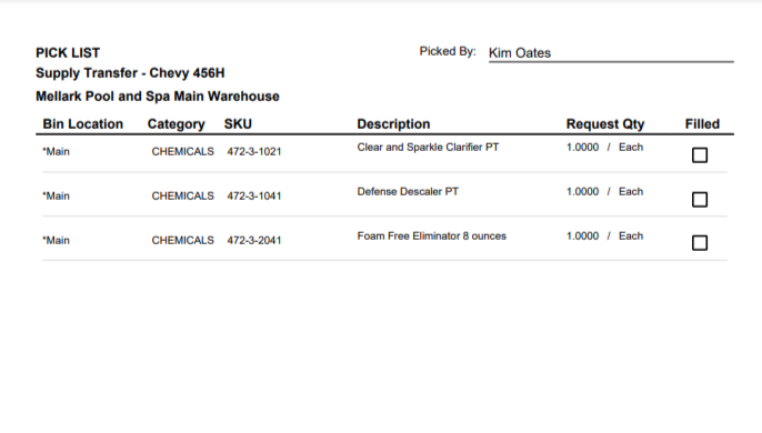
Once you print the Pick List, you can take it to your Stock Site and manually work the list. After collecting all the SKUs, you must return to LOU and access the Pick List and complete it onscreen as well. This will correctly mark the list as Complete.
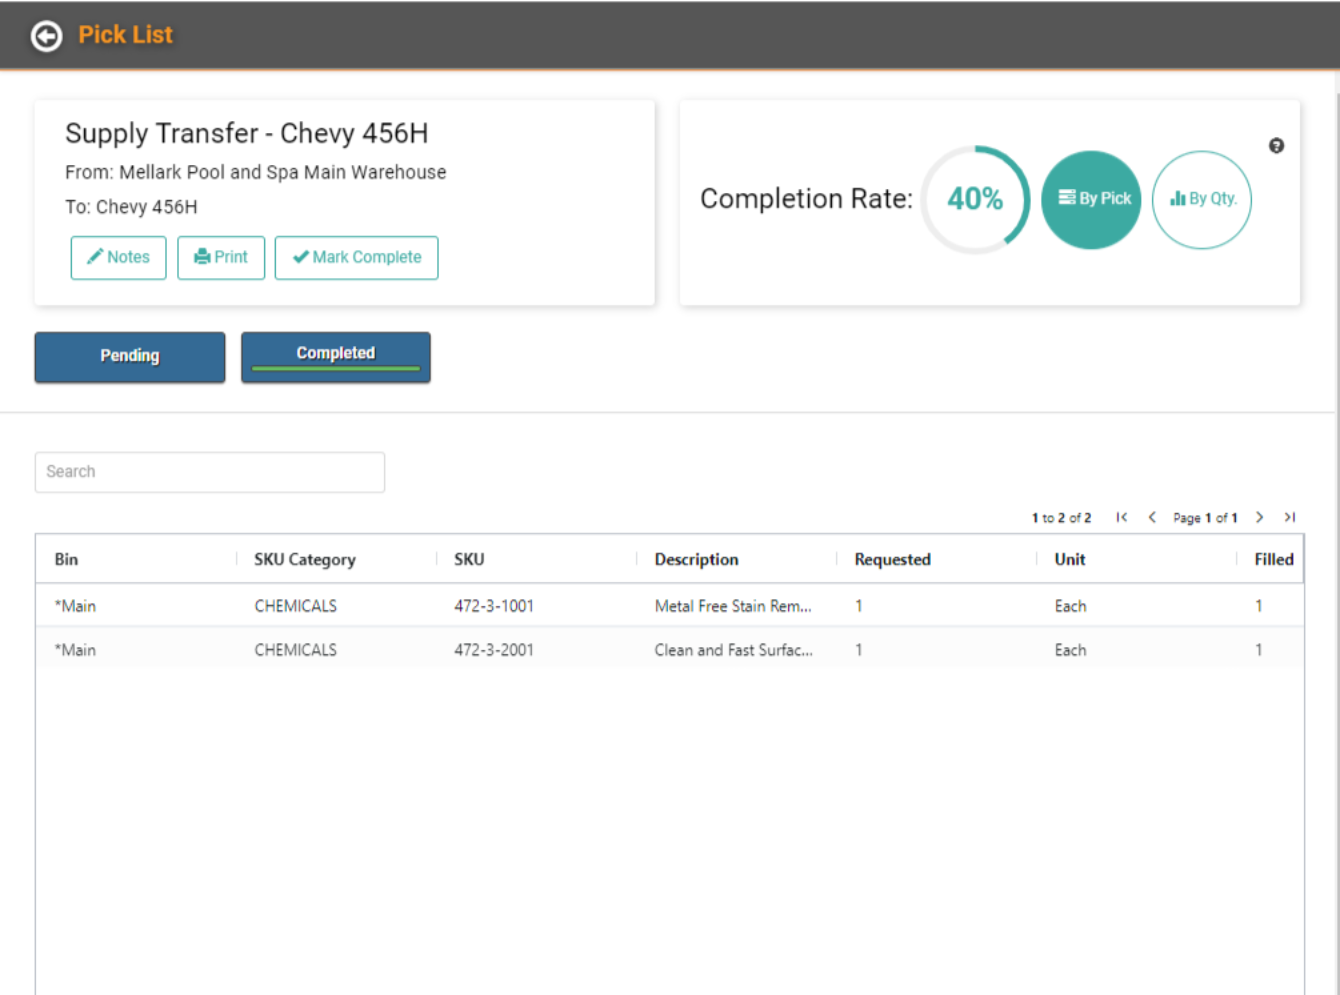
Complete Rate
This box gives you an idea of how much of the Pick List is complete. As you select SKUs and click Fill Full Quantity or Fill Partial Quantity, the Completion Rate will grow.

Click By Pick or By Quantity to see the Percentage complete based on different metrics.
Pending and Completed
The buttons for Pending and Completed will display Pending SKUs or Completed SKUs.
IMPORTANT! Since you create Pick Lists from Orders, this includes REOs. You do not need to go to the Recurring Order setup page to create a Pick List for REOs.
Pick Lists are not required to fulfill orders. This feature is a convenience feature intended to help you efficiently and quickly move Inventory for your Service Personnel.
Group Security: There are a few Security Permissions associated with Pick Lists which you can use to allow or restrict access to aspects of this feature. Head to Group Security for more information.
Go to Sales Orders or Work Orders
Create a Pick List from an Order
- You’ll create your Sales or Work Order as usual, including REOs.
- When you’re ready to create the Pick List for this Order, click the Actions button the SKU box and select Create Pick List.
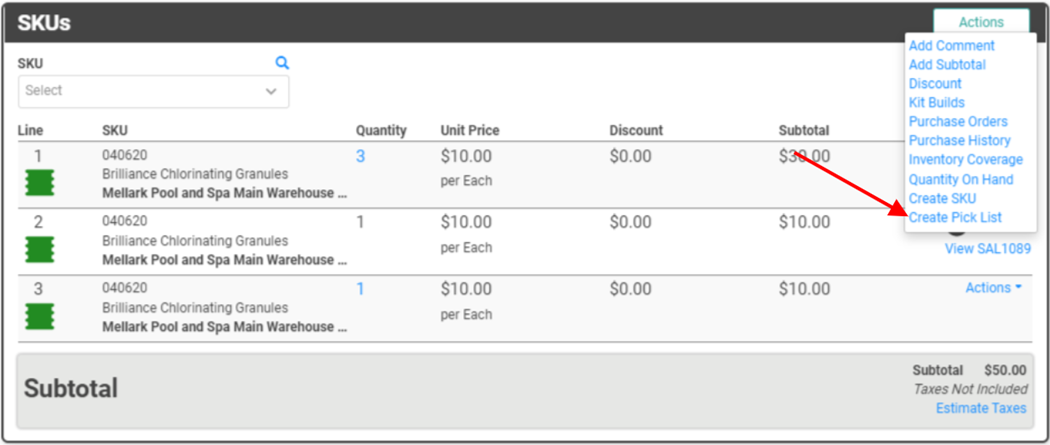
- You'll be asked to confirm you want to create a Pick List for this Order.
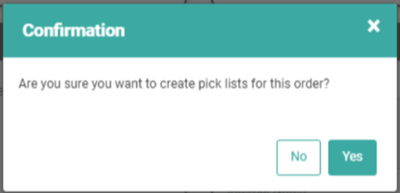
- Click Yes
A message will pop up and give you a Pick List Summary, indicating what Pick Lists have been created.
If you are ready to proceed with the Pick List, you can click Go to Pick Lists. Otherwise, click Close to return to the Order.
REMEMBER! Pick Lists will only include Inventory, Non-Inventory, and Serialized SKUs.
Kit SKUs
When you add a Kit SKU to an Order and your Kit includes SKUs that are Inventory, Non-Inventory, or Serialized, those individual SKUs will be included in a Pick List created for that Order.
Special Order Items
Special Order Items are unique in that they are not typically maintained in Inventory. The Special Order Item SKU does not represent physical inventory and does not behave in LOU the same way physical inventory SKUs (Inventory, Non-Inventory, and Serialized SKU Types) would. Since there is a special process for ordering these SKUs, they cannot be included on Pick Lists.
Once you’ve processed the Special Order Item Purchase Order and received it into Inventory, the resulting Serialized SKU which appears on the Customer’s Order can be included on a Pick List.
Services and Labor and Trade SKUs
Since these SKU Types do not represent physical product, they are not included in Pick Lists.
Go to Warehouse / Pick Lists
Pending Pick Lists
Once you’ve created the Pick Lists, it’s time to go pickin’!
When you click on the Pick Lists tile, or click Go to Pick Lists from an Order, you land on Pending Pick Lists. These are lists that have been created but not yet assigned or started.
- Select the Pick List you want to start.
- Click Actions
- Click Start Pick
As soon as you click Start Pick and confirm that you do want to assign the Pick List to yourself, you will land on the Picking page which will list all the Pick Lists currently assigned to you.
REMEMBER! You cannot assign Pick Lists to other users or take Pick Lists that are assigned to other users. However, you do not have to create the Pick List to assign it to yourself.
Unassign a Pick List
If you assigned a Pick List to yourself, but you are unable complete it or assigned it by mistake, you can unassign it and it will return to the Pending Queue so that another user can assign it to themselves.
IMPORTANT! Admins do not have the ability to assign or unassign Pick Lists for other users. All users, admin or not, can only assign and unassign Pick Lists for themselves.
Picking a Pick List
To complete a Pick List, you need to pick the items on the list. You can refer to the list while you go pick the SKUs two ways.
- Double click the Pick List or select Actions / Update to follow along with the Pick List on a device.
- Select Actions / Print to print a paper copy of the Pick List to follow along on paper.
- REMEMBER! To mark the Pick List as complete and allow LOU to make the changes to Inventory, you must come back to Picking Pick Lists and access the Pick List via step 1.
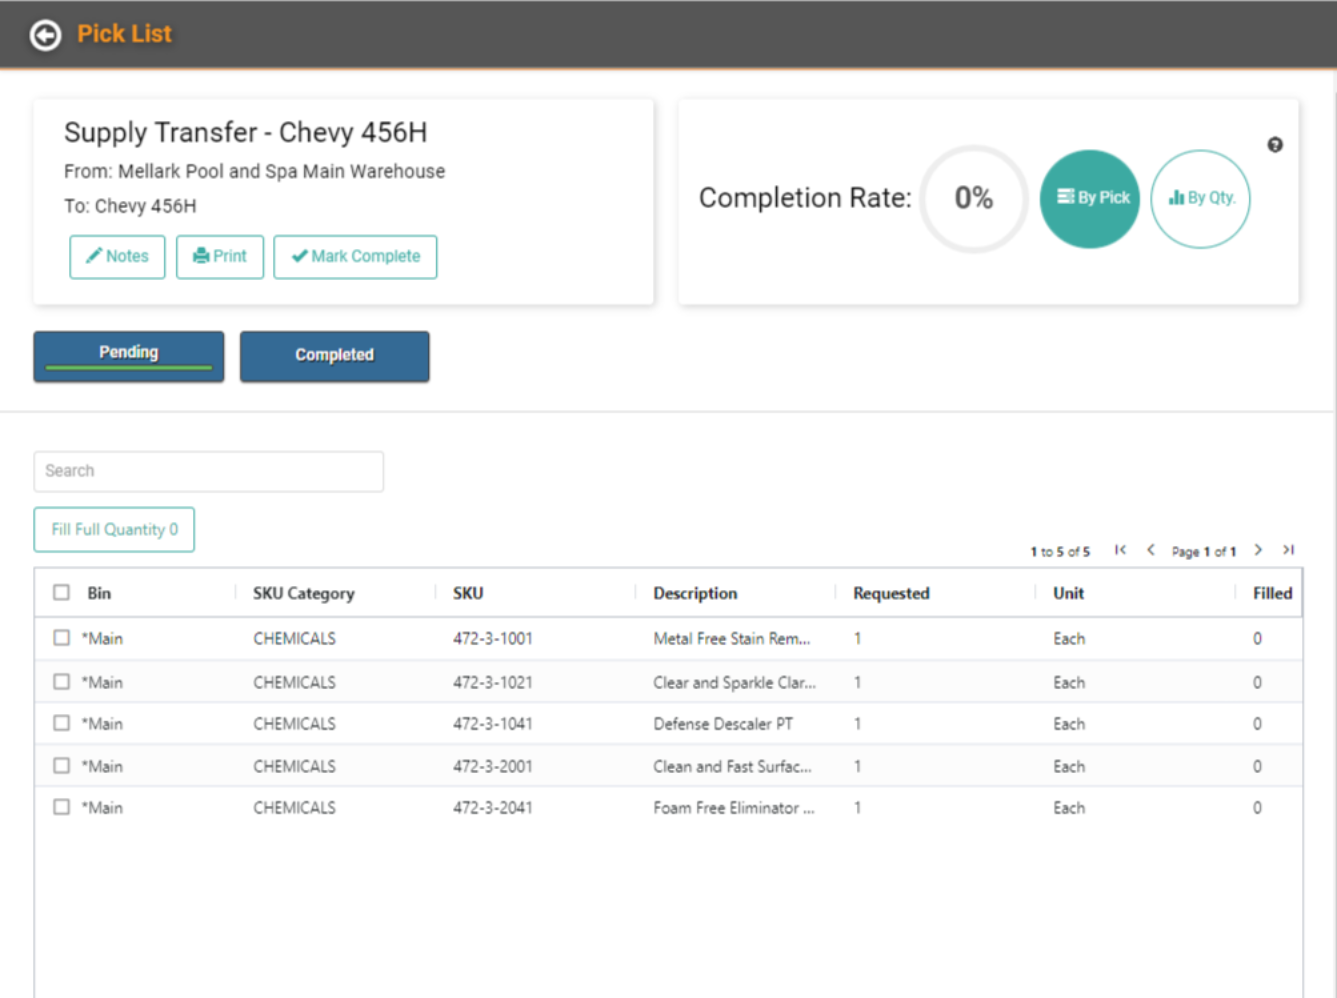
IMPORTANT! SKUs will display on the Pick List in a way that allows you to quickly and efficiently find SKUs around your Stock Site. They are sorted by Bin, then SKU Code, rather than appearing in the same order as on the Sales or Work Order.
Fill Quantity
You can fill quantity of a SKU two ways.
- By checking the box next to the SKU and clicking the Fill Full Quantity button.
- By clicking the Actions link on the SKU line item and choosing either Fill Full Quantity or Fill Partial Quantity.
- You would choose Fill Partial Quantity when the Quantity On Hand is less than the Requested Quantity on the Pick List. You can choose to Fill Partial Quantity with the quantity you have available.
Once you click Fill Full Quantity or Fill Partial Quantity, the Completion Rate will increase and the SKUs will move to Complete if you filled Full Quantity. If you filled a Partial Quantity, the Filled amount will reflect onscreen, but the SKU will remain until the full requested amount has been filled.
Fill Partial Quantity
When you click Fill Partial Quantity, a pop-up will allow you to select the Bin and enter the Quantity you’d like to fill.
Notes
On the upper right, there is a Notes button which opens a Notes box allowing you to enter Notes pertaining to the Pick List.
REMEMBER! The only place these Notes show is on this Notes box.
This Notes box is a “whiteboard”, meaning it does not save individual notes. Instead, you can write over, or add to, existing notes. It’s also not timestamped or tracked. This is just a place to jot down notes you may want to see while working through this Pick List.
For important Notes that need to be seen on the Order, best practice is to enter those Notes in the appropriate Note field on the Order directly.
This is another place you can print the Pick List. It will open the Print Preview and allow you to print a physical copy.
Once you print the Pick List, you can take it to your Stock Site and manually work the list. After collecting all the SKUs, you must return to LOU and access the Pick List and complete it onscreen as well. This will correctly mark the list as Complete.
Complete Rate
This box gives you an idea of how much of the Pick List is complete. As you select SKUs and click Fill Full Quantity or Fill Partial Quantity, the Completion Rate will grow.
Click By Pick or By Quantity to see the Percentage complete based on different metrics.
- By Pick: This percentage is based on the number of line items, regardless of quantity requested for each line item.
- By Quantity: This percentage is based on the number of items included in the Pick – some line items may have a requested quantity greater than 1.
Pending and Completed
The buttons for Pending and Completed will display Pending SKUs or Completed SKUs.