
For those of you who have been in business prior to getting started with LOU, you already have Inventory and financials related to your business which need to be accounted for in LOU. This is where Beginning Balances comes in.
LOU has three categories for Beginning Balances: Inventory Valuation, Accounts Receivable Balances, and Customer Deposits.
If you’ve already attempted an upload and you’re experiencing errors, click What Happens if Your Import Contains Errors? to skip to the end of this article.
In the Product Setup Tool, go to Beginning Balances and click ![]() .
.

Click the  on Inventory Valuation.
Click the  button to head over to Spreadsheet Uploads.
Download the Template
The first thing you must do is download the Template you’ll use to create the file for upload.
- Click

- Select Beginning Balances as the Spreadsheet Type and .xlsx as the File Type
-
- .xlsx is currently the only supported file type.

- .xlsx is currently the only supported file type.
-
- Click

- The Template will download and you will receive a confirmation

Create a File to Upload
The Template will download to the folder designated as the default in your browser settings. For most people, this will be the Downloads folder.
The file will be an .xlsx file which can be opened by Excel. If you are having trouble getting the file to open, you may need to change the default app used to open this file type in your Windows Settings. Find instructions on doing so here.
The Template contains every field available when you create an Inventory Valuation. The fields which are required are highlighted. You cannot upload data without these fields correctly populated. All non-highlighted fields are optional.
IMPORTANT! Do not change the formatting of the template. Excel may add characters or formatting that are not recognized by LOU.
These are the required fields. Please be aware some fields require specific data:
- SKU
- StockSiteName
- BinName
- Quantity (QOH): Number of items for this SKU in the selected Stock Site
- UnitMeasure: Sell By Unit of Measure
- TotalValuation (Quantity x Cost): The Total Valuation is the Quantity multiplied by the Cost. Ex: 5 QOH, Cost = $10, Total Valuation = $50
- SerialNumber**: This field is not highlighted because it is not required for non-serialized SKUs. However, if you are including Serialized SKUs in this import file, the Serial Number field is a required field.
- Do not change formatting in fields.
- Do not add or change formatting in fields.
- Nothing should be bold, italicized, or underlined in the fields.
- Do not add spaces to the beginning or end of data. Excel and LOU interpret spaces as characters and this will cause errors in LOU.
REMEMBER! Everything in LOU is case-sensitive, spelling matters, and spaces are considered characters. If you are referencing existing data in the import, you must make sure to enter it on the template exactly the same way it appears in LOU. If you spell or format the data differently by case or spacing, etc., LOU will not recognize it as existing data. This may result in errors while uploading or in duplicated data.
Upload Spreadsheets
Imports are not intended to be a process you sit and watch. Once you click Upload and the file is processing, you can click out of imports and continue your work elsewhere in LOU. You will be notified via email when the import is complete.
Once you’ve used the Template to create the Spreadsheet, you can upload it by clicking  .
.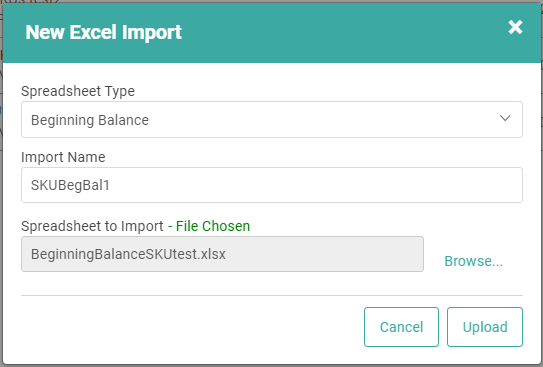
- Select Your Spreadsheet Type
- Give your Import a name
- Select the file from your computer to upload
- Click

IMPORTANT! Large import files will take several minutes or more to upload. The system must go through the data line-by-line and add it appropriately. We recommend performing large imports during off peak hours when there is less activity.
- Click the Actions link on the line corresponding to your upload
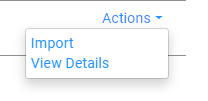
- Select View Details to confirm the information being uploaded. The information in the spreadsheet has not been added to your database yet. Confirming the information here is an important step in preventing bad data uploads.
-
- The Details Page will display the information from your spreadsheet as it will upload into LOU.

- You can click on a line item and click the
 button to edit information for that line item. IMPORTANT! Do not remove data from required fields without replacing it. The upload will fail if you don’t have the required fields correctly populated.
 - You can update Beginning Balance information after it’s uploaded during Onboarding. Once you go live, you cannot update Beginning Balances. To update or change Inventory Valuations after go-live, you will need to perform Stock Adjustments or Stock Transfers.
- The Details Page will display the information from your spreadsheet as it will upload into LOU.
-
- Once you’ve confirmed what will be uploaded, and made any changes you want to make, you are ready to complete the import. Go back to the Spreadsheet Uploads page and click the Actions link next to the line item you want to upload.

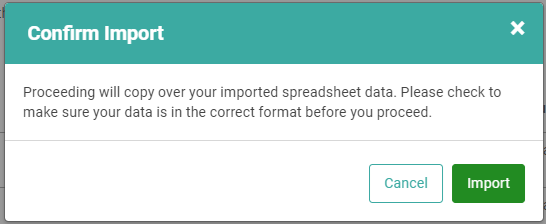
- The Confirm Import message will pop up, confirming that you are going to copy the data onto your database. Click Import.
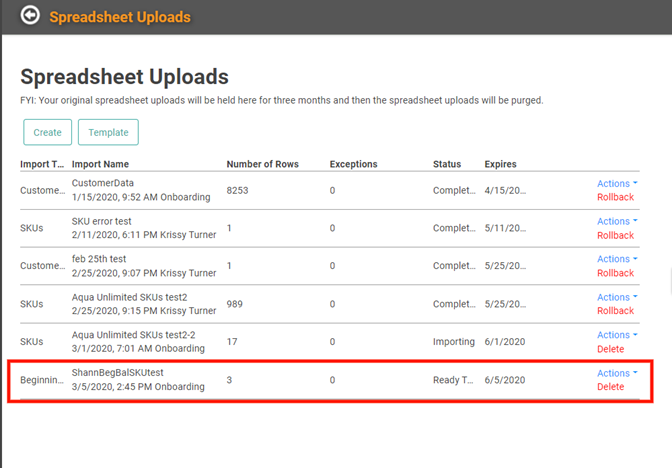
The status should update from Ready to Import to Complete.
IMPORTANT! If your import is 5000 records or more, it will be queued for import after 4pm PST and the status will change from Ready to Import to Queued instead of completing.
Validation Tips
These are some of the things that LOU looks for when it validates the data. This is not a comprehensive list. Instead, these are the more common issues that prevent data from validating.
- Unit of Measure: The Sell By UOM cannot be greater than the Purchase By UOM.
- IMPORTANT! If you create Beginning Balances for SKUs and then you edit SKUs and change the Units of Measure, you will not be able to go live until you correct the validation for Units of Measure on the Beginning Balances affected by the change.
- SKU: The SKU must exist in LOU before you can include it on an Inventory Valuation Import. The SKU must be formatted exactly as it is in LOU. TAB-23CT-CL is not the same as tab-23ct-cl. Case, spelling, and spaces matter.
- Required Fields: If you fail to populate data in a Required Field (the ones highlighted in yellow on the template), LOU cannot upload the data.
- Stock Sites and Bins: Stock Sites and Bins must exist before they can be included in the Inventory Valuation Import. As with all the other fields, you must enter the data on the template exactly the way it appears in LOU, matching case, spacing, and spelling.
Rollback Import
Unlike Imports for Customers, Vendors, and Inventory, you cannot rollback a Beginning Balances import. If you need to undo Beginning Balances, these must be done one-by-one through the Beginning Balances – Inventory Valuation screen. Click the Actions link to Update or Delete a Beginning Balance. 
What Happens if Your Import Contains Errors?
Occasionally, LOU may find an error that prevents it from uploading the data as it exists in the template. When the import is in Validating status, LOU is looking at every single field of data and making sure it is formatted correctly for the data type/field to which it belongs. LOU is also comparing fields in the template with corresponding fields in LOU to make sure existing data matches. LOU will block an import of data that doesn’t match, data which is missing in required fields, or data that is formatted incorrectly for the field. When there are exceptions in the import, LOU will update the Status from Validating to Has Errors and indicate the number of lines of data that contain exceptions under the Exceptions column. 
To take action on this Upload, click the Actions link. 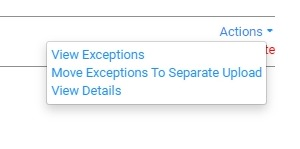
You can View the Exceptions to see exactly what is wrong with each line item that contains an error and make necessary corrections. You can Move Exceptions to a Separate Upload which allows you to separate the errors from the good data. The good data can then be uploaded while you address the Exceptions separately. You can also View Details to see Details on both the Exceptions and the good data.
View Exceptions
Click View Exceptions on the Actions link to see the error on each line item and take action to correct it. 
To correct the error, you can click Update on the line item. A box will pop up with all the fields from the template. You can change, add, or delete data from the fields. You can Save the changes or just Delete this line item entirely. 
If you Delete the line item, it will be removed from the import. You will need to manually create the Valuation or include it, with corrections, in another Beginning Balance Inventory Valuation Import. Once you Save the changes, LOU will automatically attempt to re-validate the data. It will display new Errors if the data fails validation again. Otherwise, it will clear the Errors and the line item will be ready to import.
Once you’ve completed updating or deleting all the line items with Exceptions, the Status will update to Ready to Import.
Move Exceptions to Separate Upload
You may want to upload the clean data without the Exceptions. To do this, click the Actions link and select Move Exceptions to Separate Upload. This will create a new import line item that contains only the data with Exceptions. The original import will contain only the clean data and the Status will update from Has Errors to Ready to Import.
This allows you to go ahead and process the import on the clean data while keeping the bad data separate so you can address it and make changes.
Delete the Upload File
If you have a file that is all Exceptions, or you determine you don’t want to complete the Import for any reason, you can simply click the red Delete button and it will delete that Upload from the queue.
REMEMBER! If you delete a file and determine you want to import it afterwards, you will need to Create the Upload all over again.