Layaway can be a great way to sell products when financing isn’t available. Layaway options are often cheaper than credit cards and financing because they are interest-free as well.
LOU doesn’t have a Layaway feature, but there are some ways you can use LOU to manage and track your Layaway Orders.
WAIT! Before you jump into offering Layaway, make sure you know the laws in your state. The Federal Trade Commission (FTC) has a valuable resource you can find here.
Before you create Orders, you should consider your Layaway Terms and Conditions. What does a Layaway Program look like for your business? What rules, terms, and conditions will you expect your Customers to follow? Once you’ve come up with a plan, you begin setting up everything in LOU.
TIP! To learn more about any of the features below, click the tile.
Key Steps:
- Set up a Document Type
- Define your Terms and Conditions
- Create a Drip Campaign
- Create Trade SKUs for Fees and Penalties
- Create the Layaway Order
- Manage the Layaway Order
- Complete the Layaway Order
- Cancel the Layaway Order
Go to Document Types
The first thing you should do is create a Document Type called Layaway. You can use whatever Naming Convention works for you. In our example, we chose Sales Order – Layaway. 
Go to Setup / Sales / Terms and Conditions
Terms and Conditions are important for any Layaway Program. It’s important to make sure your Customers are aware of the rules that they will be expected to follow.
Create your Terms and Conditions and toggle Print on this specific Document Type and select the Document Type you created for Layaway. 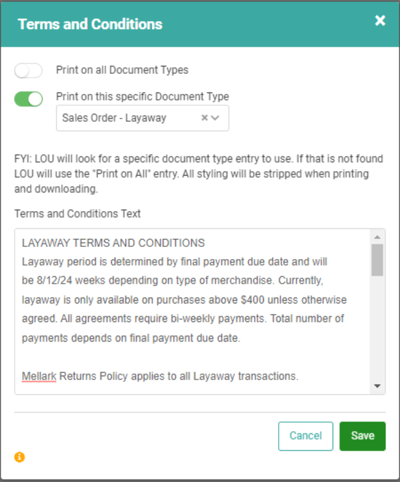
These Terms and Conditions will print on all Electronic and Physical Customer-facing copies of the Document selected. 
Go to Drip Campaign
If you’re familiar with the Marketing features, such as Drip Campaigns, you can create a Drip Campaign to help you track and contact your Customers on your Layaway program.
IMPORTANT! In order for you to create and enroll Customers in Drip Campaigns, you must also create Drip Campaign Task Types and Opportunity Interests. 
IMPORTANT! This step is optional and best utilized when you are already using the Marketing features. 
Go to Inventory
Since Layaway may require Fees and Penalties, you will want to create Trade SKUs to add those amounts to the Orders.
TIP! Create the Trade SKU with a $0 Cost and $0 Sell By Price. That way, you can update the Price when you add the Trade SKU to an Order and use the same SKU for multiple amounts. 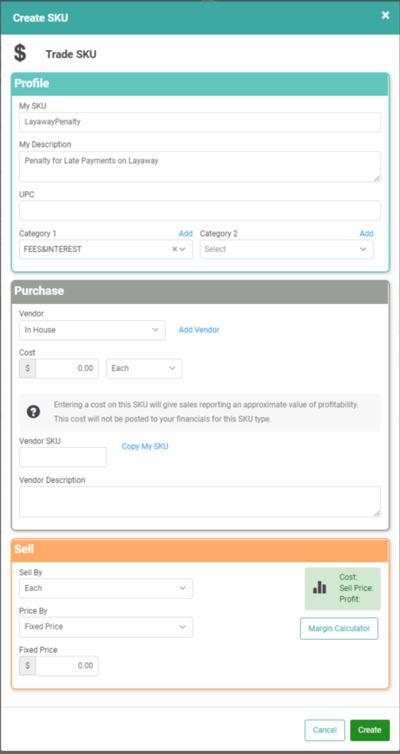
Go to Sales Orders
Now that you’ve set your Terms and Conditions, created a Document Type to quickly identify Layaway documents, and created your Drip Campaigns, it’s time to talk about Sales Orders. You can choose to create Sales or Work Orders for Layaway, but since Layaway likely won’t require a Schedule Task, we’re going to create a Sales Order for our example.
The most basic process for managing a Layaway will be as follows:
- Create a Sales Order
- Add the SKUs
- Takes Deposits over time, according to your Layaway program’s Terms and Conditions.
- Deposit Payments can be taken without Invoicing the Order. Since you are not delivering any SKUs until the full balance is paid, you don’t want to Invoice the Order and remove the SKUs from your Inventory.
- Deposits can be made for the full Balance on the Order. Once you Invoice the Order, the Deposits will apply to the Invoice and mark it as Complete without requiring an additional Payment.
- Deposits cannot be made through the Customer Portal. To take a Deposit throughout the Layaway period, you will need to contact your Customer or have them contact you to process the Deposit Payment.
- Once the full amount has been received as Deposits, you can arrange pickup/delivery of the item(s) and Invoice the Order to complete it.
Along the way, you may need to adjust the Order or add your Trade SKUs to charge any penalties incurred. As long as the Order has not been Invoiced, you can add or remove SKUs.
Create Layaway Order
Let’s create an Order.
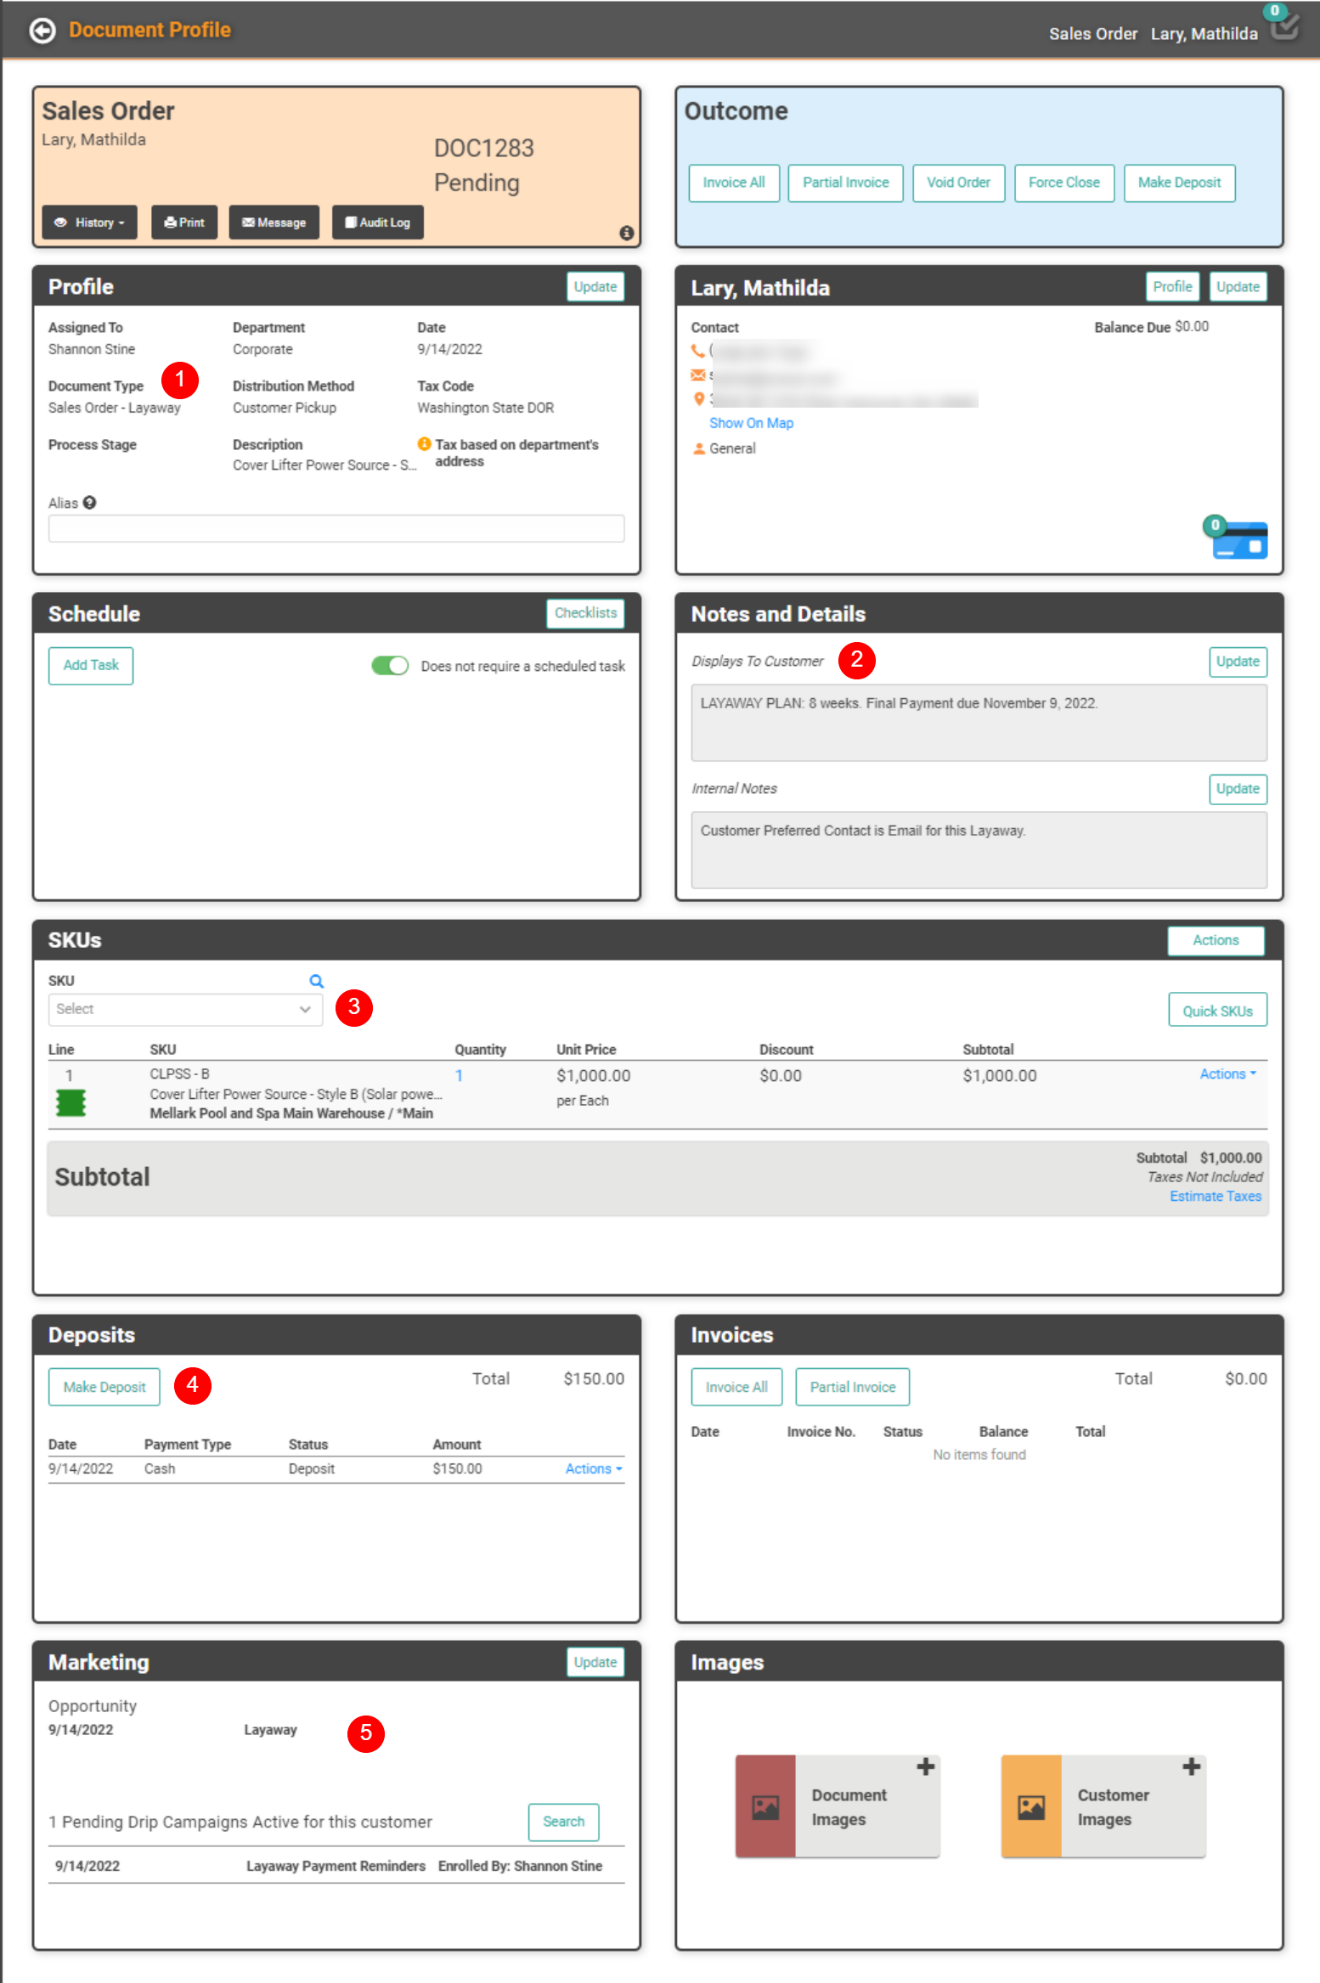
- Create the Sales Order with the Document Type you created.
- Enter important Notes for the Customer and staff.
- Customer-facing Notes section is a great place to add specific terms, including the final Payment Date.
- Add the SKUs included in the Layaway Order.
- REMEMBER! SKUs added to Orders will show as Reserved in Inventory Search and will be associated with the Order.
- Take your starting Deposit.
- If you’re using Marketing features, be sure to add the Opportunity Interest and enroll them in the Drip Campaign.
Manage Layaway Order
When using Marketing features, the Drip Campaign should be set up to create Personnel Tasks for you throughout the life of the Layaway period, reminding you to arrange to collect Deposits, reach out about missed Payments, assess penalties, or perform other Tasks you deem required for management of your Layaway Order.
If you do not use Marketing Features, you will want to create a process for your staff to properly manage and track your Layaway Orders and ensure you are receiving Deposit Payments on time according to the Terms and Conditions.
Late Fees and Penalties
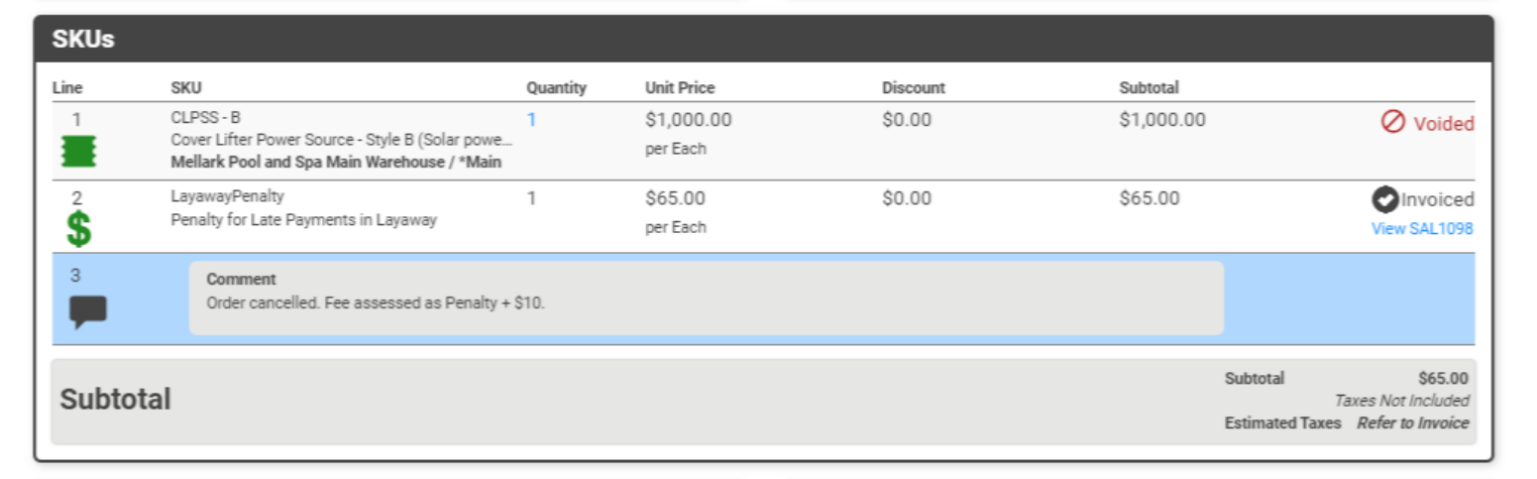
When you need to add Fees and Penalties to the Layaway Order, you can open the Order Profile and add your Trade SKUs. As a best practice, add a Comment line to the SKU Box after the SKU to explain why the Late Fee or Penalty was added.
REMEMBER! If you created the Trade SKU with a $0 price, be sure to update the SKU line item and add the correct Fee/Penalty Amount. 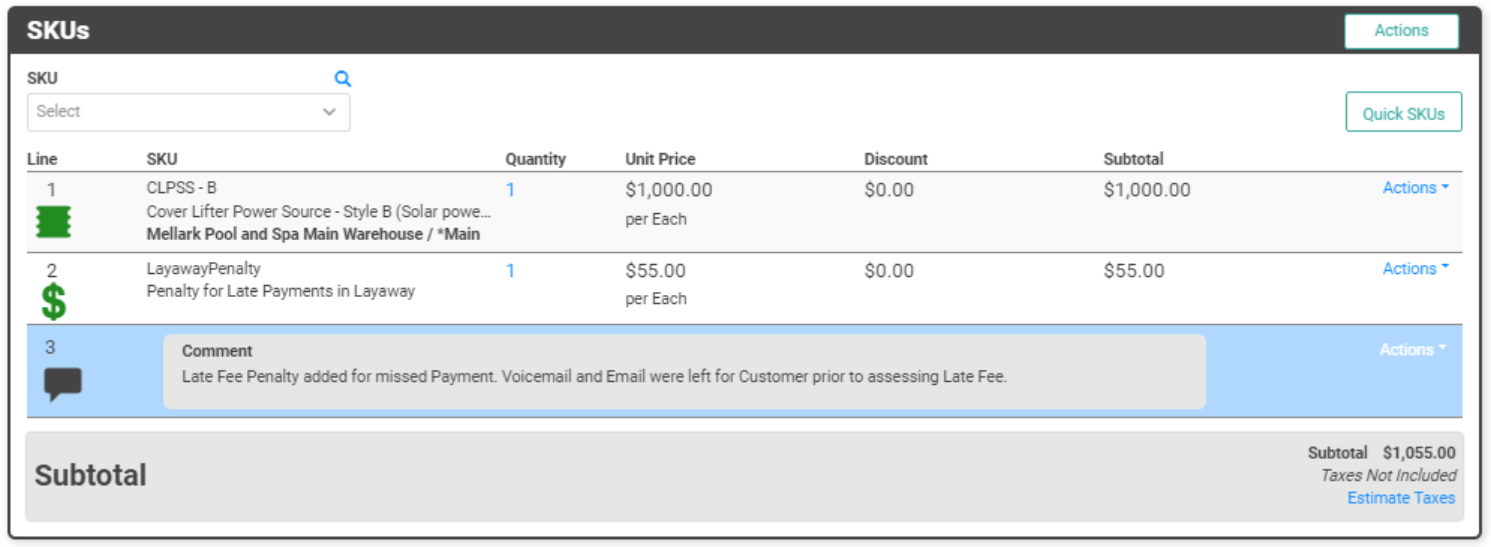
Complete Layaway Order
Once Deposits equal to the whole Order amount have been received and you’re ready to deliver the product, you can process this Order the same way you would any other Order.
- Make arrangements with the Customer to have them pick up the Order or to have it delivered. You’ve likely made these plans at the beginning of the Order.
- Once the product has been delivered, click Invoice All on the Order.
Cancel Layaway Order
You may cancel some Orders with a full refund while others will only be a partial refund. It’s important to take the correct actions and refund the correct amounts.
Full Refund
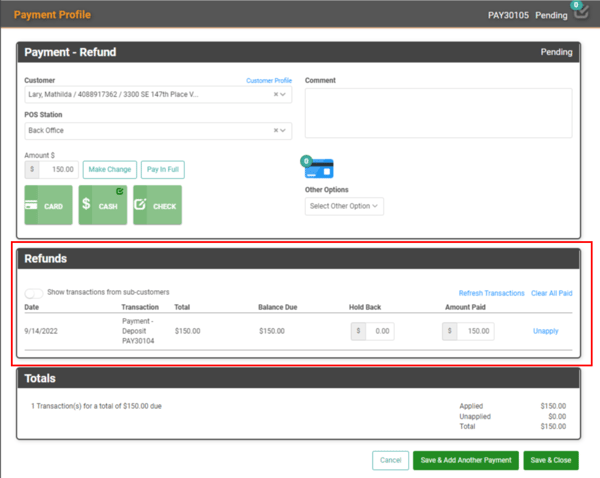
If your Customer wants to cancel the Order, you may need to refund any Deposits already made.
- Go to the Customer Profile.
- Click the Payments Tile.
- Create a Refund Payment.
- Enter an Amount.
- If multiple transactions apply, choose the Deposit(s) for the correct Order.
- Complete the Refund Payment.
Once you’ve completed the Refunds, go to the Order Profile.
The Deposits Box should reflect the Refund(s) you just posted. 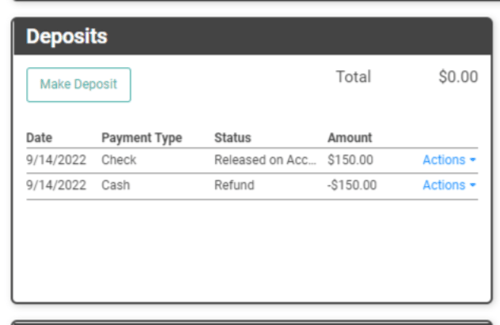
Once the Deposits have been dealt with, you can Void the Order to close it out and cancel it. Alternatively, you can choose to Force Close the Order instead. This tells LOU you’re not voiding it as a mistake, but you are considering it complete with no additional action being taken. Any SKUs not Invoiced will be voided and their Status will update from Reserved to Available.
Partial Refund
Partial Refunds are applicable when there are penalties or fees associated with cancelling the Order which should not be refunded to the Customer. You need to ensure the money is correctly applied to the Order and your financials.
- Determine the total amount not being refunded.
- Add your Layaway Trade SKU to the Order.
- Update the Trade SKU line item with a Price equal to the total not being refunded.
- Select Partial refund on the Sales Order.
- Select the Trade SKU to Invoice.
- Go to the Customer Profile.
- Go to Payments.
- Locate the Deposit(s) associated with this Order.
- On the first Deposit, click the Actions link and select Apply.
- On the pop-up, click Apply To next to the Invoice you just created for the Trade SKU.
- Apply Full Amount.
- If the Full Amount is smaller than the Amount of the Deposit, the remaining Deposit will be released On Account.
- Repeat the steps to apply additional Deposits to the Balance if necessary.
If there is a remaining Balance and all Deposits have been exhausted, you will need to collect additional Payment on the Invoice from the Customer.
If the Deposits are greater than the Invoice Amount and you owe the Customer a Refund, perform the following:
- From the Customer Profile, click the Payments tile.
- Create a Refund Payment.
- Enter the Amount due as a Refund.
- Process the Refund Payment.
Force Close allows you to tell LOU the Order is as complete as it’s going to be and everything else can be cancelled/closed with no further action being taken. Any SKUs left un-Invoiced will Voided and their Status updated from Reserved to Available in Inventory.