
Journal Entries record business transactions in an accounting system. These transactions display as Debits and Credits. Journal Entries are not created automatically by transactions in LOU. They are created by you and post to the General Ledger.
Jump ahead to the following sections:
- Manually Create Journal Entry
- Import from Spreadsheet
- Drafts
- Post Journal Entry
- Completed Journal Entries

Go to Accounting / Financials / Journal Entry 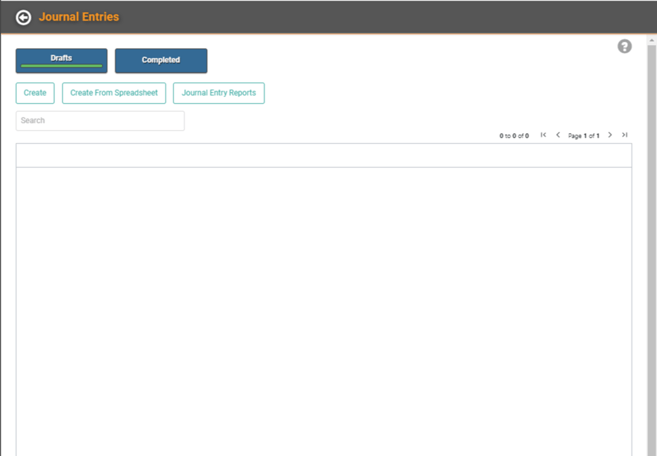
The Journal Entry page defaults to Drafts. You can also see Completed Journal Entries by clicking Completed. There is also a button to access the Journal Entry Report under Operations / Reports / Journal Entry Reports.
There are two options for creating Journal Entries: individually by clicking Create or en masse by uploading via a spreadsheet by clicking Create From Spreadsheet.
Manually Create Journal Entry
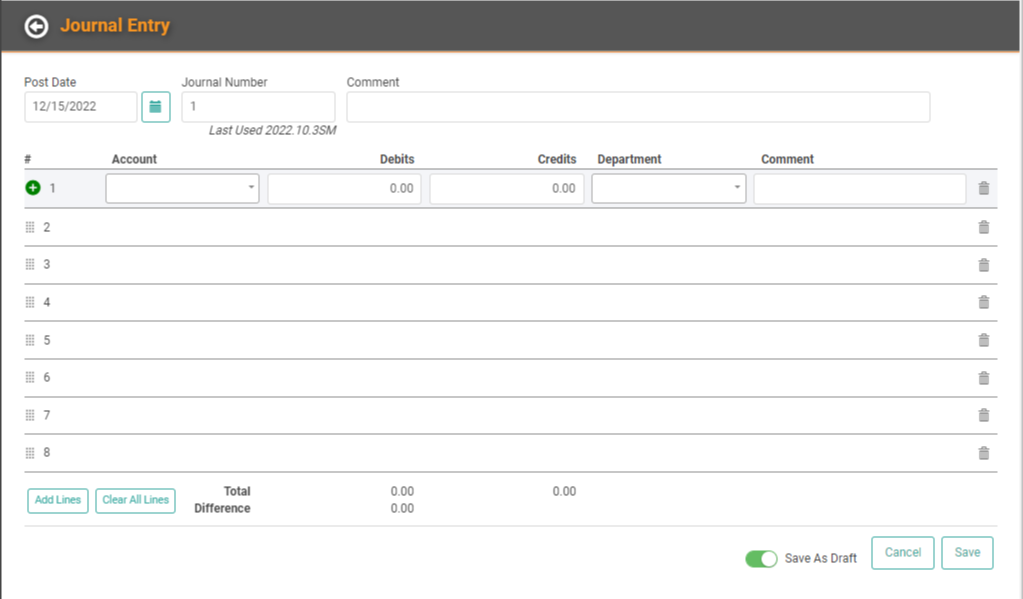
- Post Date This will default to the current date, but you can change it the correct Post Date.
- You cannot create Journal Entries for closed Accounting Periods. If you need to create a Journal Entry for a previous Accounting Period, you will need to make sure the Accounting Period has been toggled back on.
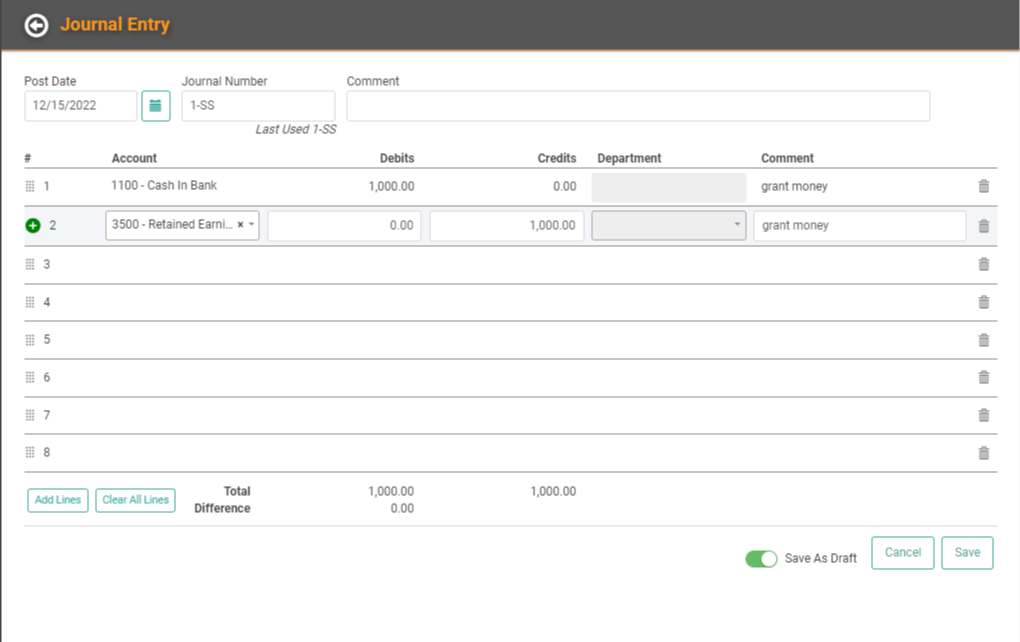
- Journal Number This will serve as a unique identifier of sorts. You cannot reuse a number already in use. Below the field, you’ll see a helpful tip letting you know what number was last used. TIP! You can use a combination of letters and numbers to help you further organize the journal.
- Comment This is an optional comment you can use to further identify the entry.
- Account line items This is where you’ll enter the detail of the transaction.
- Choose the Account, enter the Amounts – Debits, Credits, choose the Department, and leave an optional Comment.
- Repeat these steps for each Account you want to include in this Journal Entry.
- Add Lines The Journal Entry defaults to 8 lines of Accounts. You can click Add Lines to add additional lines to complete the Entry.
- Clear All Lines If you’ve made a mistake and need to clear the entire Entry, click Clear All Lines.
- Total and Difference As you create the line items, the Total for Debits and Credits will appear at the bottom of those columns and the Difference between the two will appear on the next line.
- Save As Draft This toggle defaults on, allowing you to save a Journal Entry as a Draft. You can return to Drafts and make additional changes and edits.
Import From Spreadsheet
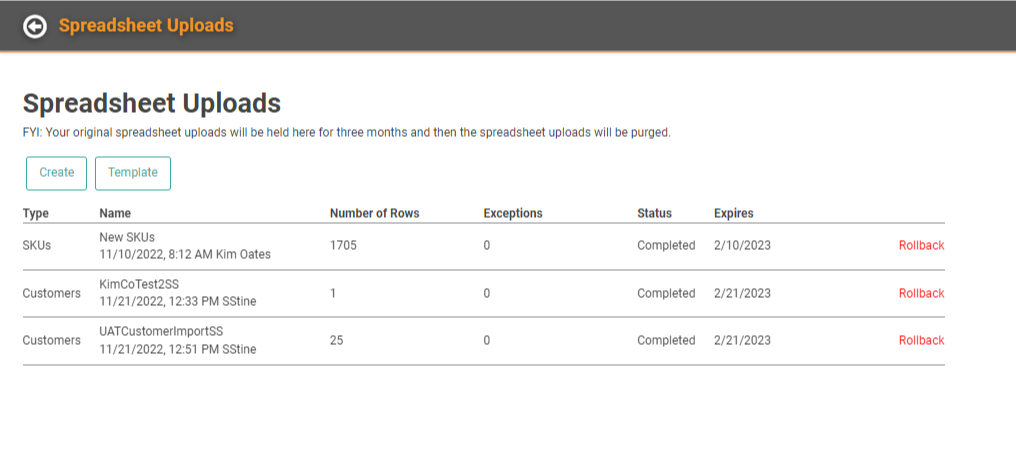
In addition to manually creating a Journal Entry, you can use a spreadsheet import. These imported Journal Entries will upload to Drafts. When you click Create From Spreadsheet, you’ll go to the Spreadsheet Uploads/Import Data page.
Download the Template
The first thing you need to do is download the Template you’ll use to create the file you upload.
- Click

- Select Customers as the Spreadsheet Type and .xlsx as the File Type
- .xlsx is currently the only supported file type
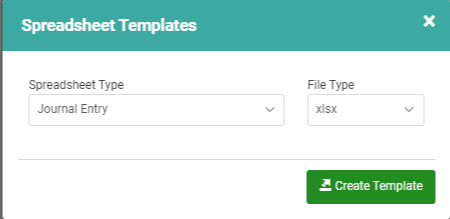
- Click

- The Template will download and you will receive a confirmation

Create a File to Upload
The Template will download to the folder designated as the default in your browser settings. For most people, this will be the Downloads folder. 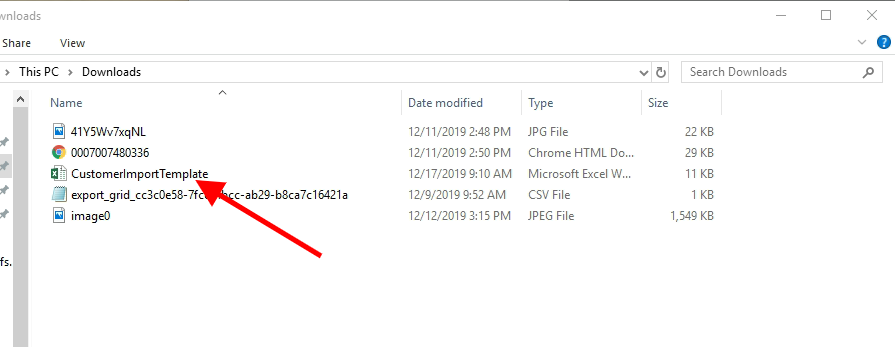
The file will be an .xlsx file which can be opened by Excel. If you are having trouble getting the file to open, you may need to change the default app used to open this file type in your Windows Settings. Find instructions on doing so here.
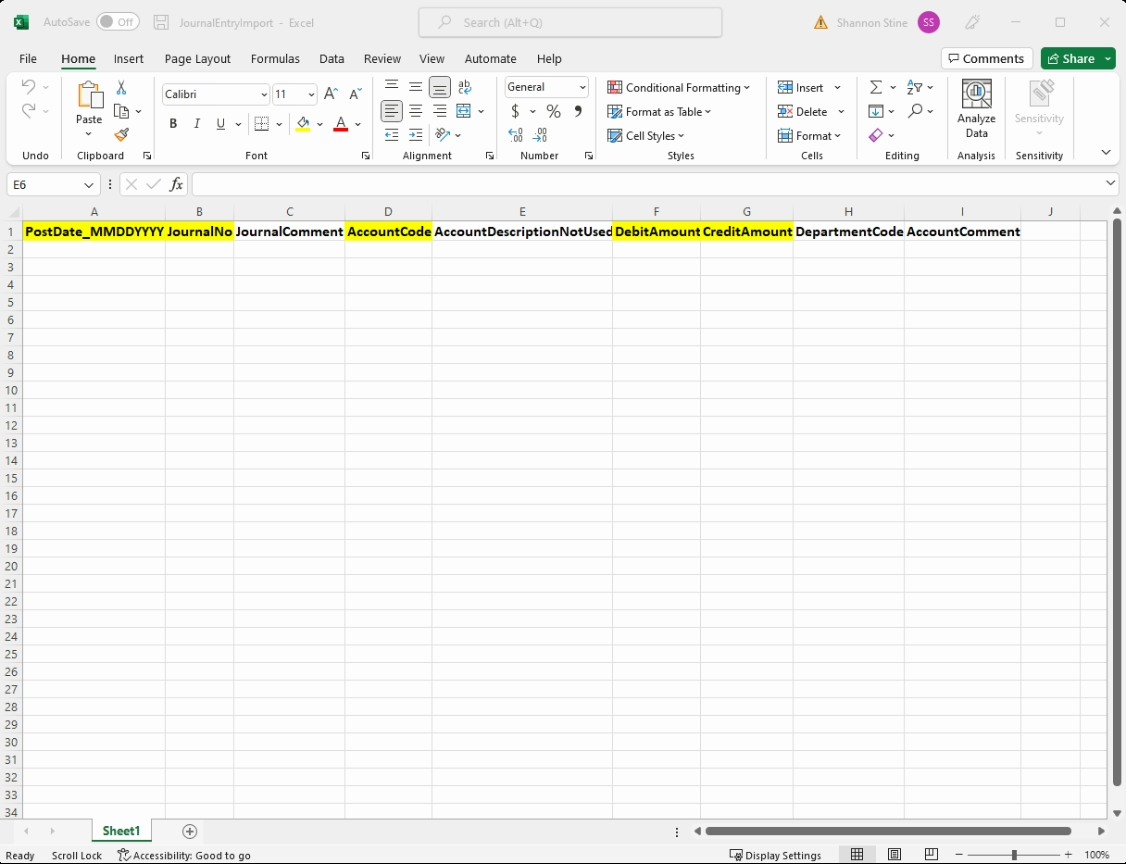
VERY IMPORTANT! Do not change the template in any way. Populate data in the fields, but do NOT change formatting, add additional columns, or move columns around. Templates are intended to be a document with specific formatting and placement already configured. Making changes to these preconfigured fields will cause errors and prevent the data from importing correctly.
IMPORTANT! When uploading, there are a couple important things to keep in mind.
- Do not change the order of columns in the template.
- Do not remove Column Headers.
- Do not add or change formatting in fields.
- Nothing should be bold, italicized, or underlined in data fields.
- NO changes to Columns’ or Rows’ Formatting
- Do not add special characters such as dashes or slashes for dates and phone numbers, dollar signs for amounts, or parentheses.
- A decimal in an amount or a period at the end of a sentence in a Comment field is permitted.
- Do not add spaces to the end of data. Excel interprets spaces as characters, and this can cause errors in fields in LOU.
Required Fields for the import are highlighted in Yellow:
- PostDate_MMDDYYYY Enter the date exactly as indicated in the name. MMDDYYYY with no additional formatting like slashes or dashes.
- Journal Number Be sure to refer to the last used Journal Number to avoid duplicates. You can use dashes and underscores in this field along with your alphanumeric number.
- Account Code Enter just the Account Code without a Name.
- Debit Amount Enter Debit Amount.
- Credit Amount Enter Credit Amount.
Additional Fields are optional:
- JournalComment This comment will appear on the Journal Entry Drafts or Completed page
- AccountDescriptionNotUsed This is the Account Name/Description and is here for your reference only. It will not appear on the Journal Entry as a separate field.
- DepartmentCode Enter the Department Name or Code
- AccountComment This is the Comment that will appear on the specific Account line item within the Journal Entry.
REMEMBER! Everything in LOU is case-sensitive. Be mindful of case whenever you are entering data. When referencing existing data, you must use the same case. Changing case may result in duplicated data. Example: Steve Rogers and STEVE ROGERS.
Upload Spreadsheet
Once you’ve used the Template to create the Spreadsheet, you can upload it by clicking 
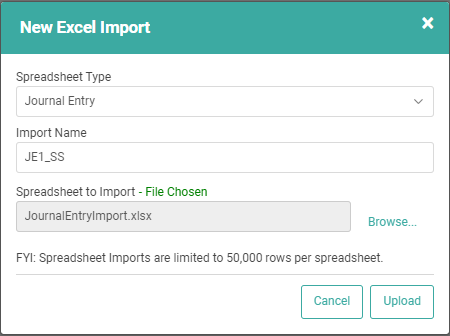
- Select your Spreadsheet Type
- Give your import a name
- Select the file from your computer to upload
- Click
 You should see the Status changing from Uploading to Validating to Ready to Import. IMPORTANT! Large import (2501+ records) files will take several minutes or more to upload. The system must go through the data line-by-line and add it appropriately. Spreadsheets uploaded during business hours with 5000+ records will be Queued by LOU and will not import until after 4p PST.
 - Click the Actions link on the line corresponding to your upload.

- Select View Details to confirm the information being uploaded. The information in the spreadsheet has not been added to your database yet. Confirming the information here is an important step in preventing bad data uploads.
- The Details Page will display the information from your spreadsheet as it will upload into LOU.
- You can click the Action link and select Edit to change make changes to any line item being uploaded. This will open a window with every field from the template for you to add, remove, or update information. IMPORTANT! Do not remove data from required fields without replacing it. The upload will fail if you don’t have the required fields correctly filled in.

- When you’re finished, click

- To delete the line item entirely, click

- Once you’ve confirmed what will be uploaded, and made any changes you wish to make, you are ready to complete the import. Click the Actions link and select Import.

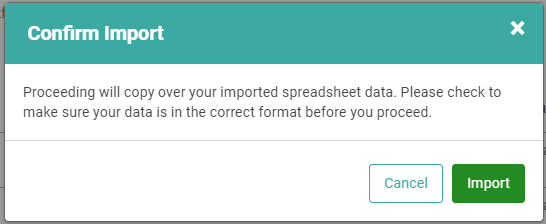
- The Confirm Import message will pop up, confirming that you are going to copy the data onto your database. Click Import.
The status should update from Ready to Import to Complete.
IMPORTANT! Journal Entry imports will populate to the Drafts page of Journal Entry, allowing you another opportunity to make changes before posting.
Drafts
Once you’ve created a Draft Journal Entry either by manually creating it or importing, you can come back to it and Update, Copy, Reverse, Delete, or Post the Journal Entry.

- Update You can make changes or additions to the Journal Entry while it’s in Drafts by clicking Actions / Update.
- Post Journal Entry When you’re ready to post the Journal Entry, click Actions / Post Journal Entry.
- Copy You can Copy the Journal Entry, creating a second identical entry which you can update.
- Reverse You can reverse a Journal Entry, creating a record that it was created and then reversed/undone.
- Delete This option allows you to completely remove the Journal Entry entirely, leaving no record it existed.
Post Journal Entry
Once the Journal Entry is ready to post and the Debits and Credits are balanced, you can click Actions / Post Journal Entry.

You’ll receive a confirmation message. Click OK to proceed. Once LOU is finished processing, the Journal Entry will disappear from the Drafts page and move to the Completed page.
Completed Journal Entries
Completed Journal Entries have posted to the General Ledger. They can be viewed on the Completed page by date range. The Date Range will default to the previous 6 months.

On the Completed Journal Entries page, you can select a Journal Entry, click Actions, and choose View, Copy, or Reverse.
You cannot Update or Delete posted Journal Entries.
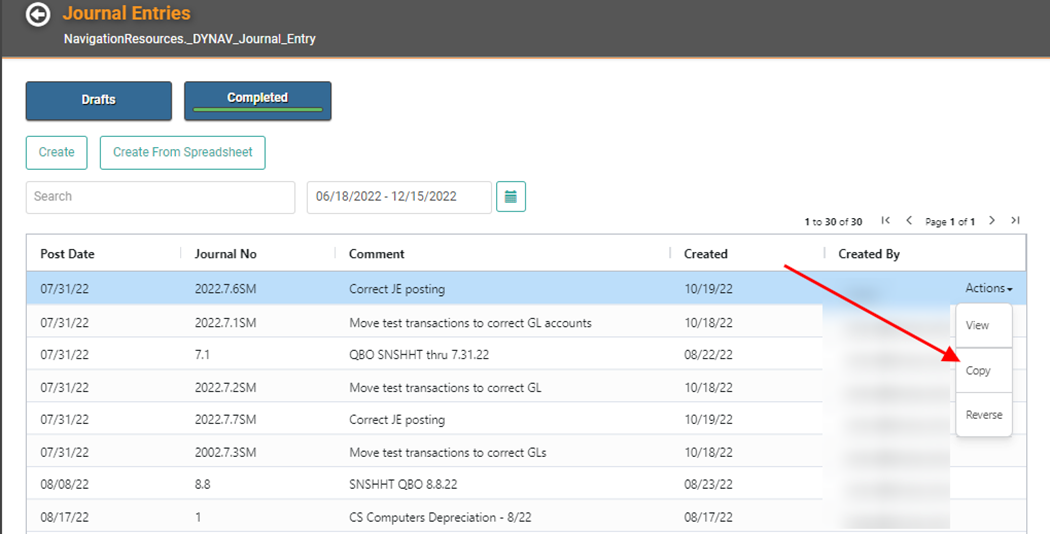
- Copy will create an exact duplicate of the Journal Entry in Drafts. A pop-up will allow you to determine the Post Date, Journal Number, and Comment for the copy as well as determine whether to Copy Accounts and Amounts or only the Accounts.

- Reverse will create a Journal Entry in Drafts which reverses the original Journal Entry. A pop-up will allow you to determine the Reversal Date, Journal Number, and Comment.
