
LOU Schedule makes it easy to Log In and Out, switch users if multiple users are using the same device, Sync Data and Pictures, turn Dark Mode on or off, and review LOU Schedule’s Terms & Conditions.
WAIT! Make sure you have already activate LOU Schedule on your Mobile Device.
There are several features available in the hamburger menu on accessed on the left. 

Sync Data and Picture Sync Settings
Tap Sync Data to be taken to a page that will tell you the last time the Data was synced and allow you to sync data.
IMPORTANT! This Sync will sync the same data as the Sync button that appears on the upper right corner of the app. 
Tap Sync Now to sync data now. Once the sync is complete, you will get a confirmation message indicating the sync is complete. Tap OK to return to the Sync Page. 
If you have open work items and you tap Sync, you will receive a message indicating there are open work items. 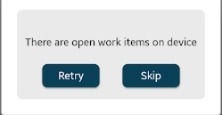
Once all the work items are closed and you sync again, the sync will proceed and update the date and time stamp.
Pictures
You must Sync Data before you can Sync Pictures. In the hamburger menu, tap Settings. 
You can set a few settings to Sync Pictures. Determine if you want to require wifi when syncing. This can save data if you’re on limited data plans. You can have LOU Schedule automatically attempt to sync pictures when the Device is idle and you can determine if pictures can be synced when the battery on your device is low.
REMEMBER! These automated settings will not override the requirement that all data is synced before pictures are synced. If there is data to sync, LOU Schedule will not auto-sync pictures.
To manually sync, click Sync Pictures. This will manually sync pictures so long as there is no outstanding data to sync.
Synced Pictures appear in LOU Web on the Customer Profile and the Document associated with the Task on which you took the Pictures.
Add Opportunity
You can create Opportunities out in the field by tapping Add Opportunity. This allows you to take down contact information and their interest if someone is interested in products and services.
Creating an Opportunity in LOU Schedule automatically creates a Customer Record with the contact information as well as the Open Opportunity in Opportunities in LOU Web. This information will appear in LOU Web as soon as you perform a data sync.
IMPORTANT! A Customer Record will be created in LOU Web even if you enter contact information for an existing Customer, including Customers on your Task list.
- Select the Opportunity Interest, Department, and Type from each dropdown.
- Enter the Customer/Contact Name.
- Enter the Contact information.
- Enter any Notes you want to include in the Opportunity.
- Tap the Check box on the upper right to save the Opportunity.

In order to create the Opportunity, you must have Opportunities set up in LOU Web.
Search Inventory
You can search your entire Inventory if you need to locate a SKU.
REMEMBER! You cannot add any SKU to an Order. You can only add the SKUs in Quick SKUs through the Task Workflow. 
You can swipe up and down to scroll through the SKUs. You can also search keywords. 
Switch User
Use this button to select another user activated on this device OR request access for another user on this device. 
Settings
The Settings menu allows you to control several settings in the app. Dark Mode, Picture Sync Settings, and Terms and Conditions can be found in this page. 
In the Picture Sync Settings, you can determine when to auto-sync data as well as manually sync photos by tapping the Sync Pictures button.
Tap Terms and Conditions to access links to the Terms and Conditions. 