Within the Inventory screen, are several boxes of information. We're going to look at SKUs.
SKUs are an essential piece of your Inventory. They are the primary way LOU identifies a product or service you provide. These unique identifiers are what LOU uses for tracking, reporting, and documents.
This article will discuss two critical features of Inventory in LOU:
- The various SKU types provided by LOU
- How to create a SKU in LOU
You can import SKUs en masse. Head over to How to Import Inventory SKUs for additional information.
Go to Inventory
We’re only going to focus on the SKUs box in this article. Be sure you check out Inventory and SKU Details for additional Inventory information.
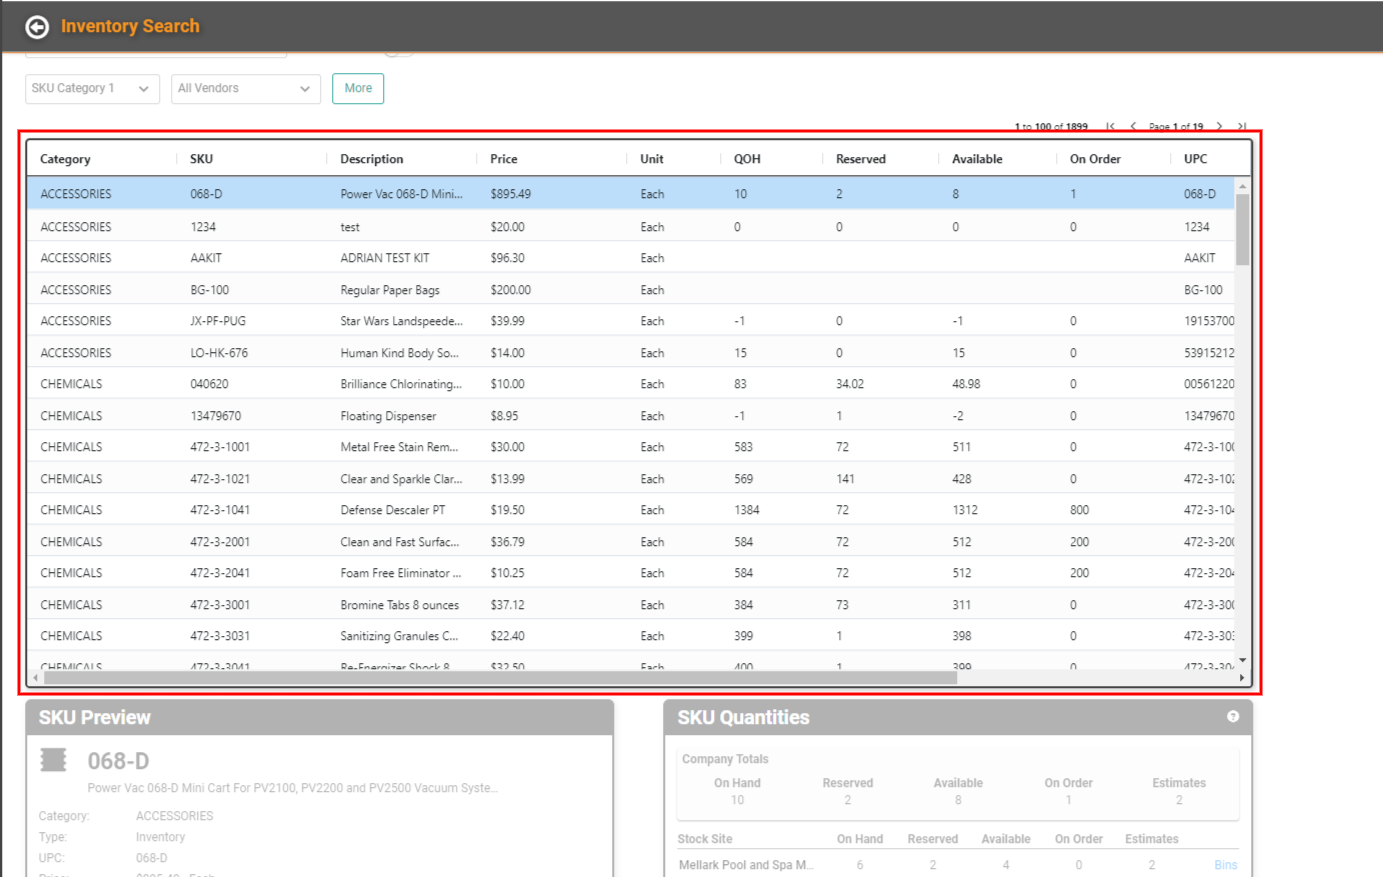
This box shows you a list of SKUs you’ve created in LOU.
SKU Types
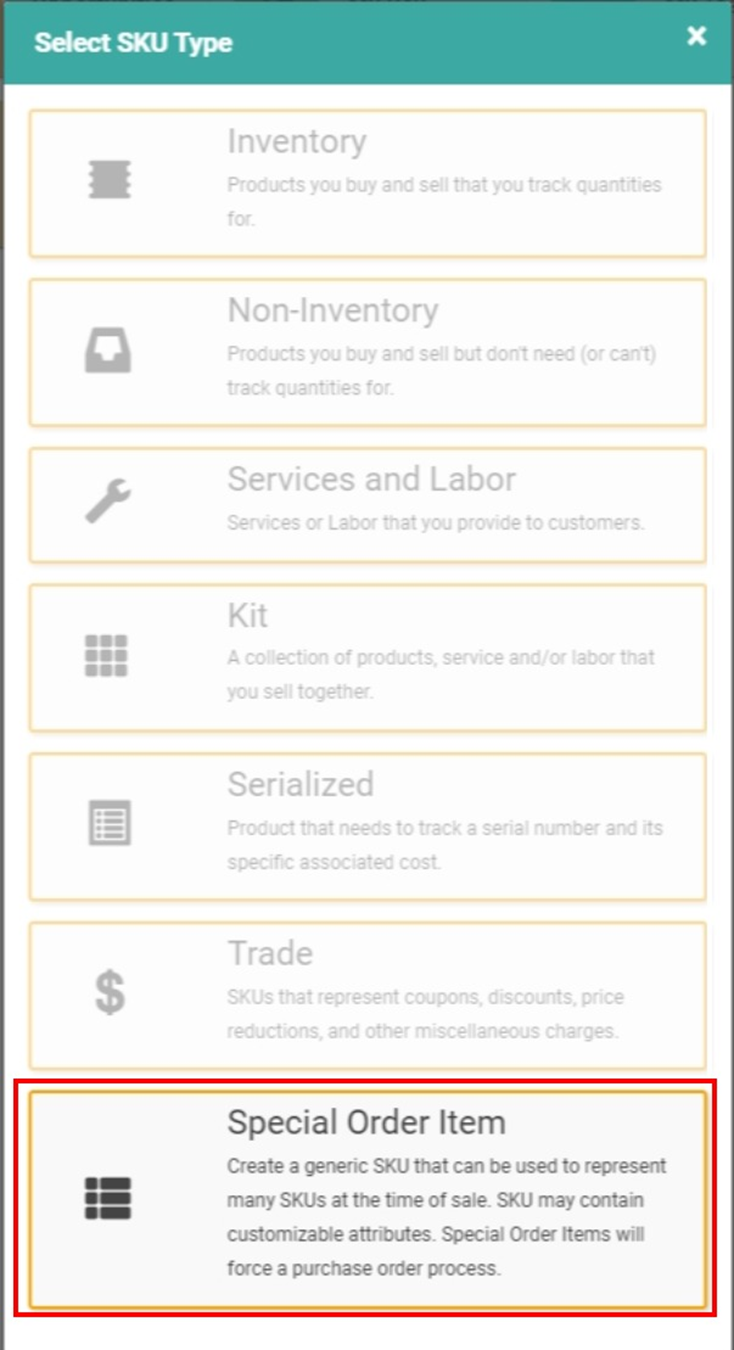
You will have SKUs that represent various kinds of goods and services offered by your business. LOU allows you to create the following types of SKUs:
- Inventory: Products you buy and sell for which you track quantities. Examples include chemicals, equipment, and toys.
- Non-Inventory: Products you buy and sell, but for which you don't (or can't) track quantities. Examples may include plastic/paper shopping bags if you live somewhere that requires you to charge for these items.
- Services and Labor: Services or Labor provided to customers. These wouldn’t have quantities, but you would still want to have a SKU for financial transactions and documents.
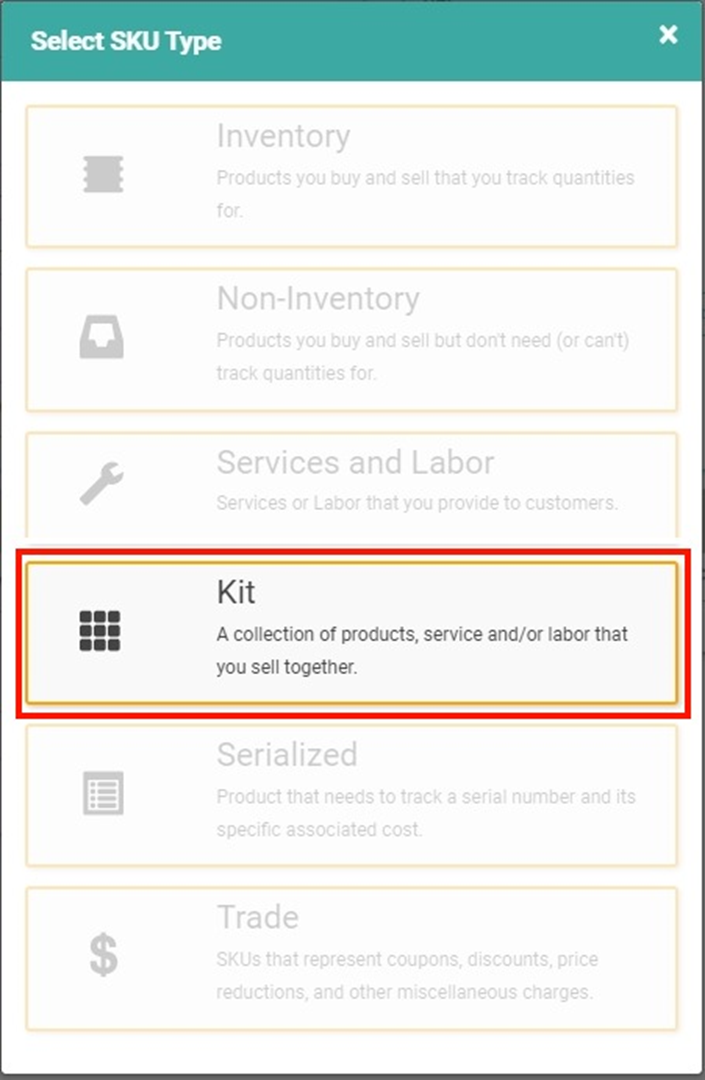
- Kit: A collection of products, possibly including services and labor, which you curate and sell together. This SKU Type can be used for Static or Dynamic Kits. Examples include starter chemical and water testing sets, covers with included installation, etc.
- Serialized: Products that have serial numbers and need to be tracked via those serial numbers. See Serial Numbers for additional information.
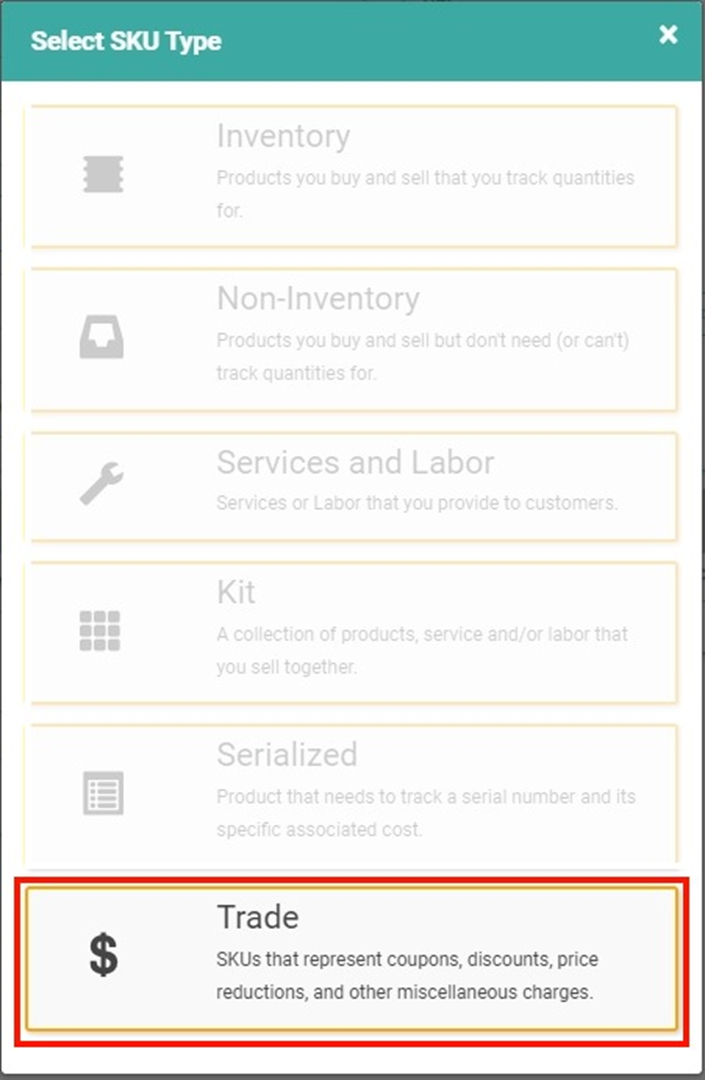
- Trade: Coupons, discounts, price reductions, and other miscellaneous charges and credits. Check out Discounts on Orders for additional information.
- Special Order Items: Generic SKUs that can be used to represent Customizable SKUs at time of sale. This SKU Type will require a Purchase Order process.
Create an Inventory SKU
When you get started in LOU, you will need to create your SKUs. Let’s begin with Inventory SKUs. These, as mentioned above, are the SKUs for the products for which you track quantities.
REMEMBER! Looking for the fastest way to add multiple SKUs to your Inventory? Inventory SKU Import makes it super easy!
- To create a new SKU, click

- Select Inventory as your SKU Type.
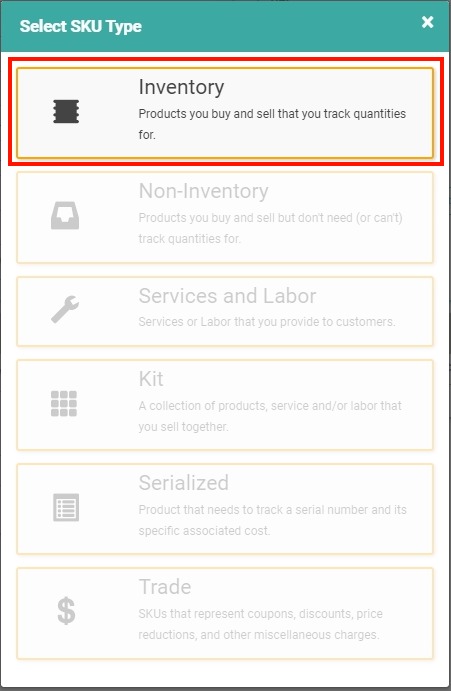
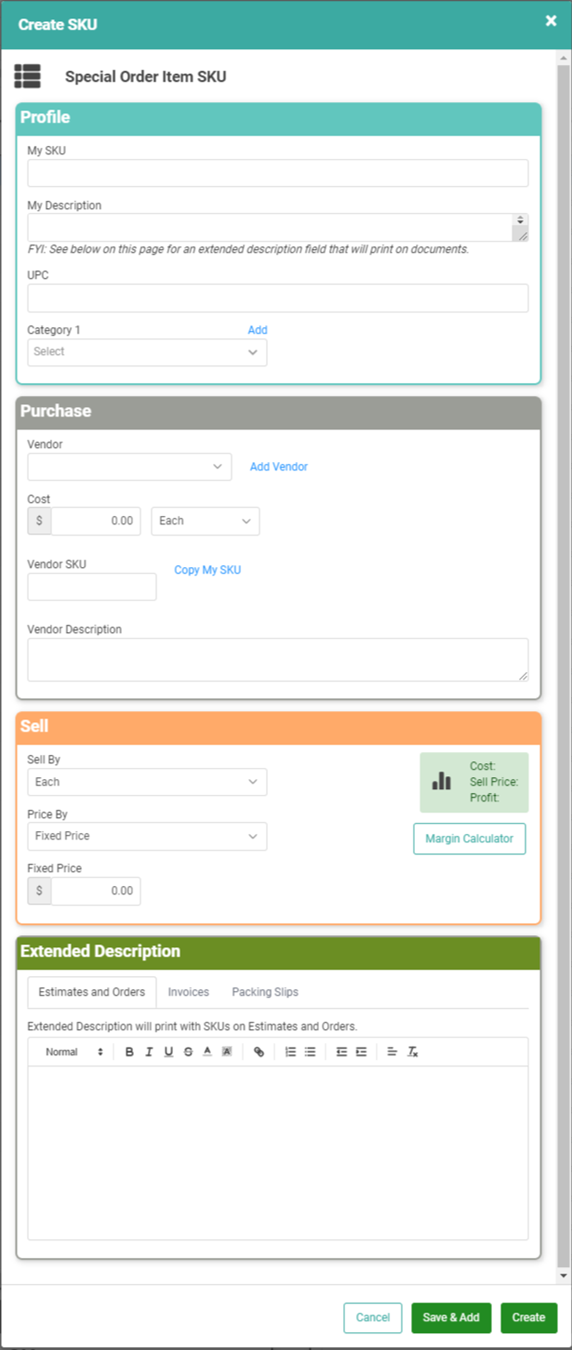
- When you click the SKU Type, you will be taken to a Create SKU page with three boxes of information to complete.
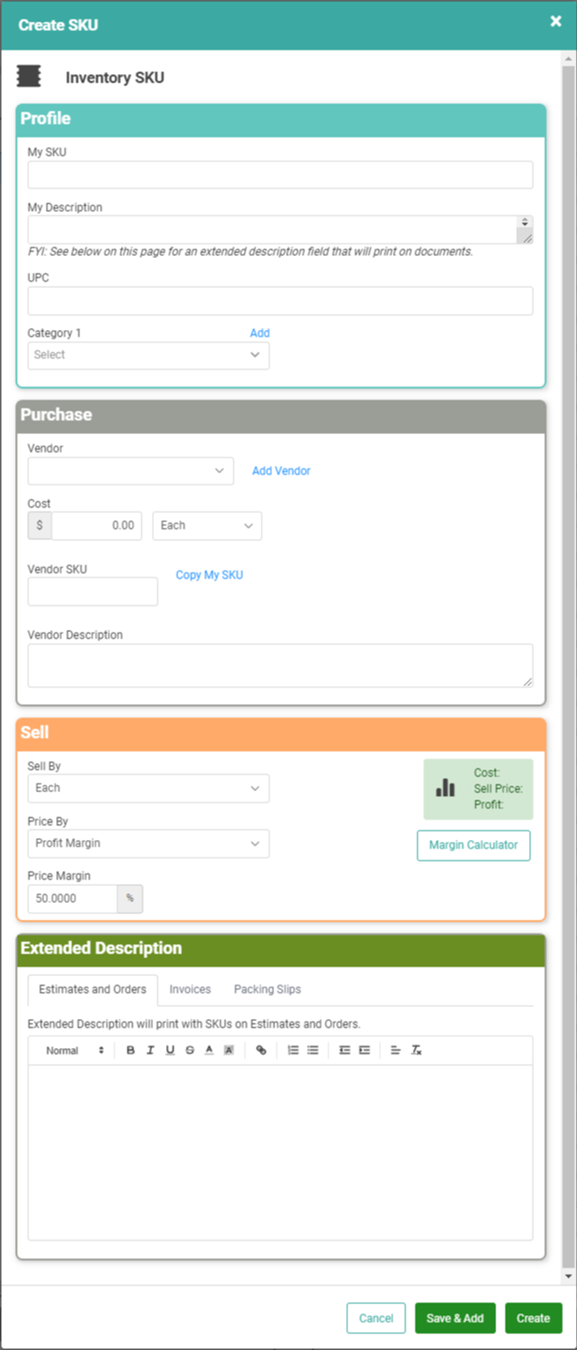
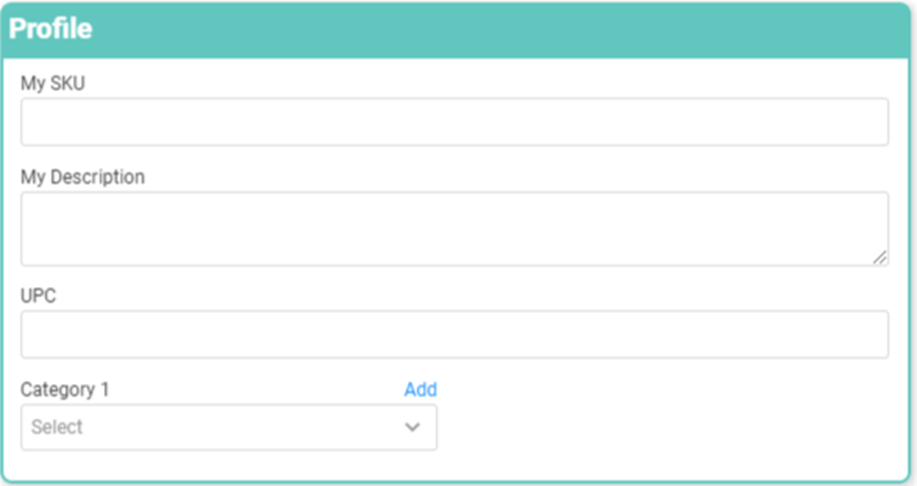
- First, enter information in the Profile box: Your SKU, a Description, the UPC, and a SKU Category. If you need to create a new Category for this SKU, click the Add.
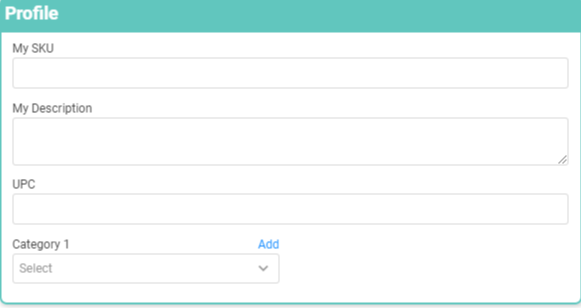
- IMPORTANT! My SKU and Description should remain short and sweet. The character limit for both is 200.
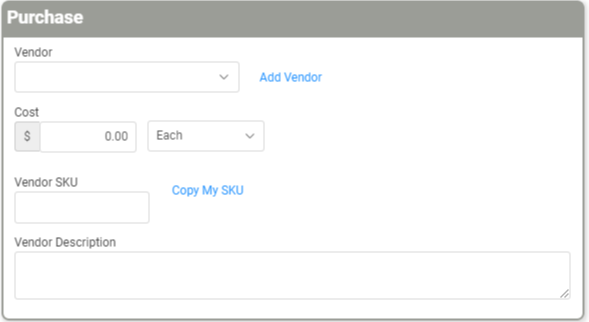
- Next, Purchase Information. From which Vendor do you get this product? To add a Vendor, click Add Vendor to jump to Vendors. What’s your cost? What’s the unit of measure you buy for this product? Enter the Vendor SKU and Description or click Copy My SKU to use your SKU information.
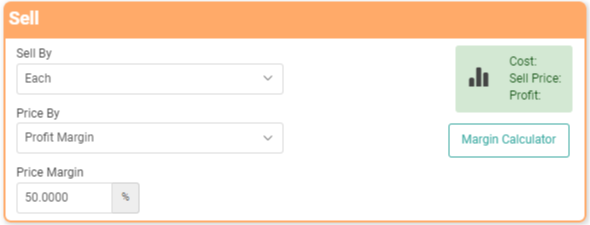
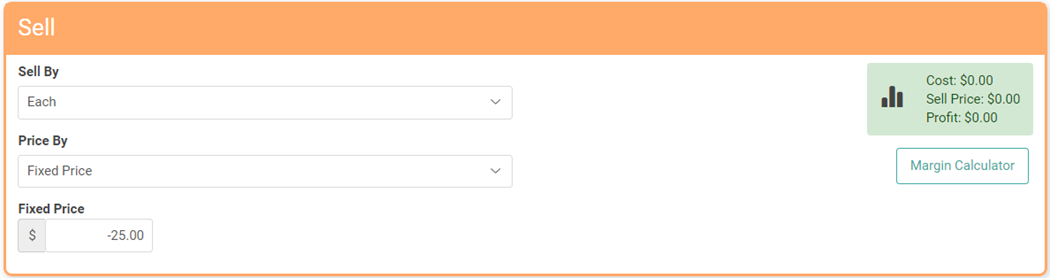
- Finally, enter the Sell Information. What unit of measure will you sell? How are you pricing the product? There are two options here. You can choose a Fixed Price and enter that price, or you can choose Profit Margin and enter a percentage over your Cost which you want to make as a profit. On the right, the green box will indicate your Cost, the Sell Price, and your Profit.
- If you want to create a Description that is more than 200 characters, you can use this Extended Description field.
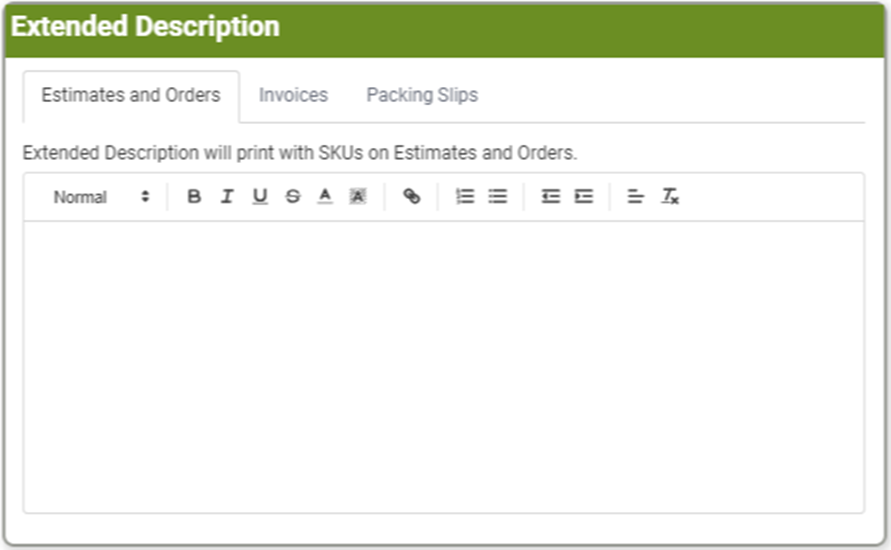
- You can create an Extended Description that appears on Estimates and Orders, Invoices, and Packing Slips.
- For Invoices you can create a unique Extended Description that differs from Estimates and Orders. Choosing this option means the Estimates and Orders Extended Description will not appear on the Invoice.
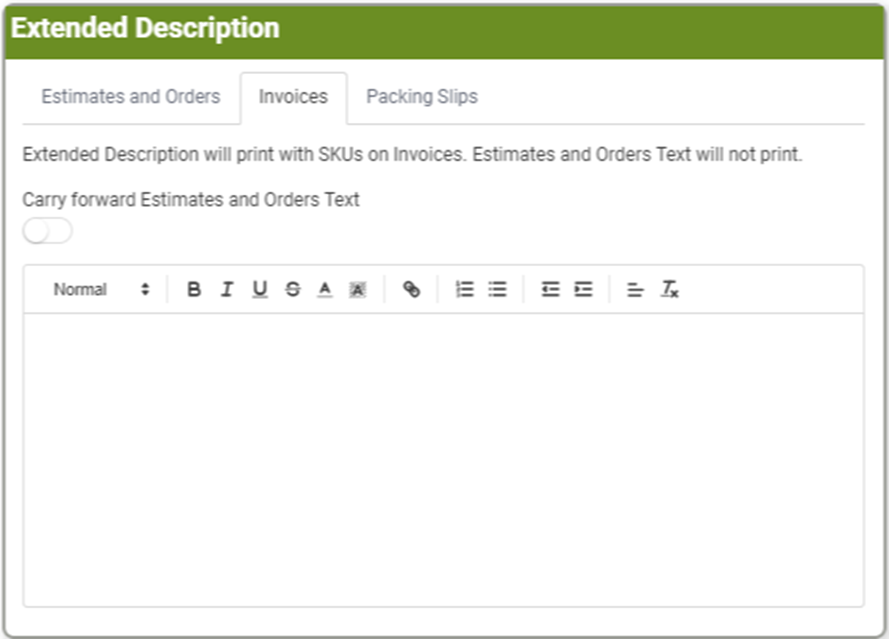
- Additionally, you can choose to use the same Extended Description as Estimates and Orders.
- IMPORTANT! You must either create a unique Extended Description or carry Estimates and Orders forward if you want any extended descriptions to appear on the Invoice.
- For Packing Slips, you can create a unique Extended Description that differs from Estimates and Orders. Choosing this option means the Estimates and Orders Extended Description will not appear on the Packing Slip.
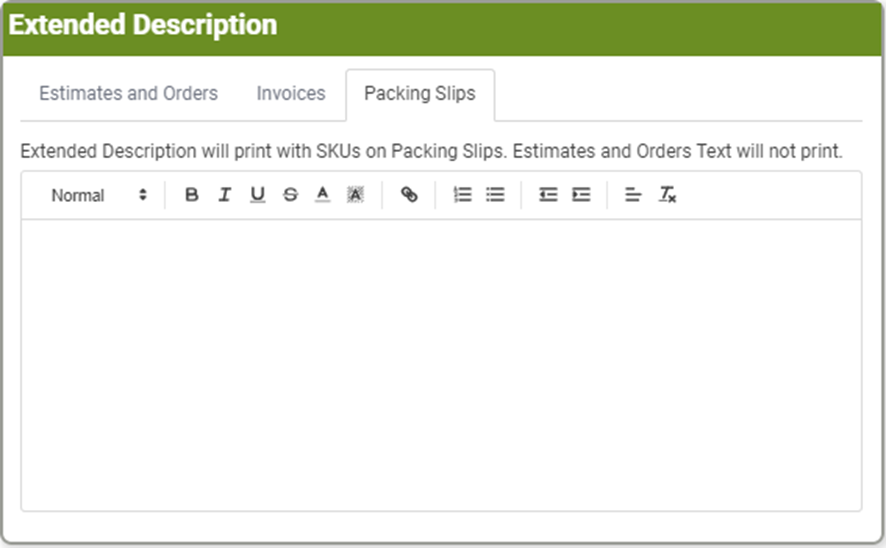
- Extended Descriptions will appear on each SKU line item through the printed documents.
- TIP! For Terms & Conditions, warranty information, maintenance schedules or suggestions, and other important information for the SKU unrelated to a description of the product itself, we recommend using Terms & Conditions instead of Extended Descriptions. This information will appear on printed documents at the end of the document.
- Once you've entered everything in each of the three boxes, click

- If you have more than one SKU to create with the same SKU Category, Vendor, and Price By, you can click
 .
.
- If you have more than one SKU to create with the same SKU Category, Vendor, and Price By, you can click
REMEMBER! If you use Save & Add, you must come back and go to the SKU Profile for each SKU you created and complete creation/setup. Save & Add does not drop you to the SKU Profile to complete important tasks such as Bin Relationships, Kit Questions, SKU Attributes, and more.
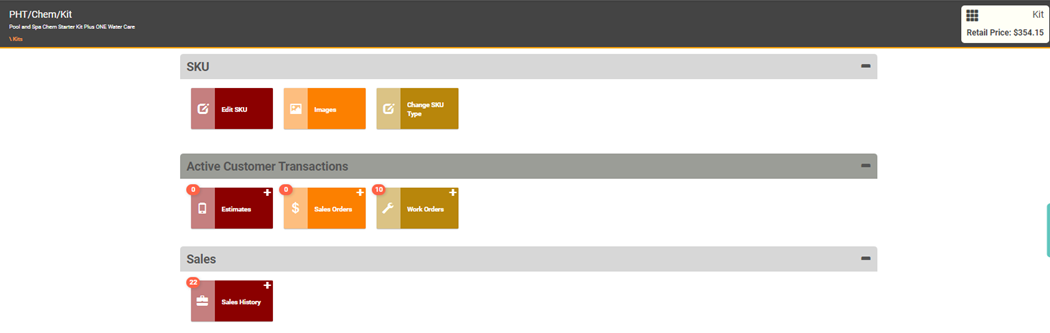
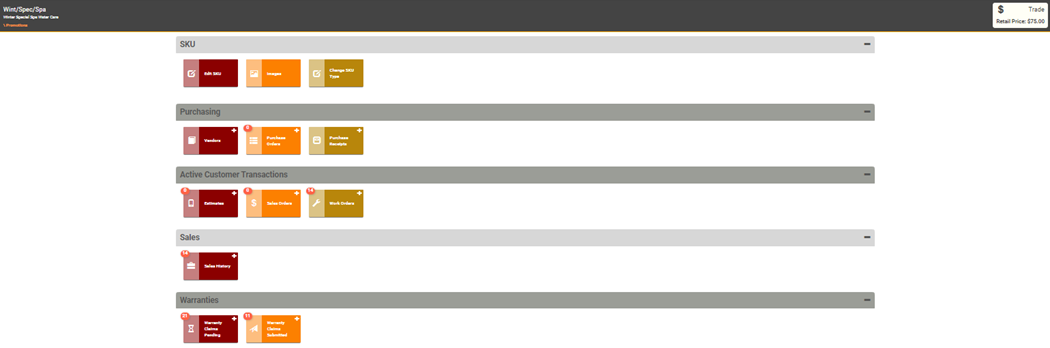
Once you click, Create, you will arrive at the SKU Profile Page. 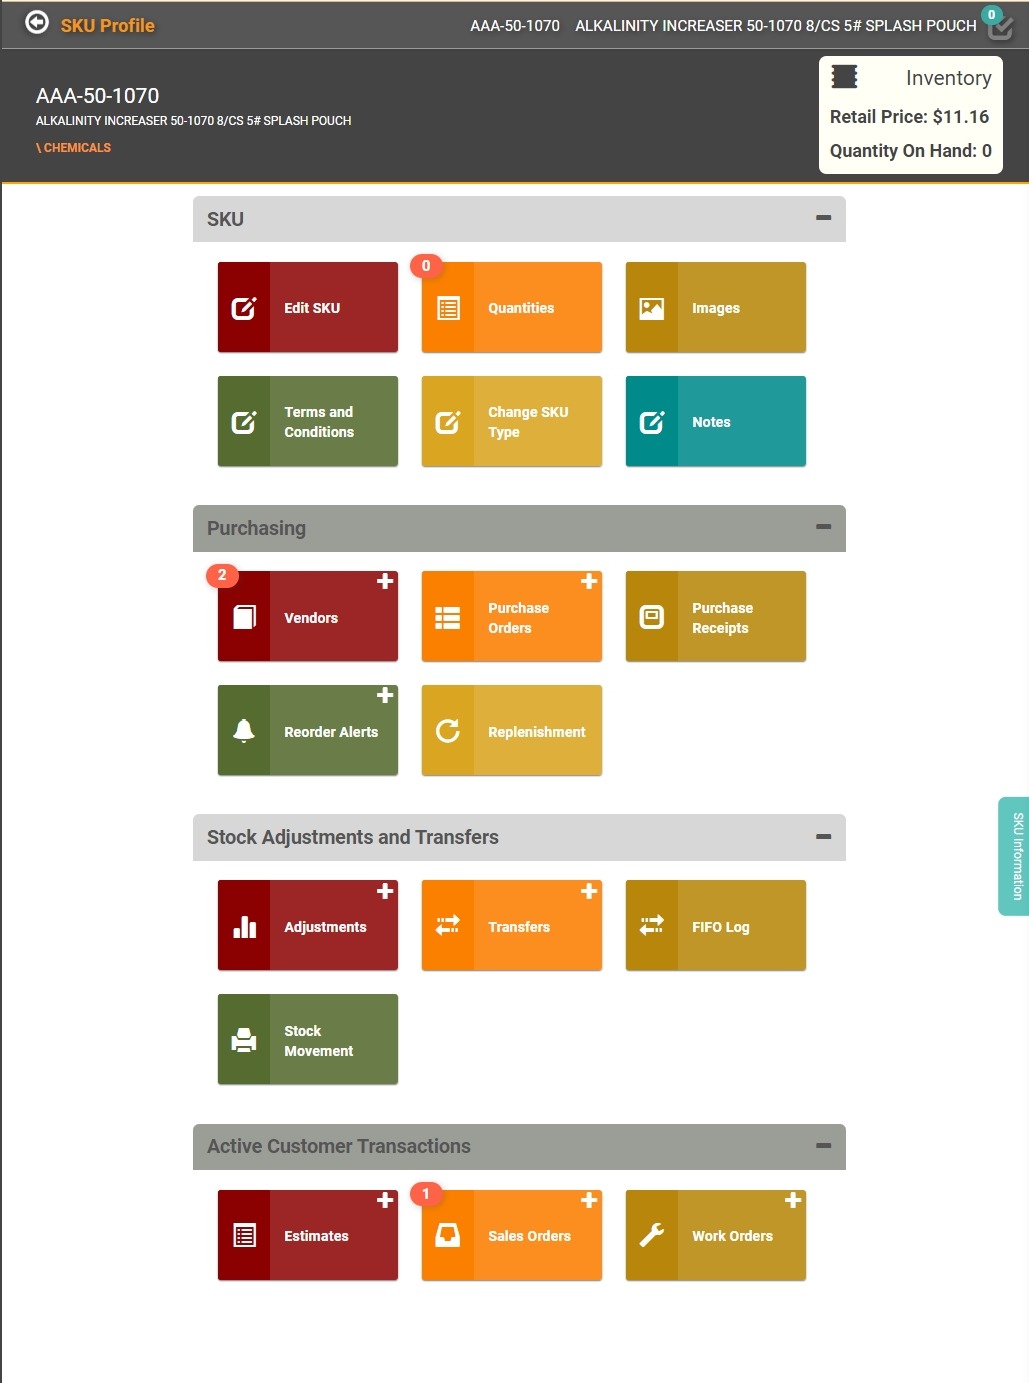
There are several items related to SKUs which you can access from this Screen. You can also see a snapshot of the Quantity on Hand in the upper right corner. Head over to How to Access SKU Details for information on all the tiles on the SKU Profile.
Create a Non-Inventory SKU
The process of creating a Non-Inventory SKU will be the same as creating an Inventory SKU. However, the result will be a SKU with no Quantity Counts.
- To create a new SKU, click

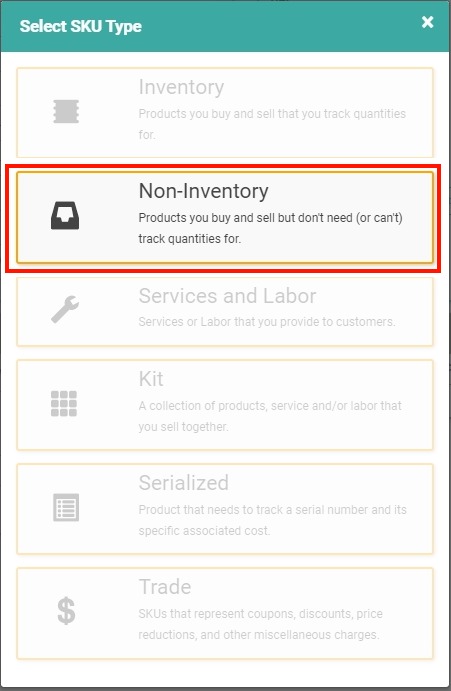
- Select Non-Inventory as the SKU Type.
- As with Inventory, you will arrive at the Create SKU page.
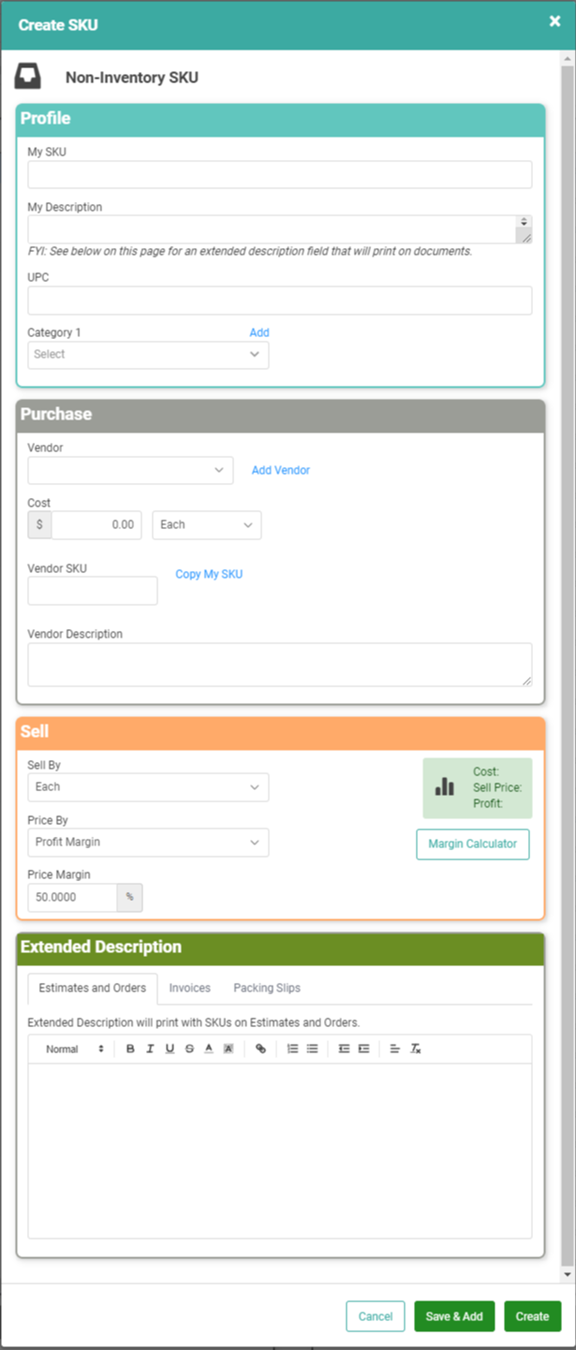
- You will go through each of the three boxes, filling them out the same way you do for Inventory. Once you have filled in the information, click
 .
.
- If you have more than one SKU to create with the same SKU Category, Vendor, and Price By, you can click
 .
.
- If you have more than one SKU to create with the same SKU Category, Vendor, and Price By, you can click
REMEMBER! If you use Save & Add, you must come back and go to the SKU Profile for each SKU you created and complete creation/setup. Save & Add does not drop you to the SKU Profile to complete important tasks such as Bin Relationships, Kit Questions, SKU Attributes, and more.
Many of the tiles available on the SKU Profile page will look the same as Inventory SKUs. You will not have a Tile for Quantities, and the snapshot in the upper right will not list the number of items on hand. You can find additional information in How to Access SKU Details. 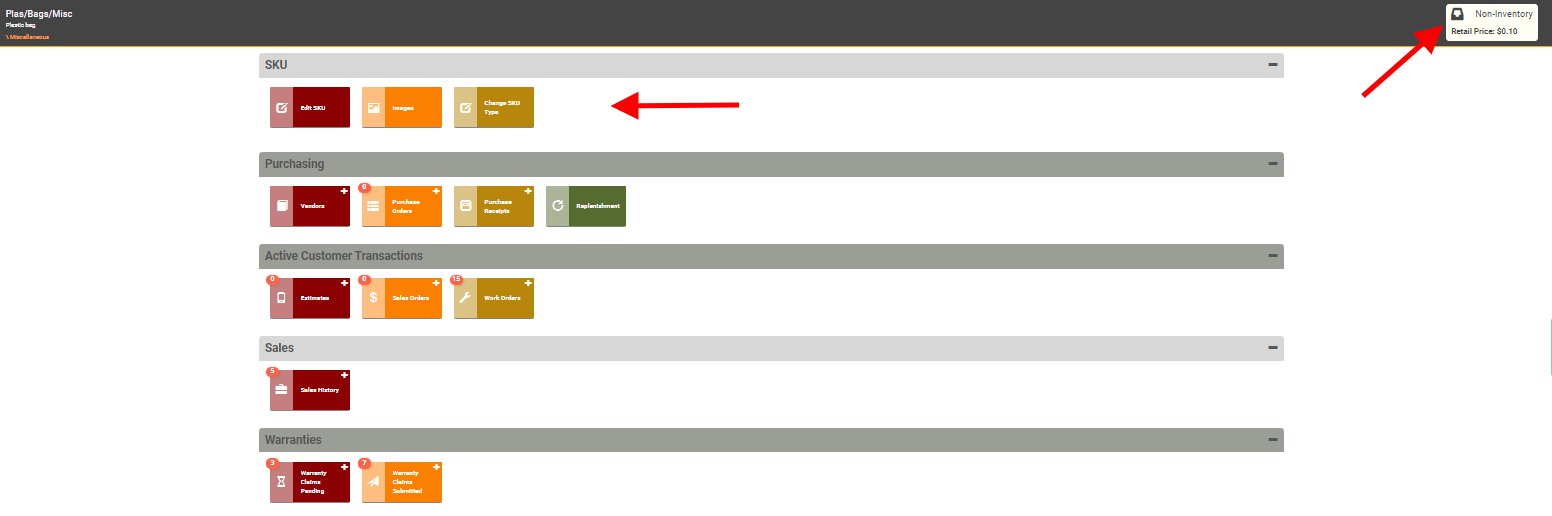
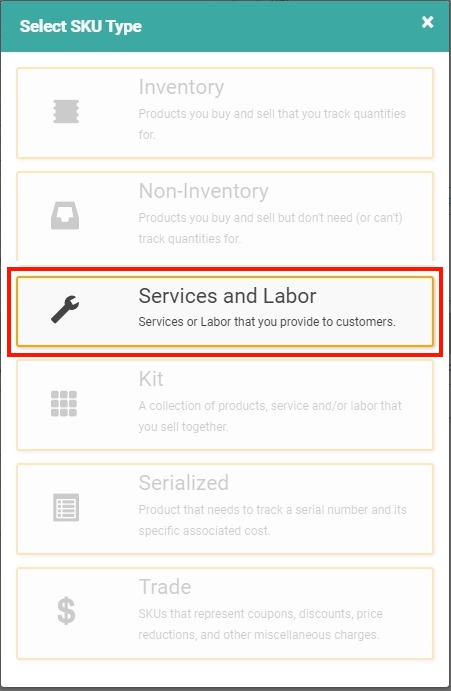
Create a Services and Labor SKU
If your business provides service and labor, you will need to be able to set prices for these services and track this information in transaction documents.
- To create a new SKU, click

- Choose Services and Labor as your SKU Type.
- As with the other SKU Types, you will be taken to Create SKU page.
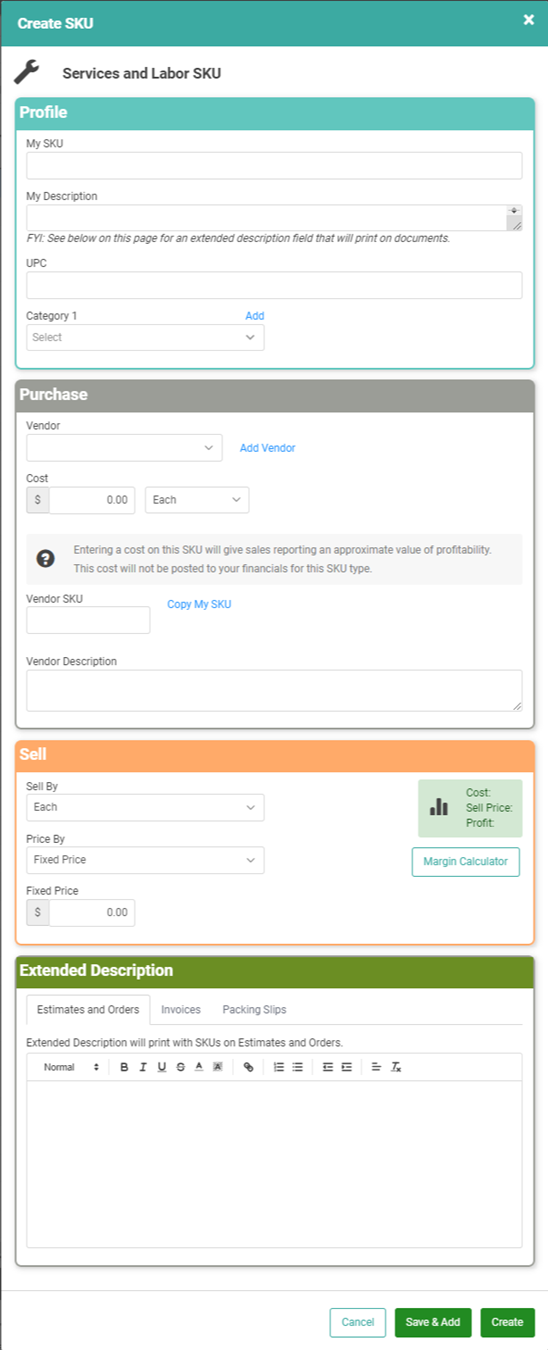
- Just as you have with the other SKU Types, you will fill out the pertinent information and click
 .
.
- If you have more than one SKU to create with the same SKU Category, Vendor, and Price By, you can click
 .
.
- If you have more than one SKU to create with the same SKU Category, Vendor, and Price By, you can click
REMEMBER! If you use Save & Add, you must come back and go to the SKU Profile for each SKU you created and complete creation/setup. Save & Add does not drop you to the SKU Profile to complete important tasks such as Bin Relationships, Kit Questions, SKU Attributes, and more.
The Purchase Box with Vendor information will function a little differently here as you are the Vendor. You can still enter a Cost to calculate Price and profitability, but it’s not necessary. Vendor and Unit of Measure are required. 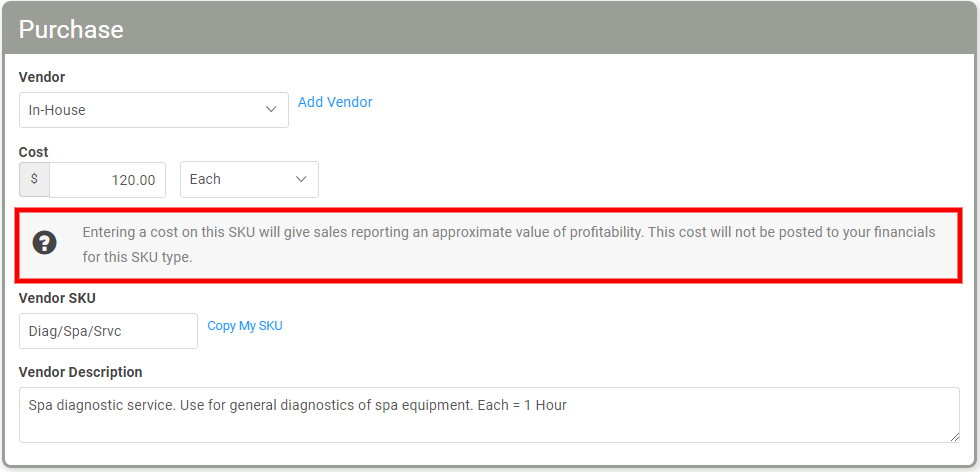
Once you’ve created your Service and Labor SKU, the SKU Profile page will look like the Non-Inventory SKU page with no quantities listed. You can find additional information in How to Access SKU Details. 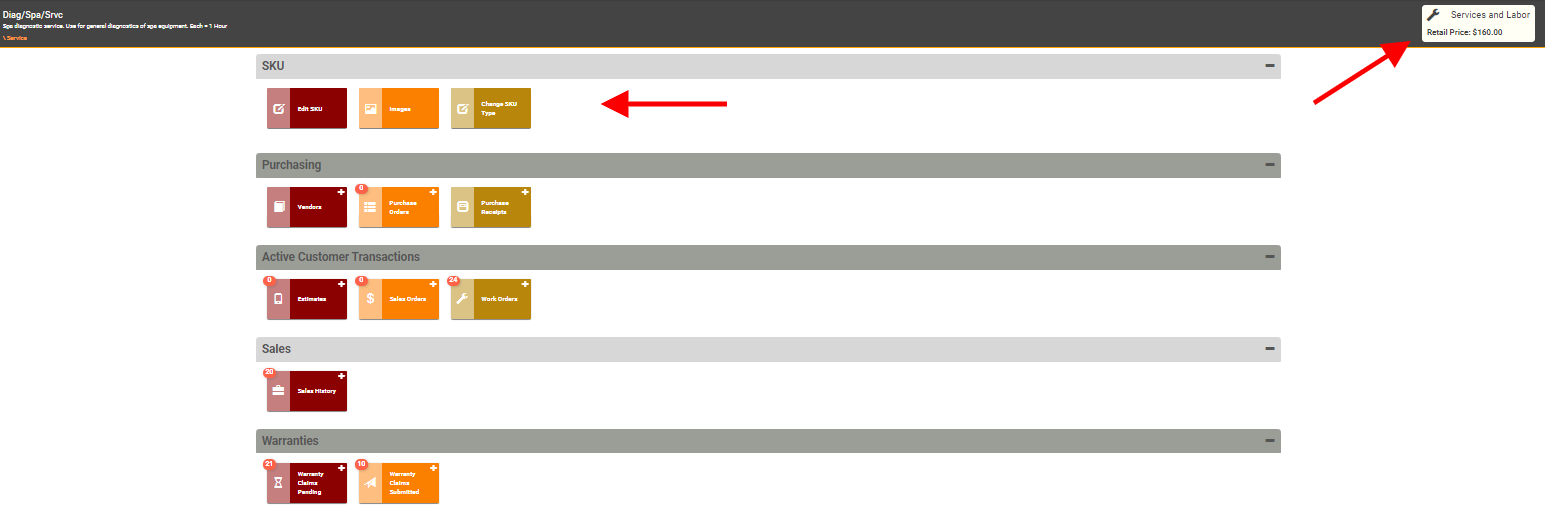
Create a Kit SKU
You may decide to sell a group of goods and services together as a Kit. You can create a SKU which encompasses the items in the Kit. You can find additional information in How to Create Kit SKUs.
- To create a new SKU, click
- Select the Kit SKU Type.
- You will arrive at the Create SKU page as with the previous SKU Types. This screen will look a little different from the previous Create SKU screens we've viewed.
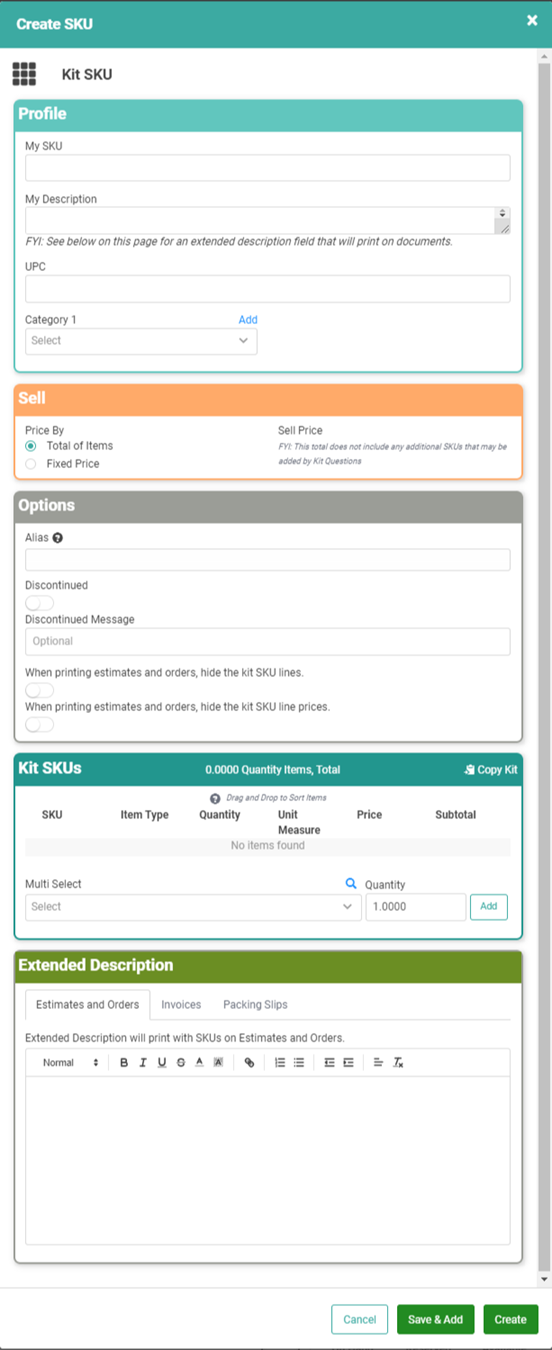
- Fill in the Profile information for your Kit.
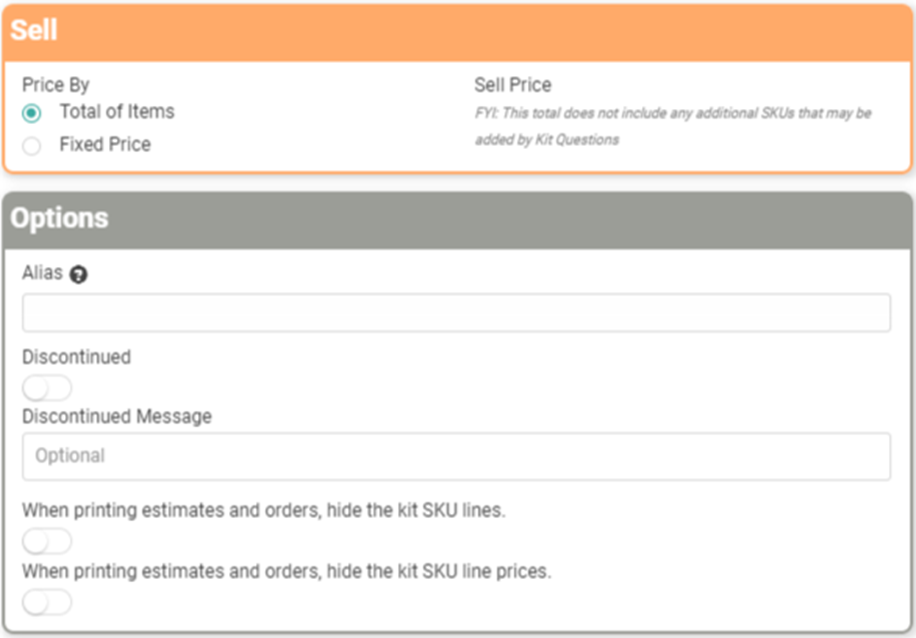
- The Sell box will be defaulted to Price By Total of Items. Once you add items in Step 6 below, the Sell Price will display. The Options box allows you to give your Kit an Alias and is where you would discontinue the Kit if you decided not to offer it any longer.
- Add SKUs to your Kit by selecting the SKU from the dropdown, updating the Quantity, and clicking Add.
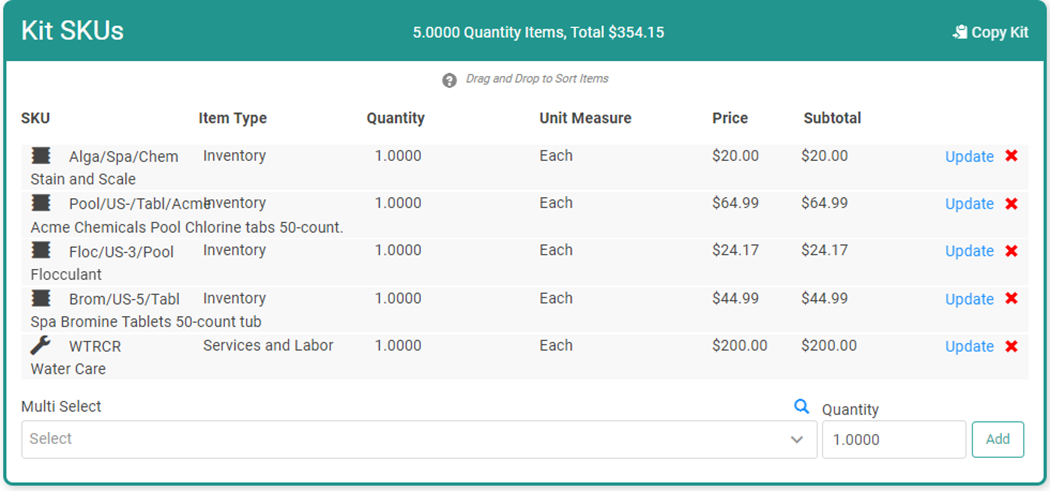 You can also Update SKUs from this box by clicking the Update link. You can remove a SKU from the Kit by clicking the Red X.
 - Once you've completed each of the boxes, click
 .
.
- If you have more than one SKU to create with the same SKU Category, Vendor, and Price By, you can click
 .
.
- If you have more than one SKU to create with the same SKU Category, Vendor, and Price By, you can click
REMEMBER! If you use Save & Add, you must come back and go to the SKU Profile for each SKU you created and complete creation/setup. Save & Add does not drop you to the SKU Profile to complete important tasks such as Bin Relationships, Kit Questions, SKU Attributes, and more.
Since Kits are a combination of individual SKUs, you will see fewer tiles on the SKU Profile page than previous SKU Types. Instead of affecting the Kit, those missing functions are controlled by going to the individual SKUs contained in your Kit. You can find additional information in How to Access SKU Details.
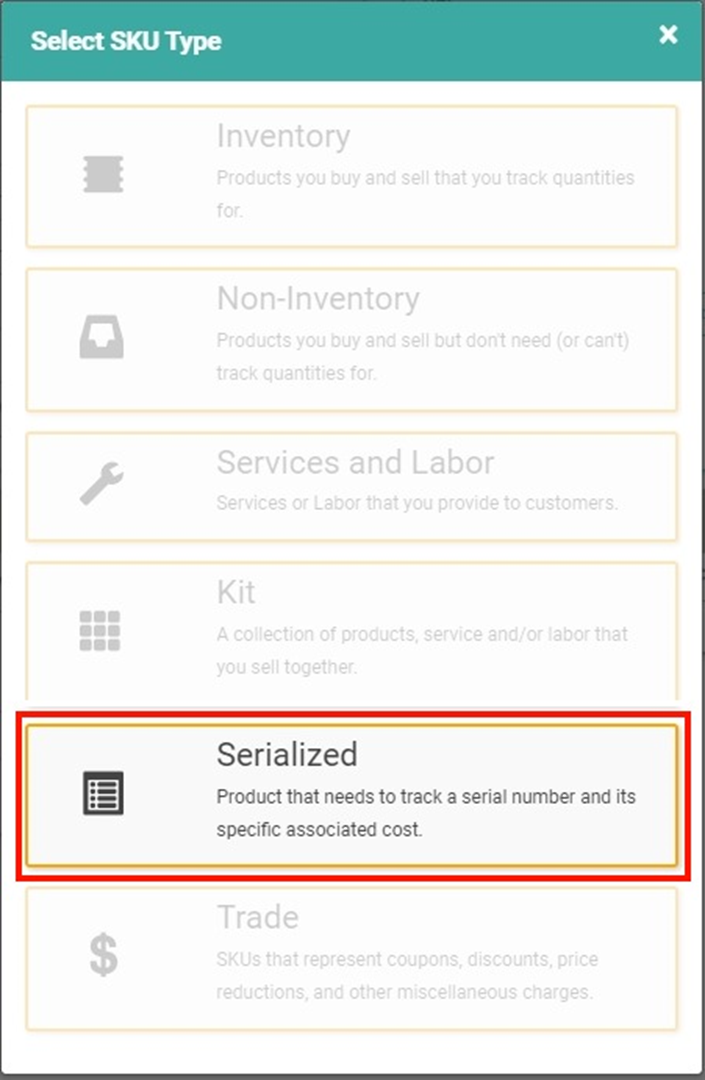
Create a Serialized SKU
Some items you sell may have Serial Numbers that are used to identify the product and are necessary for tracking and receiving service, warranty claims, etc. Those items should have a Serialized SKU which links the SKU to the Serial Number, allowing LOU to track both. The SKU is a unique identifier of the group while the Serial Number is a unique identifier of the single product within the group.
- To create a new SKU, click

- Select Serialized as your SKU Type.
- The Create SKU screen will look the same as the Inventory SKU Type Create SKU screen.
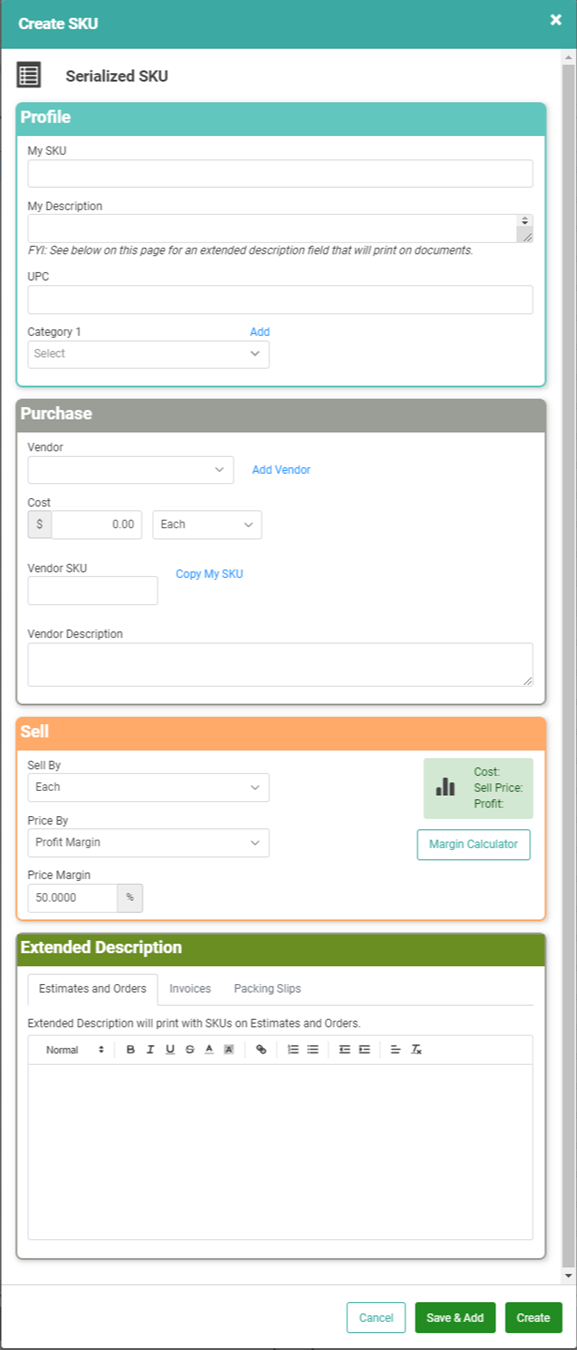
- Fill in the four boxes as you would for an Inventory SKU Type.
- When you've completed each box, click
 .
.
- If you have more than one SKU to create with the same SKU Category, Vendor, and Price By, you can click
 .
.
- If you have more than one SKU to create with the same SKU Category, Vendor, and Price By, you can click
REMEMBER! If you use Save & Add, you must come back and go to the SKU Profile for each SKU you created and complete creation/setup. Save & Add does not drop you to the SKU Profile to complete important tasks such as Bin Relationships, Kit Questions, SKU Attributes, and more.
The resulting SKU Profile will have the same tiles as an Inventory SKU Type.
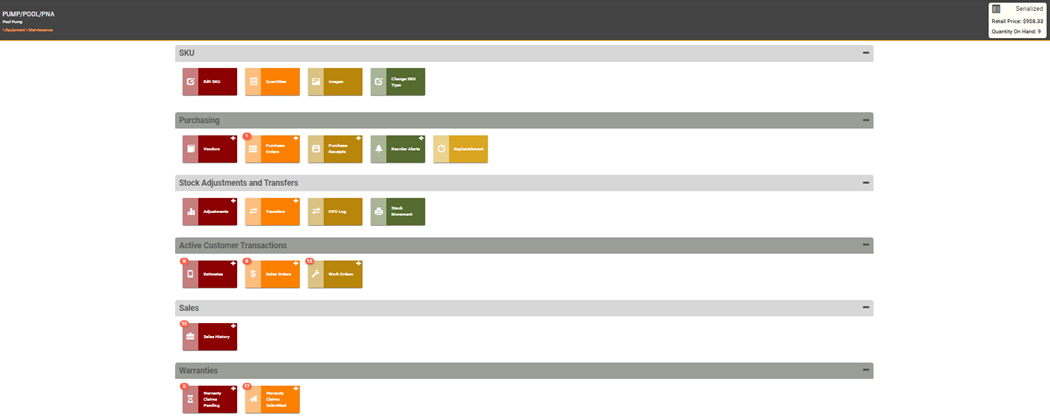
The key difference between Inventory and Serialized SKUs will be when you’re adding Inventory/ordering. You will have to enter each Serial Number for each product with this SKU you receive. You can find additional information in How to Access SKU Details.
Create a Trade SKU
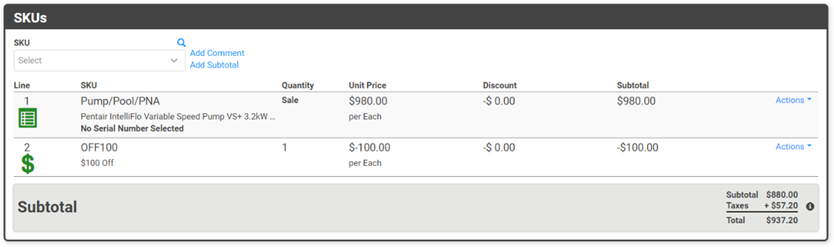
From time to time, you may offer discounts, coupons, or other incentives to your customers. You can create a SKU to apply this pricing change to a transaction. When creating Trade SKUs, remember that these should be negative amounts. They are not percentages. They are flat dollar amounts. There are some ways you can set up a Trade SKU to be able to use a percentage off. See How to Create Discounts on Orders for information on the various ways you can create Discounts.
- To create a new SKU click
- Select Trade as the SKU Type.
- The Create SKU page will look like the Services and Labor Create SKU page.
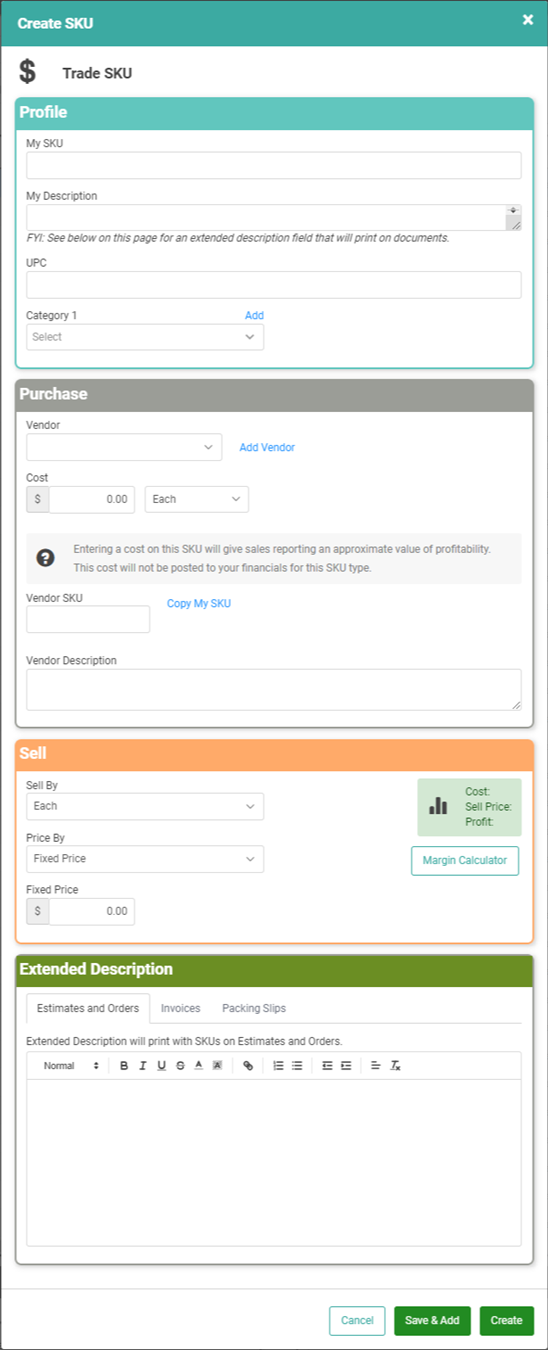
- Enter your SKU and choose a category

- You do not have to enter a cost. You do have to enter a Vendor and Unit of Measure. Entering a cost will aid in your sales reports and evaluating profitability.

- Enter the Sell information, including the price.
- When you've filled in each box, click
 .
.
- If you have more than one SKU to create with the same SKU Category, Vendor, and Price By, you can click
 .
.
- If you have more than one SKU to create with the same SKU Category, Vendor, and Price By, you can click
REMEMBER! If you use Save & Add, you must come back and go to the SKU Profile for each SKU you created and complete creation/setup. Save & Add does not drop you to the SKU Profile to complete important tasks such as Bin Relationships, Kit Questions, SKU Attributes, and more.
TIP! If you want Sales Tax to be calculated based on the Sale Price after the Trade SKU is applied, you must ensure the Trade SKU is taxable. When the Trade SKU is added to an Order, it will calculate the negative Sales Tax according to your Tax settings and that will correctly reduce the Sales Tax due according to the amount of discount on the Trade SKU.
The resulting SKU Profile page will have the same tiles as the Non-Inventory tiles with exception to the Replenishment tile under Purchasing. You can find additional information in How to Access SKU Details.
Special Order Items
This is a generic SKU you will create to represent a Special Order Item (SOI). This generic SKU represents a product that requires customization at the time of sale. Adding this item to an Order will force a Purchase Order process.
- To create a new SKU, click

- Choose Special Order Item
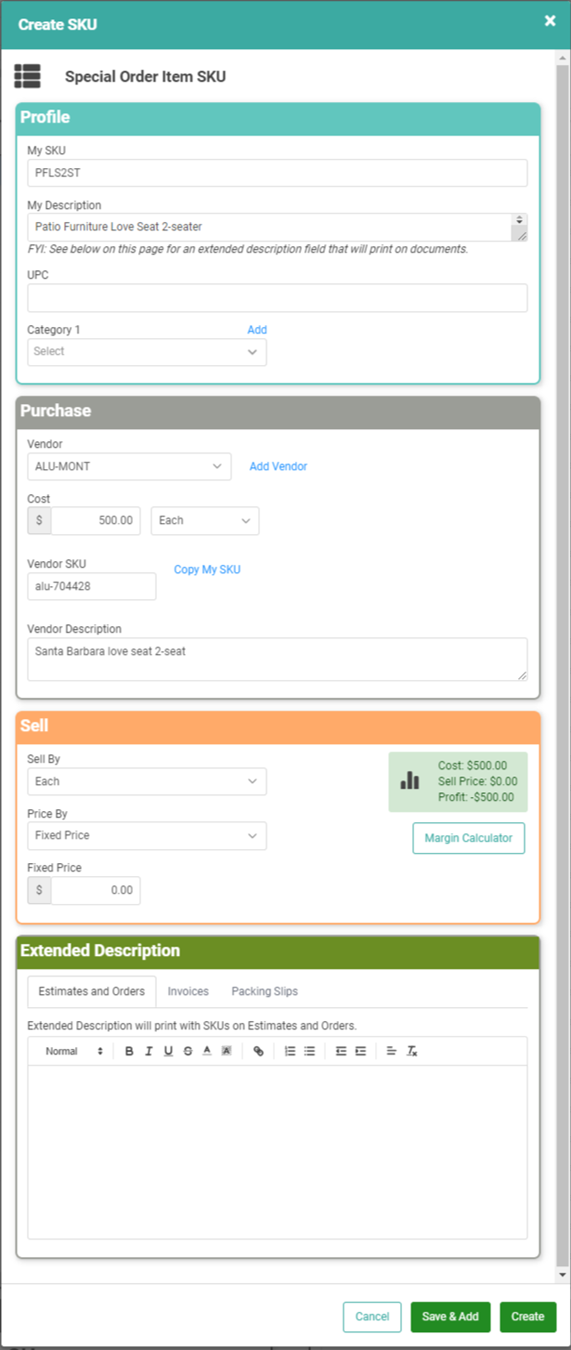
- This will take you to the same Create SKU pop-up you’ve seen with other SKU Types.
- Fill in the correct, generic information.
- The Description and Details should be generic. You will have the opportunity to create a specific Description, based on customizations, when you add the SKU to an Order.
- REMEMBER! The Extended Description you create here applies to the generic Special Order Item and not the configured SKU after answering Attributes.
- You can leave the Cost and Sell Prices empty or fill in a base, generic price. You will have the opportunity to fill in additional specific information for customization later in the process.
- Click

-
- If you have more than one SKU to create with the same SKU Category, Vendor, and Price By, you can click
 .
.
- If you have more than one SKU to create with the same SKU Category, Vendor, and Price By, you can click
REMEMBER! If you use Save & Add, you must come back and go to the SKU Profile for each SKU you created and complete creation/setup. Save & Add does not drop you to the SKU Profile to complete important tasks such as Bin Relationships, Kit Questions, SKU Attributes, and more.
SOI SKU Attributes
With the SKU created, you need to create Special Order Item Attributes. These will be selected when you add the SKU to an Order to help customize the item for your Customer.
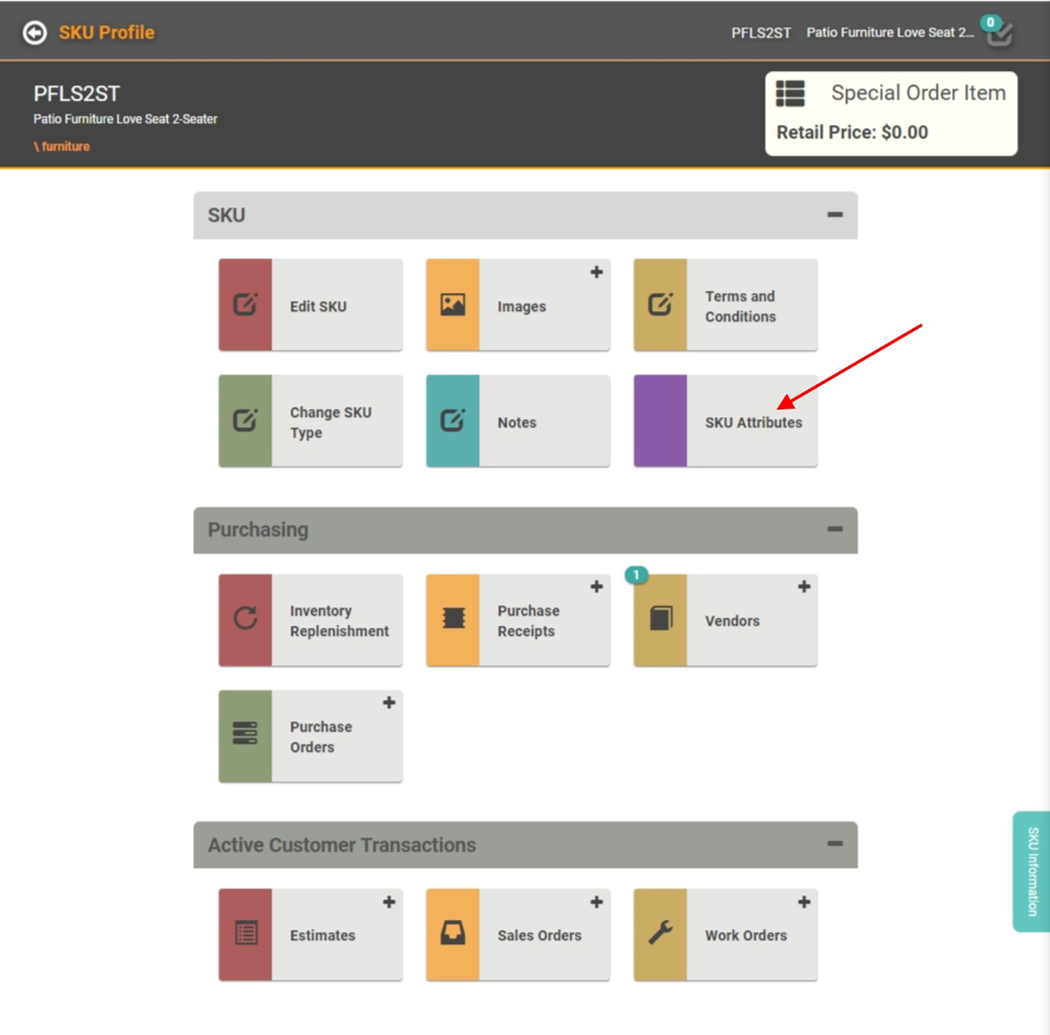
- To add Attributes to the SKU, click the SKU Attributes tile in the SKU section of the SKU Profile page.
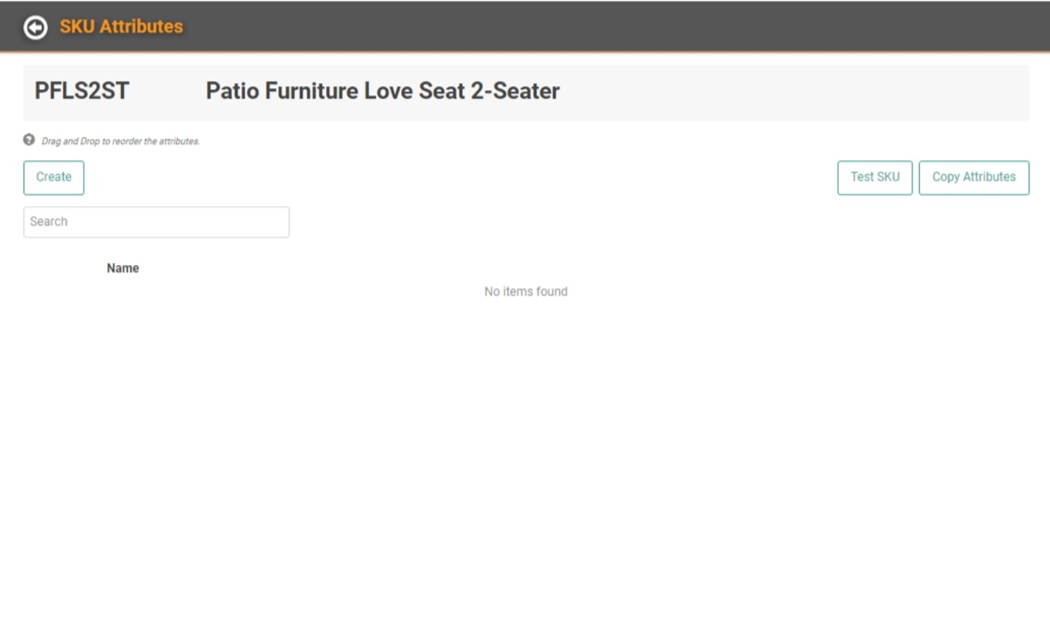
- Click
 to create your first Attribute.
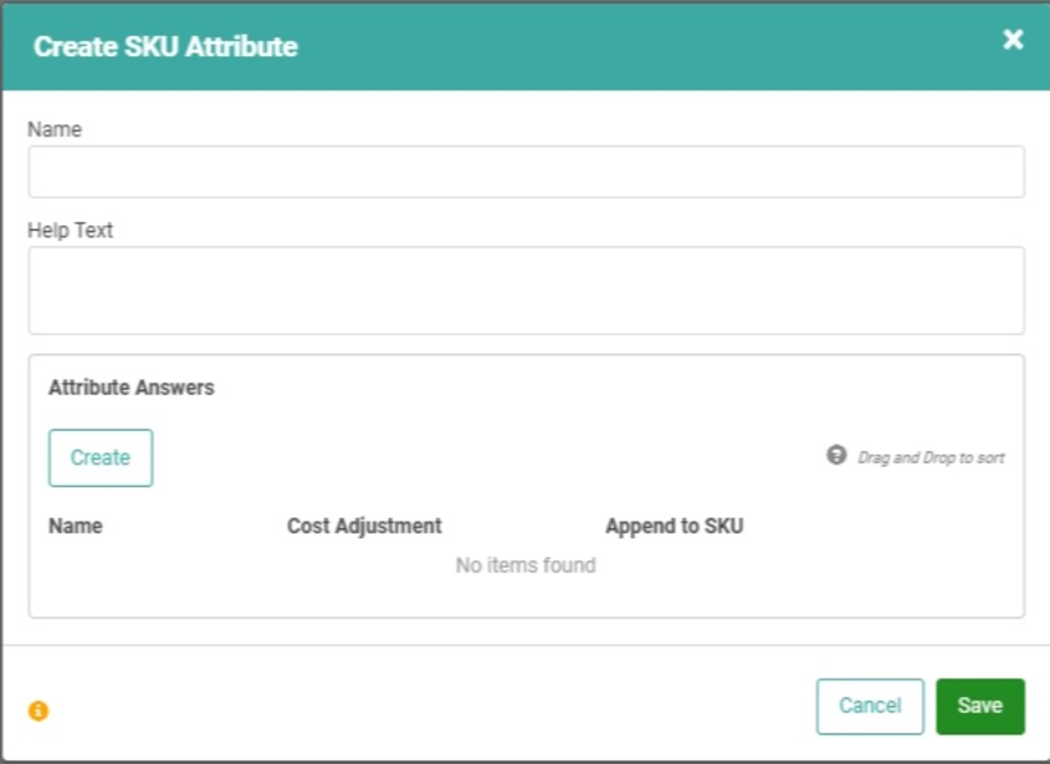
- Name your Attribute. For our example, we’ll name the first Attribute “Frame”.
- You can enter Help Text. This will appear when you click the question mark (?) icon next to the Attribute on an Order. This is optional.
- Click
 to add Answers to your Attribute. These will be the specific options available for our Frame in our example.
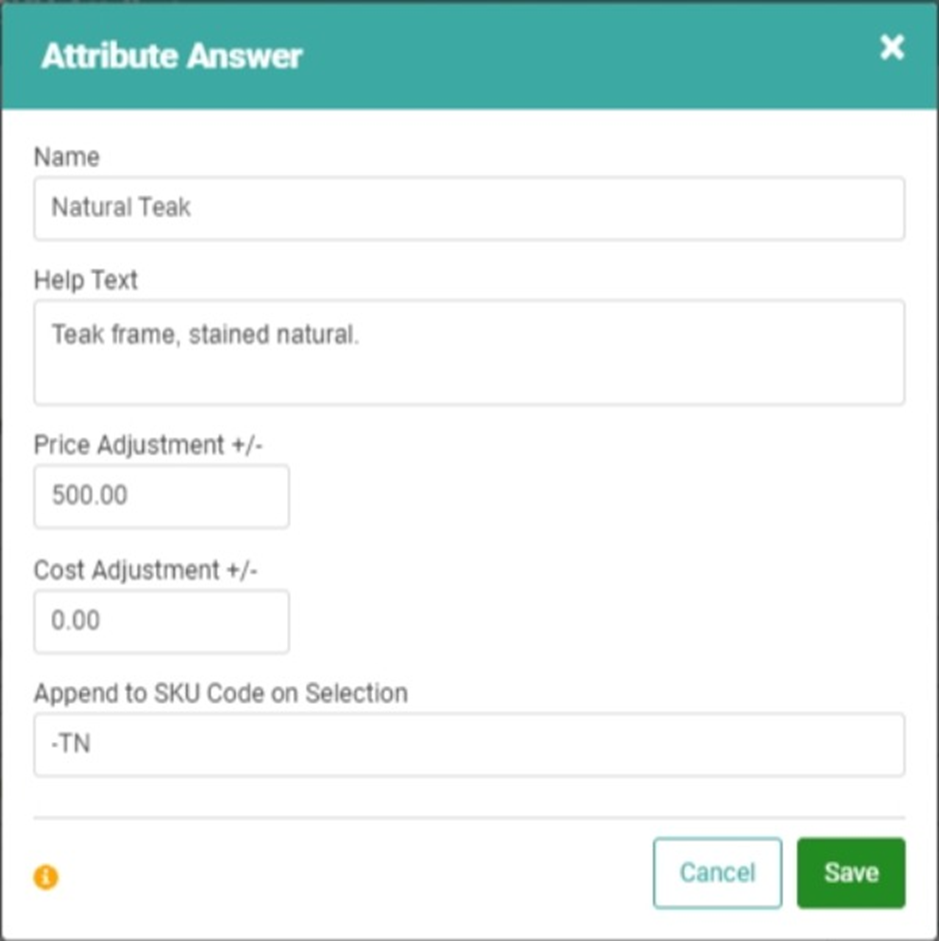
 - You will fill in the information about your Attribute Answer.
- Name (this could be a color or material)
- Help Text. This appears in the question mark (?) icon next to the Answer when selecting Attributes and Answers on an Order.
- Add a Price Adjustment if selecting this Answer changes the Sell Price. Add a negative sign (-) before the amount if this Answer reduces the Price.
- Repeat the same process for the Cost (Cost = what you will buy the item for from the Manufacturer)
- Append to SKU Code on Selection is an important field. What you input here will be appended to the end of the Vendor SKU on the Order, making the SKU unique based on customizations.
- TIP! Add a dash (-) or other formatting character at the beginning to ensure proper formatting. Whatever you put in this field will be added to the SKU without formatting unless you add it here. In this example, our SKU alu-704428 becomes alu-704428-TN.
- TIP! Add a dash (-) or other formatting character at the beginning to ensure proper formatting. Whatever you put in this field will be added to the SKU without formatting unless you add it here. In this example, our SKU alu-704428 becomes alu-704428-TN.
- Click
 to add the Answer to this Attribute.
 - Repeat the steps to create additional Answer for the Attribute.
The Answers will be listed in the Attribute Answers box. You can use the dot icon on the left to drag and drop to reorder the Answers. 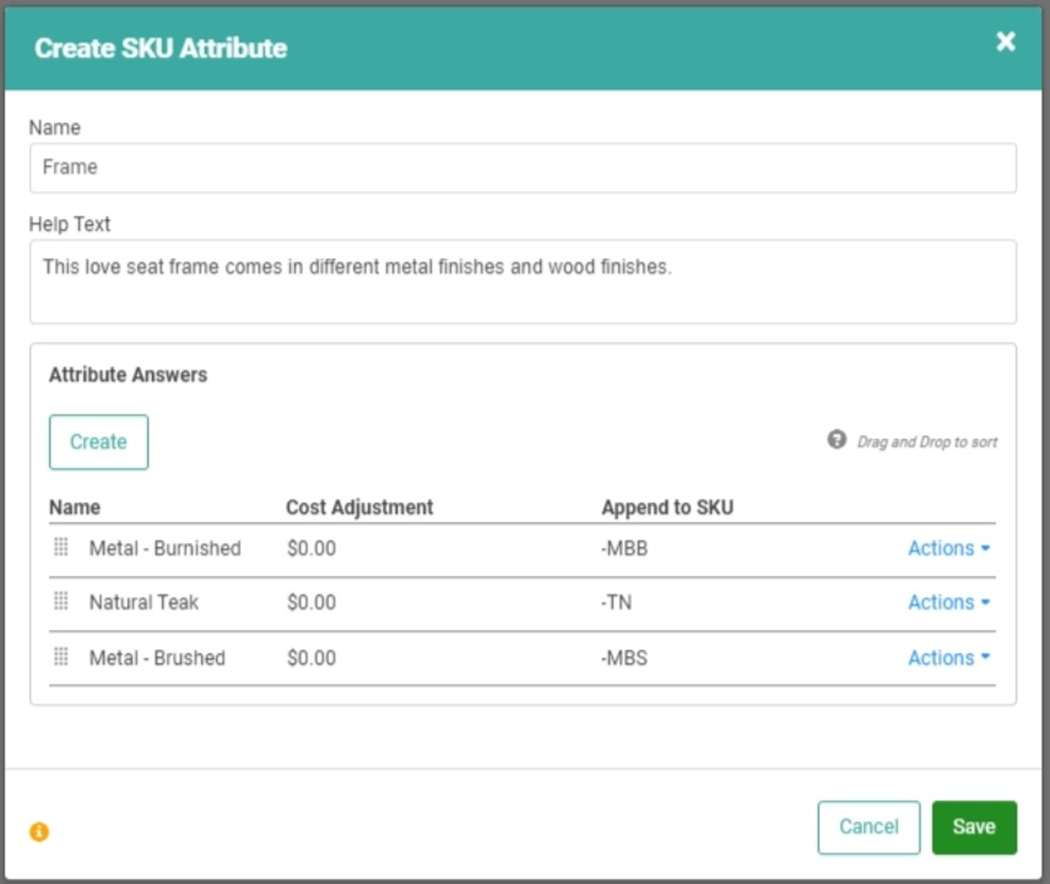
Once you’ve added all the Answers for this Attribute, click  . Repeat the steps above to create additional Attributes with Answers for this SKU.
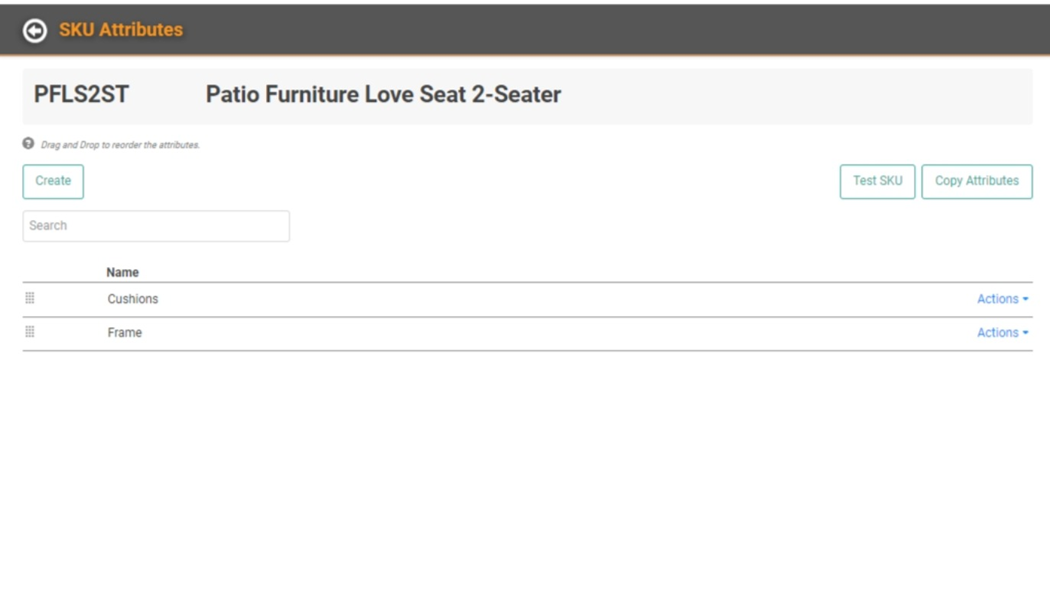
On the SKU Attributes page, you can Search Attributes using the Search field, Copy Attributes from other Special Order Item SKUs, and Test the SKU to see if the Attributes and Answers will work the way you expect.